Introduction
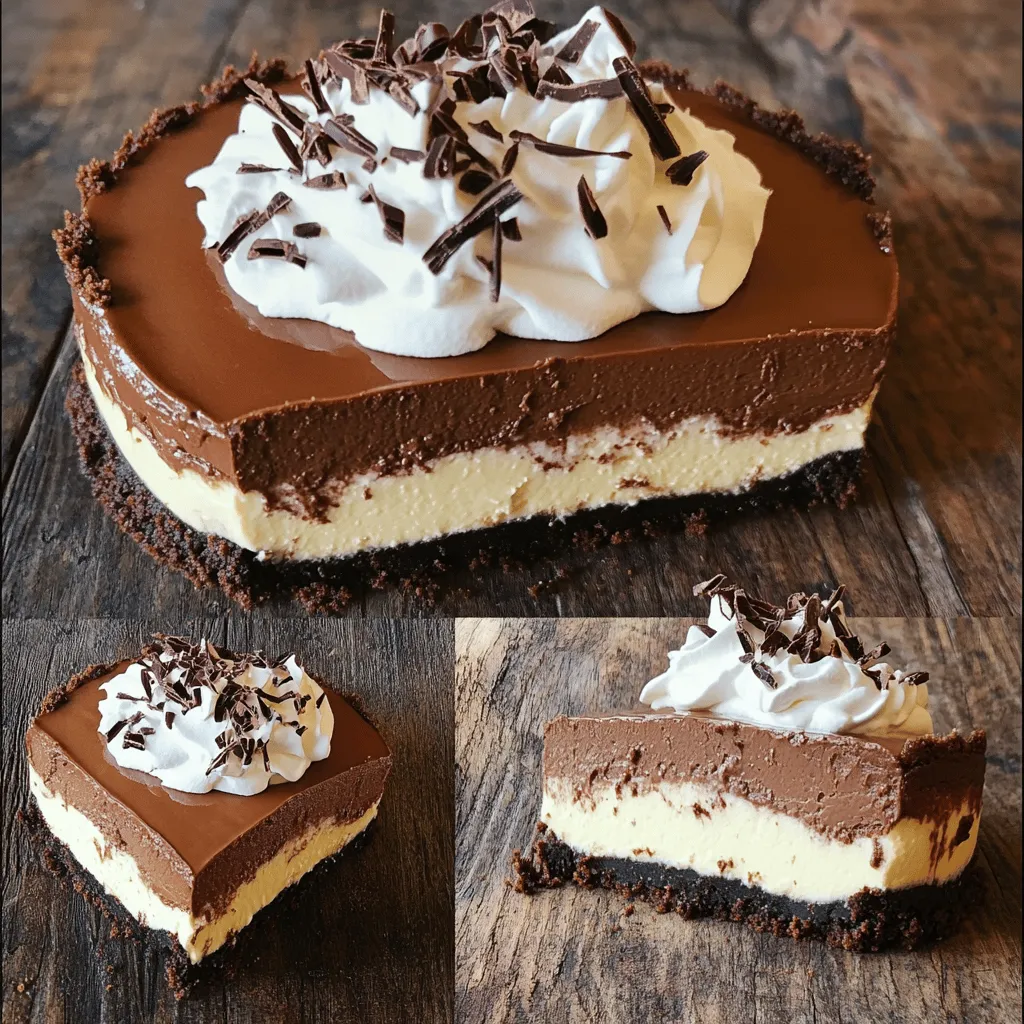
Indulge yourself in the decadent delight of a Chocolate Mousse Cheesecake, a dessert that marries the rich flavors of chocolate with the creamy texture of cheesecake. This recipe is perfect for special occasions or whenever you crave a luxurious treat. With a chocolate cookie crust, a creamy cheesecake layer, and a light chocolate mousse topping, this multi-layered dessert is sure to impress your family and friends. In this article, we will explore the ingredients, detailed preparation steps, and tips for achieving the perfect Chocolate Mousse Cheesecake.
The allure of Chocolate Mousse Cheesecake lies not just in its exquisite taste but also in its elegant presentation. Whether served at a dinner party, a holiday gathering, or simply enjoyed at home, this dessert is a showstopper. Its combination of rich chocolate flavor and smooth, creamy textures invites everyone to take a slice and savor each bite. From the moment you cut into the cheesecake and see the luscious layers, you’ll understand why this dessert has become a favorite among chocolate lovers.
Understanding the Components of Chocolate Mousse Cheesecake
The Crust: A Chocolatey Foundation
A good crust is crucial for any cheesecake, providing the perfect balance of flavor and texture. In the case of Chocolate Mousse Cheesecake, the crust serves as the chocolatey foundation that holds the creamy layers together. Typically made from chocolate cookies, the crust adds a delightful crunch that contrasts beautifully with the smooth cheesecake and mousse layers.
Ingredients and Their Role in Flavor and Texture
For the crust, you’ll need chocolate wafer cookies, melted butter, and a pinch of sugar. The chocolate wafer cookies deliver a deep chocolate flavor, while the melted butter acts as a binding agent, ensuring the cookies hold their shape once pressed into the pan. A touch of sugar enhances the sweetness, balancing out the rich flavors of the chocolate.
Alternative Crust Options for Dietary Preferences
If you have dietary restrictions or preferences, there are several alternative crust options to consider. For a gluten-free version, you can substitute regular chocolate cookies with gluten-free chocolate cookies or use almond flour mixed with cocoa powder and coconut oil. For a healthier twist, consider using crushed nuts or oats combined with coconut oil for a nutty flavor that complements the chocolate.
The Cheesecake Layer: Creamy Perfection
The cheesecake layer is the heart of this dessert, providing a rich and creamy texture that pairs beautifully with the light mousse on top. This layer is made primarily from cream cheese, sugar, eggs, and vanilla extract, creating a smooth and luscious filling.
Explanation of the Cheesecake Base Ingredients
– Cream Cheese: The foundation of any cheesecake, cream cheese gives this layer its characteristic creaminess and tanginess. It’s essential to use full-fat cream cheese for the best flavor and texture.
– Sugar: Sweetens the cheesecake while balancing the richness of the cream cheese.
– Eggs: Help to set the cheesecake, giving it structure as it bakes.
– Vanilla Extract: Provides a warm, aromatic flavor that enhances the overall taste of the cheesecake.
The Significance of Cream Cheese in Achieving the Right Consistency
When making cheesecake, it’s vital to allow the cream cheese to come to room temperature before mixing. This step ensures that the cream cheese blends smoothly with the other ingredients, preventing lumps and resulting in a silky-smooth filling. Mixing at a low speed helps to incorporate air without overworking the batter, which can lead to cracks during baking.
Variations in Flavoring and Additional Ingredients
While the classic cheesecake layer is delicious as is, you can customize it further by adding flavorings such as chocolate, coffee, or even fruit purees. Incorporating melted chocolate into the cheesecake base can give it an extra chocolatey punch, making it even more indulgent.
The Chocolate Mousse Layer: Light and Airy
The chocolate mousse layer is what sets this cheesecake apart from traditional varieties. This layer is light and airy, providing a delightful contrast to the dense cheesecake beneath it. The key to achieving the right texture lies in whipping the cream to the perfect consistency.
The Role of Heavy Whipping Cream in Creating Mousse
Heavy whipping cream is the star ingredient in the mousse layer. When whipped, it incorporates air, creating a light texture that beautifully balances the richness of the cheesecake. It’s essential to use heavy cream with a high fat content for the best results, as it will whip up more easily and hold its shape.
Explanation of How to Achieve the Right Texture and Flavor
To create the mousse, you will melt chocolate and allow it to cool slightly before folding it into the whipped cream. This step is crucial; if the melted chocolate is too warm, it can deflate the whipped cream. The folding technique is important as it combines the two mixtures without losing the airy texture of the whipped cream, resulting in a light and fluffy mousse layer.
Potential Substitutions for Chocolate Types or Sweeteners
For those who prefer dark chocolate, feel free to substitute semi-sweet chocolate with dark chocolate or even white chocolate for a different flavor profile. Additionally, if you’re looking to reduce sugar intake, consider using sugar-free chocolate or natural sweeteners like stevia or maple syrup. Just be sure to adjust the amount based on the sweetness level you desire.
Step-by-Step Guide to Making Chocolate Mousse Cheesecake
Preparing the Crust
Now that we’ve explored the essential components of the Chocolate Mousse Cheesecake, it’s time to dive into the preparation steps, starting with the crust.
Detailed Instructions for Making the Crust
1. Gather Your Ingredients: You will need 1 ½ cups of chocolate wafer cookie crumbs, ¼ cup of granulated sugar, and ½ cup of unsalted butter, melted.
2. Preheat the Oven: Set your oven to 350°F (175°C) to prepare for baking the crust.
3. Mix the Ingredients: In a medium mixing bowl, combine the chocolate wafer cookie crumbs and sugar. Pour in the melted butter and mix until the crumbs are evenly coated and resemble wet sand.
4. Press into the Pan: Firmly press the crumb mixture into the bottom of a 9-inch springform pan. Use the back of a measuring cup or your fingers to create an even layer, ensuring it is tightly packed.
5. Bake the Crust: Place the pan in the preheated oven and bake for about 10 minutes. This step helps to set the crust and enhances the flavor.
6. Cool the Crust: Once baked, remove the pan from the oven and let the crust cool completely before adding the cheesecake layer.
Tips for Pressing the Crust Evenly into the Pan
– Be sure to press the crumb mixture firmly into the pan to create a stable base. If the crust is too loose, the cheesecake may separate during serving.
– Use a flat-bottomed object, like a glass or measuring cup, to achieve an even surface.
Baking and Cooling Time to Achieve the Perfect Base
Allow the crust to cool at room temperature for at least 30 minutes before proceeding with the cheesecake layer. This cooling period is vital, as it prevents the cheesecake from cracking due to temperature differences.
Crafting the Cheesecake Layer
With the crust ready, let’s focus on making the cheesecake layer.
Step-by-Step Guide to Mixing the Cheesecake Ingredients
1. Gather Your Ingredients: You will need 24 ounces of cream cheese (softened), 1 cup of granulated sugar, 3 large eggs, 1 teaspoon of vanilla extract, and 8 ounces of melted chocolate (cooled).
2. Beat the Cream Cheese: In a large mixing bowl, beat the softened cream cheese with an electric mixer on medium speed until smooth and creamy.
3. Add Sugar and Eggs: Gradually add the sugar and mix until well combined. Add the eggs, one at a time, blending well after each addition. Scrape down the sides of the bowl as needed to ensure everything is thoroughly mixed.
4. Incorporate Vanilla: Add the vanilla extract and mix until combined.
5. Fold in Melted Chocolate: Allow the melted chocolate to cool slightly, then fold it into the cream cheese mixture until fully incorporated, being careful not to deflate the batter.
6. Pour over the Crust: Gently pour the cheesecake batter over the cooled crust, smoothing the top with a spatula.
7. Bake the Cheesecake: Bake in the preheated oven at 325°F (160°C) for 50–60 minutes, or until the edges are set but the center is still slightly jiggly. The cheesecake will firm up as it cools.
8. Cool and Chill: Once baked, turn off the oven and crack the oven door, allowing the cheesecake to cool gradually for about an hour. Afterward, refrigerate for at least 4 hours, or overnight for best results.
By following these detailed steps, you will be on your way to creating a stunning Chocolate Mousse Cheesecake that will delight your taste buds and impress your guests. Stay tuned for the next sections of this article, where we will explore the light and airy chocolate mousse layer and provide more tips for perfecting this elegant dessert.
Importance of Temperature and Mixing Techniques for a Smooth Batter
The key to creating a velvety Chocolate Mousse Cheesecake lies in the temperature of your ingredients and the mixing techniques used. Start by ensuring that all your ingredients, particularly the cream cheese, are at room temperature. This helps in achieving a smooth batter without lumps. When cream cheese is cold, it can be difficult to combine with other ingredients effectively, resulting in a less-than-ideal texture.
When mixing, use a hand mixer or stand mixer on medium speed. Begin by beating the cream cheese on its own until it is creamy and free of lumps. This step is crucial, as it lays the foundation for a smooth cheesecake layer. Gradually add in the sugar, mixing until fully incorporated. It’s important to scrape down the sides of the bowl regularly to ensure that no lumps remain.
Incorporating eggs is another critical step. Add them one at a time, mixing gently until just combined after each addition. Overmixing can introduce too much air into the batter, leading to cracks during baking. Finally, add in the melted chocolate and vanilla extract, mixing until just combined. The batter should be smooth and glossy—this indicates that you’ve blended your ingredients correctly.
Baking Instructions and Cooling Methods for Optimal Texture
The baking process for your Chocolate Mousse Cheesecake is essential for achieving that perfect texture. Preheat your oven to 325°F (160°C). To prevent cracking, place a shallow pan filled with water on the bottom rack of the oven. This creates a steam environment that helps the cheesecake bake evenly and gently.
Pour your cheesecake batter into a springform pan lined with parchment paper. Bake for around 50 to 60 minutes or until the edges are set but the center still has a slight jiggle. This slight jiggle is crucial; it indicates that your cheesecake will continue to firm up as it cools.
Once baked, turn off the oven and crack the oven door open, allowing the cheesecake to cool gradually. This gradual cooling process helps prevent cracks from forming due to sudden temperature changes. After about an hour, remove the cheesecake from the oven and let it cool at room temperature for an additional hour before transferring it to the refrigerator. Chill the cheesecake for at least four hours, but overnight is ideal. This time allows the flavors to meld together beautifully.
Creating the Chocolate Mousse Layer
Instructions for Whipping Cream Properly
The mousse layer is what elevates this dessert and adds a light, airy element to the dense cheesecake. Start by placing a mixing bowl and the beaters in the refrigerator for about 10 minutes before whipping the cream. Cold equipment is essential for achieving the right consistency.
Pour heavy whipping cream into the chilled bowl, and begin mixing on medium speed. Gradually increase to high speed as the cream starts to thicken. Whip until soft peaks form—this means that when you lift the beater out of the cream, it should hold a shape but still droop slightly at the tips. Be cautious not to over-whip, as this can lead to butter formation, which is not desirable for mousse.
Techniques for Folding Chocolate into Whipped Cream Without Deflating
To create the mousse, you’ll need to carefully fold the melted chocolate into the whipped cream. Start by allowing the melted chocolate to cool slightly; it should be warm but not hot. If the chocolate is too hot, it may melt the whipped cream and ruin the airy texture.
Using a spatula, add a small amount of whipped cream to the melted chocolate and stir gently to combine. This technique, known as “lightening,” helps to temper the chocolate, making it easier to incorporate into the remaining whipped cream without deflating it. Once combined, gently fold in the remaining whipped cream using a figure-eight motion. Be careful to maintain the airiness of the whipped cream, as this is what gives the mousse its light texture.
Setting Time for the Mousse Layer to Achieve the Right Consistency
After folding the chocolate into the whipped cream, allow the mousse to sit for about 10 to 15 minutes at room temperature. This resting time helps it to thicken slightly, making it easier to layer over the cheesecake.
Assembling the Cheesecake
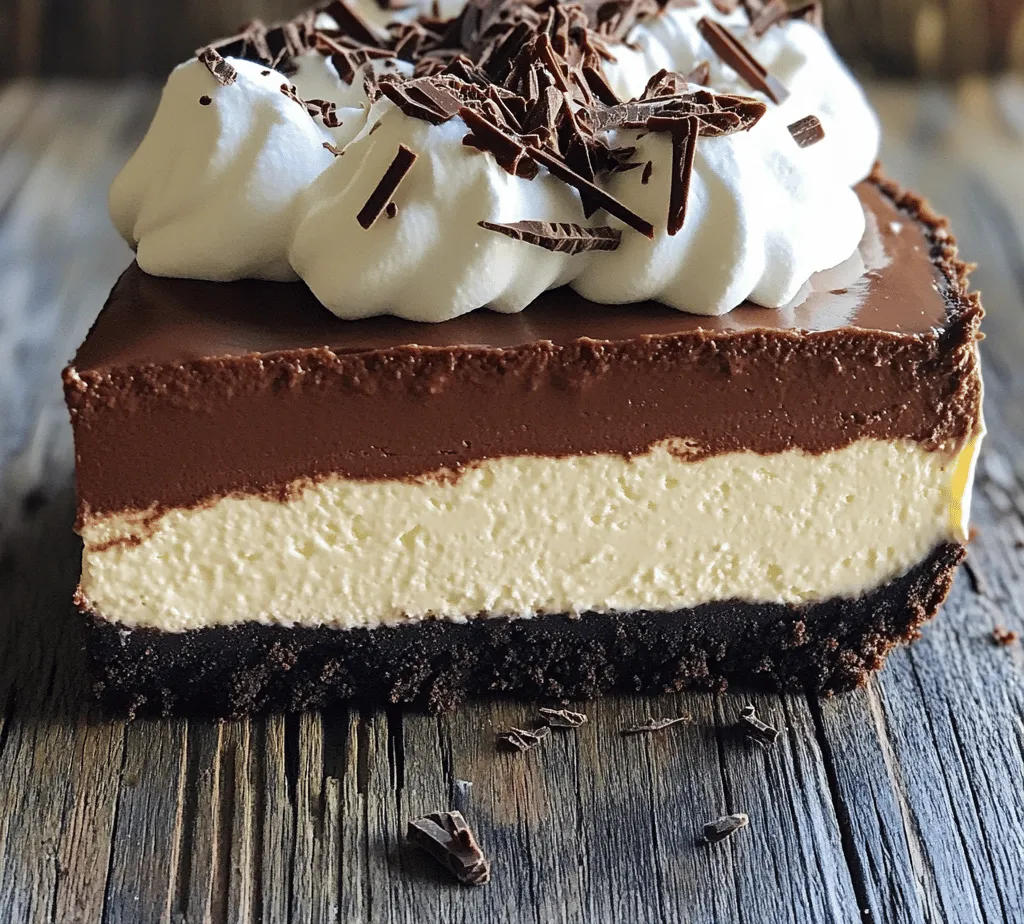
Instructions for Layering the Mousse Over the Cheesecake
Once the cheesecake has fully cooled and set, it’s time to add the mousse layer. Start by gently spreading the mousse over the cooled cheesecake using an offset spatula. Begin at the center and work your way to the edges, creating a smooth and even layer. Be careful not to disturb the cheesecake layer beneath.
For a more defined layer, you can pour the mousse in the center and then gently spread it to the edges, allowing it to naturally settle.
Tips for Achieving an Aesthetically Pleasing Presentation
To achieve an aesthetically pleasing presentation, consider using a piping bag fitted with a star tip to create decorative swirls or peaks on top of the mousse layer. This not only enhances visual appeal but also adds a touch of elegance to your dessert.
You can also sprinkle some cocoa powder or chocolate shavings on top for an added touch. For a more vibrant presentation, fresh berries such as raspberries or strawberries can be arranged around the edges or on top of the mousse.
Recommended Chilling Time for the Final Set
After assembling, cover the cheesecake with plastic wrap and return it to the refrigerator. Allow it to chill for at least 4 hours, though overnight is best. This chilling time ensures that the mousse layer firms up and makes it easier to slice when serving.
Serving Your Chocolate Mousse Cheesecake
Presentation Ideas
When it comes to serving your Chocolate Mousse Cheesecake, presentation is key. Start by carefully removing the sides of the springform pan. Use a sharp knife dipped in hot water to slice cleanly through the layers. Wipe the knife clean after each cut for the best presentation.
Garnish each slice with a dollop of freshly whipped cream and a sprinkle of chocolate shavings or cocoa powder. For a touch of luxury, drizzle some chocolate sauce over the plate before placing the slice on top.
Creative Serving Techniques for an Elegant Display
Consider serving individual portions in clear dessert cups or jars for a unique twist. Layer the cheesecake and mousse in the cups, garnishing each with whipped cream and fruit. This method not only looks beautiful but also allows guests to enjoy their own personal serving without the need for slicing.
Pairing Suggestions for Beverages that Complement the Dessert
Pair your Chocolate Mousse Cheesecake with beverages that enhance its rich flavors. A robust coffee or espresso complements the chocolate wonderfully. For a more festive touch, consider serving it alongside a glass of dessert wine, such as a late-harvest Riesling or a sweet Port. These pairings elevate the dessert experience, making it even more memorable.
Storage and Shelf Life
Proper Storage Techniques
To maintain the freshness of your Chocolate Mousse Cheesecake, proper storage techniques are essential. Store the cheesecake in the refrigerator, covered with plastic wrap or in an airtight container, to prevent it from absorbing odors. The cheesecake will keep well for about 4 to 5 days in the fridge.
If you need to store the cheesecake for a longer period, it can be frozen. Wrap it tightly in plastic wrap and then in aluminum foil to prevent freezer burn. It can be stored in the freezer for up to 3 months.
How to Store Leftovers to Maintain Freshness
When storing leftovers, ensure that you cut slices only when necessary to minimize exposure to air. This helps to keep the cheesecake moist and prevents the mousse layer from becoming dry.
Tips for Reheating or Serving Stored Cheesecake
If you have frozen the cheesecake, allow it to thaw in the refrigerator overnight before serving. Avoid reheating the cheesecake, as this can alter its texture. Instead, let it come to room temperature for about 30 minutes before serving to enhance the flavors.
Conclusion
The Chocolate Mousse Cheesecake is not just a dessert; it is an experience that combines the richness of chocolate with a velvety cheesecake texture. Each layer brings its unique flavors and sensations, making it a favorite for chocolate lovers. By following this detailed guide, you can create a stunning and delicious dessert that is sure to be the highlight of any gathering. Whether it’s a birthday celebration or a cozy family dinner, this cheesecake is a treat that everyone will enjoy. Embrace the art of dessert-making and indulge in the rich flavors of this Chocolate Mousse Cheesecake.