Skip to content
DisclaimerTerms Of UseGDPR PolicyCookie Policy

Chelles Recipes

  • Home
  • Drinks
  • Appetizers
  • Dinner
  • Dessert
  • About
  • Contact
  • Privacy Policy
DisclaimerTerms Of UseGDPR PolicyCookie Policy

Rosie

- 1 medium head of cauliflower, cut into bite-sized florets - 1 cup all-purpose flour (or gluten-free flour) - 1 cup almond milk (or any non-dairy milk) - 1 cup Buffalo sauce - 1 teaspoon garlic powder - 1 teaspoon onion powder - 1 teaspoon smoked paprika - 1/2 teaspoon cayenne pepper (adjust to taste) - Salt and pepper, to taste - 2 tablespoons olive oil - Fresh parsley, chopped (for garnish) Buffalo cauliflower bites are a tasty twist on the classic snack. You need fresh cauliflower, flour, and Buffalo sauce to bring this dish to life. The garlic and onion powders give a nice depth of flavor. A bit of smoked paprika adds warmth, while cayenne pepper gives a kick. Adjust the cayenne based on your spice tolerance. For garnishing, olive oil helps the cauliflower crisp up nicely. Chopped parsley adds a bright touch. Check out the full recipe to get all the steps needed for these bites. You will love how easy they are to make! - Preheat the oven to 450°F (232°C). - Line a baking sheet with parchment paper. - In a large bowl, whisk together: - 1 cup all-purpose flour (or gluten-free flour) - 1 cup almond milk (or any non-dairy milk) - 1 teaspoon garlic powder - 1 teaspoon onion powder - 1 teaspoon smoked paprika - 1/2 teaspoon cayenne pepper (adjust to taste) - Salt and pepper, to taste - Mix until smooth. - Dip cauliflower florets in the batter. Shake off any extra. - Arrange the coated florets on the prepared baking sheet in a single layer. - Bake for 20 minutes. Flip the florets halfway to ensure crispiness. - While the cauliflower bakes, mix 1 cup Buffalo sauce with 2 tablespoons olive oil in a bowl. - After 20 minutes, toss the baked cauliflower in the Buffalo sauce mixture. - Return the cauliflower to the baking sheet. Bake for another 10 minutes. - Let the bites cool slightly before serving. You can find the full recipe in the article. Enjoy this crispy and spicy snack! Baking Buffalo cauliflower bites is easy and healthy. You avoid extra oil and mess. Frying gives a different texture. It creates a crispier bite but adds calories. If you choose to fry, use a deep pot. Heat oil to 350°F (175°C). Carefully drop in the battered florets. Fry until golden brown, about 5 minutes. To achieve extra crispiness when baking, use these tips: - Preheat the oven: Always preheat your oven to 450°F (232°C). - Use parchment paper: This helps the cauliflower not stick and makes cleanup easy. - Space out the florets: Give each floret room to breathe. This helps them crisp up. - Flip halfway: Turn the cauliflower halfway through baking for even browning. Buffalo cauliflower bites taste great with dips. Ranch dressing is a classic choice. Blue cheese dressing also pairs well for a tangy kick. You can even mix them for extra flavor. To present your dish nicely, serve on a white platter. Add fresh parsley on top for color. Line the platter with lettuce leaves for a nice touch. It makes the dish look fresh and inviting. For gluten-free diets, use gluten-free flour in the batter. Almond milk works for dairy-free diets. You can swap it with soy or oat milk too. If you want a low-calorie Buffalo sauce, try this: mix hot sauce with a little apple cider vinegar. This keeps the heat without added calories. You can also use a non-caloric sweetener for flavor. These tips make Buffalo cauliflower bites a tasty, healthy snack for everyone! For the full recipe, check above. {{image_2}} You can change the flavor of your Buffalo cauliflower bites. Try making spicy ranch Buffalo bites. Mix ranch seasoning with your Buffalo sauce for a creamy kick. Another idea is to make sweet and tangy bites. Drizzle honey or agave over the baked cauliflower. This adds a fun twist that balances the heat. You don't have to bake your Buffalo cauliflower bites. An air fryer works well for a quick and crispy result. Just follow the same steps, but cook them at 400°F for about 15 minutes. Flip them halfway for even cooking. If you want a smoky taste, grill your cauliflower bites. Just toss them on the grill for a few minutes until they get nice char marks. Add extra veggies for more crunch. Carrots and celery make great additions. They add color and texture. You can also use seasonal herbs for a fresh touch. Try basil in summer or rosemary in fall. These little changes keep your bites exciting and flavorful. To keep Buffalo cauliflower bites fresh, cool them completely first. Place them in an airtight container. This helps lock in the taste and texture. Store them in the fridge for up to three days. To avoid sogginess, don't stack them too high in the container. For the best taste, reheat in the oven. Set it to 350°F (175°C). Place the cauliflower bites on a baking sheet. Heat for about 10 minutes. This keeps them crispy. You can use a microwave, but it may make them soft. If you must, heat in short bursts. Check them often to avoid overcooking. You can freeze Buffalo cauliflower bites for later. Cool them completely, then lay them on a baking sheet and freeze until solid. Once frozen, transfer them to a freezer-safe bag. They can last up to three months in the freezer. To use them, thaw in the fridge overnight. Reheat in the oven to restore crispiness. Enjoy your tasty treat anytime! For the full recipe, check back to get all the details. Can I bake the cauliflower bites instead of frying? Yes, you can bake them! Baking is a healthier option. It gives a nice crunch without extra oil. Follow the full recipe for baking times and tips. How do I make the cauliflower bites less spicy? To reduce spice, cut down on cayenne pepper. You can also use milder sauces. Consider a mix of Buffalo sauce and ranch for a milder flavor. What can I serve as a dip for Buffalo cauliflower bites? Ranch dressing and blue cheese dressing are great choices. You can also try yogurt dip or a creamy avocado sauce for a fresh twist. Can I use other vegetables instead of cauliflower? Absolutely! Broccoli, Brussels sprouts, or zucchini work well. Just adjust the cooking time based on the vegetable size. How can I make this recipe vegan? To make it vegan, use non-dairy milk and ensure your Buffalo sauce is vegan. The batter already has no eggs, so it's easy! How many servings does this recipe yield? This recipe makes about four servings. It’s perfect for sharing or enjoying as a snack. What are the calorie counts for each serving? Each serving has around 150 calories. This can change based on the dips or extra ingredients you add. You now know how to make delicious Buffalo cauliflower bites. The recipe combines simple ingredients and spices, making it easy to create a tasty snack. You can use different methods and flavors to suit your taste. Remember to store leftovers properly to keep them fresh. Whether you’re looking for a healthier party snack or a savory dish, these bites are a great choice. Experiment with dips and variations to find your favorite. Enjoy preparing and sharing this easy recipe!

Buffalo Cauliflower Bites Crispy and Delicious Snack

Are you craving a tasty snack that’s both crispy and healthy? Look no further than these Buffalo Cauliflower Bites! This

- Olive oil and aromatics - Start with 2 tablespoons of olive oil. This oil gives the soup a rich flavor. I add a medium onion, chopped finely. This builds a strong base. Don’t forget 3 minced garlic cloves for that wonderful aroma! - Tomatoes and broth - Use 2 cans of crushed tomatoes, about 14 oz each. These tomatoes bring sweetness and depth. Add 1 cup of vegetable broth for a warm and hearty texture. A teaspoon of sugar helps balance the acidity. - Cream and herbs - For creaminess, add ½ cup of heavy cream (or use coconut cream for a vegan option). Freshness comes from 1 cup of chopped basil leaves. This herb brightens the soup! - Vegan alternative options - To keep it vegan, stick with coconut cream. You can also use vegetable broth instead of regular broth. This keeps the flavors bold while being plant-based. - Garnishes and sides - Consider garnishing with extra basil leaves. A drizzle of olive oil adds a nice touch. Serve with crusty bread for dipping. It makes the meal complete! - Cooking utensils and pot - Grab a large pot for cooking. A wooden spoon helps mix the ingredients well. You’ll also need a chopping board and knife for prepping your veggies. - Blender or immersion blender - To blend the soup, you can use a regular blender. An immersion blender works well too. This tool gives you smooth soup in just a few minutes! Start by heating 2 tablespoons of olive oil in a large pot over medium heat. Once hot, add 1 medium onion, chopped. Sauté it for about 4-5 minutes. You want the onion to soften and turn translucent. Next, stir in 3 minced garlic cloves. Cook for another 1-2 minutes until it smells really good. Now, it’s time to add flavor. Pour in 2 cans of crushed tomatoes, 1 cup of vegetable broth, and 1 teaspoon of sugar. Then, sprinkle in 1 teaspoon of dried oregano, along with salt and pepper to taste. Stir this mix well. Bring it to a simmer and let it cook uncovered for about 20 minutes. This slow cook helps the flavors blend together nicely. After your soup has simmered, take it off the heat. Use an immersion blender to puree the soup until it’s smooth. If you don’t have one, you can carefully transfer it to a regular blender in batches. Once smooth, return the pot to low heat. Stir in ½ cup of heavy cream and 1 cup of chopped fresh basil. Add 1 tablespoon of balsamic vinegar for a nice touch. Heat this through for 5 more minutes. Be sure to taste it and adjust the seasoning as needed. When you’re ready to serve, ladle the soup into warm bowls. For a special touch, garnish with extra fresh basil leaves and a drizzle of olive oil on top. This makes the soup look nice and inviting. I love to pair it with crusty bread on the side. It’s perfect for dipping! For more details, check out the Full Recipe, which includes everything you need to create this creamy tomato basil bliss. To make your creamy tomato basil soup just right, focus on the texture first. Blend the soup until it is smooth and creamy. If you prefer a bit of chunkiness, blend only half. This gives a nice contrast in texture. For flavor, use fresh herbs whenever you can. Fresh basil adds a bright note that dried herbs can't match. You can also add a pinch of red pepper flakes for a little heat. A dash of balsamic vinegar at the end brightens the flavors too. One mistake is overcooking the soup. Cooking it too long can dull the flavors. Aim for about 20 minutes after adding the tomatoes and broth. Another mistake is not balancing the acidity. Tomatoes are acidic, so add a teaspoon of sugar to help balance it out. This small step makes a big difference in the taste. For leftovers, cool the soup quickly. Put it in a shallow container to speed up cooling. Once cool, cover it tightly and store it in the fridge. It will last for about three to four days. When you reheat, do it gently on the stove over low heat. Stir often to keep it from sticking. If it’s too thick, add a splash of broth or water to bring it back to life. Enjoy your creamy tomato basil soup again with these easy tips! {{image_2}} You can tweak creamy tomato basil soup in many fun ways. Adding a pinch of red pepper flakes gives the soup a nice heat. If you like a bit of spice, try this simple addition. You can also use a slow cooker or an Instant Pot. These methods save time and keep the soup warm for longer. Just follow the same steps, but adjust the cooking times. If you need a gluten-free option, you are in luck! This soup is naturally gluten-free since it does not use flour. For those who want a dairy-free or vegan version, switch heavy cream with coconut cream. This keeps the soup rich and creamy while fitting your diet. You can also add more fresh herbs to enhance the flavor without dairy. Take your creamy tomato basil soup on a global journey. Adding herbs like cilantro or cumin gives it an Indian flair. You can also use basil and thyme for a French twist. Each herb changes the taste, making it fun to explore. Try different spices to find your favorite version. Each region has unique tastes. Enjoy making this soup with your own creative spin! For the full recipe, visit the recipe section. Can I make this soup ahead of time? Yes, you can make this soup ahead of time. After cooking, let it cool. Store it in an airtight container in the fridge. It can last for about three days. When you are ready to eat, just reheat it on the stove or in the microwave. How do I thicken tomato soup? To thicken tomato soup, you can add a few options. One way is to blend in some cooked potatoes. Another method is to add a bit more heavy cream. If you want a quick fix, use cornstarch mixed with water. Stir this mix in while cooking to thicken it up. Calories and nutritional breakdown per serving Each serving of creamy tomato basil soup is about 300 calories. It offers a good balance of fat, carbohydrates, and protein. The heavy cream adds richness but also calories. If you use coconut cream, it can be dairy-free while keeping the calories similar. Health benefits of tomatoes and basil Tomatoes are packed with vitamins. They help boost heart health and lower bad cholesterol. Basil is not just tasty; it has anti-inflammatory properties too. Together, they create a dish that supports good health. What to serve with creamy tomato soup? Creamy tomato soup pairs well with many sides. A classic choice is grilled cheese sandwiches. The crunch and meltiness balance the soup's creaminess. You can also serve it with crusty bread or a fresh salad for a light meal. Recommended wine or drink pairings For drinks, a light white wine, like Pinot Grigio, works great. If you prefer non-alcoholic options, try sparkling water with lemon. This adds a refreshing twist and complements the flavors nicely. For the complete cooking directions, check out the Full Recipe. To make creamy tomato basil soup, follow these steps: 1. Heat Olive Oil: In a large pot, pour in 2 tablespoons of olive oil. Heat it over medium heat. 2. Sauté Onion: Add 1 medium chopped onion. Cook it for 4-5 minutes until it is soft and clear. 3. Add Garlic: Stir in 3 minced garlic cloves. Cook for 1-2 minutes until you smell the garlic. 4. Combine Ingredients: Add 2 cans (14 oz each) of crushed tomatoes, 1 cup of vegetable broth, 1 teaspoon of sugar, and 1 teaspoon of dried oregano. Season with salt and pepper. Stir it all together. 5. Simmer the Mixture: Bring the soup to a simmer. Let it cook uncovered for 20 minutes. This helps the flavors mix well. 6. Blend the Soup: After 20 minutes, take the pot off the heat. Use an immersion blender to puree the soup until smooth. If you don't have one, carefully use a regular blender in batches. 7. Return to Heat: Put the pot back on low heat. Now stir in ½ cup of heavy cream, 1 cup of chopped fresh basil, and 1 tablespoon of balsamic vinegar. Heat it for 5 more minutes. Taste it and add more seasoning if needed. 8. Serve the Soup: Remove the pot from heat. Let it cool a little before serving. Serving Suggestions: Serve the soup in warm bowls. You can add more fresh basil leaves on top. A drizzle of olive oil adds a nice touch. Pair it with crusty bread for dipping. This creamy tomato basil soup is rich and full of flavor! Enjoy every spoonful! In this post, we explored making creamy tomato basil soup. We covered essential ingredients, step-by-step instructions, and helpful tips. Remember, you can adjust the recipe to suit your taste. Don’t forget to add fun variations like spices or dietary options. Cooking this soup can be simple and rewarding. Enjoy crafting your perfect bowl. Your culinary adventures start now!

Creamy Tomato Basil Soup Rich and Flavorful Delight

Welcome to your next kitchen adventure! In this post, I’ll share a foolproof recipe for creamy tomato basil soup that’s

To make tasty Thai peanut noodles, you need these key ingredients: - 8 oz rice noodles - 1/2 cup creamy peanut butter - 2 tablespoons soy sauce (or tamari for gluten-free) - 2 tablespoons lime juice - 1 tablespoon maple syrup - 2 teaspoons fresh ginger, grated - 2 cloves garlic, minced - 1/2 cup coconut milk - 1 red bell pepper, thinly sliced - 1 cup shredded carrots - 1 cup snap peas, trimmed - 1/4 cup green onions, sliced - 1/4 cup crushed peanuts for garnish - Fresh cilantro for garnish (optional) - Red pepper flakes (optional, for spice) These ingredients come together to create a rich and creamy sauce that coats the noodles perfectly. The peanut butter gives a nutty taste, while lime juice adds brightness. To make your dish even more exciting, consider adding these optional ingredients: - Chopped bell peppers in other colors - Broccoli florets for crunch - Sliced mushrooms for earthiness - Fresh basil or mint for extra flavor - Extra lime wedges for serving These options let you play with flavors and textures. You can make the dish your own! If you don’t have something on hand, don’t worry! Here are some great substitutes: - Use almond butter instead of peanut butter for a different nutty taste. - Swap soy sauce with coconut aminos for a soy-free option. - Use apple cider vinegar in place of lime juice for a tangy twist. - Replace coconut milk with almond milk for a lighter sauce. These substitutes keep your dish delicious while allowing you to adapt to what you have. For the full recipe, check the details above and get cooking! First, boil water in a pot. Add 8 oz of rice noodles to the water. Cook them as the package says. This usually takes about 5-7 minutes. Stir the noodles so they don’t stick. Once cooked, drain the noodles and set them aside. Toss them with a little oil to keep them from sticking together. Grab a medium bowl. Add 1/2 cup of creamy peanut butter. Then, pour in 2 tablespoons of soy sauce. Add 2 tablespoons of lime juice for a zesty kick. Next, add 1 tablespoon of maple syrup for sweetness. Grate 2 teaspoons of fresh ginger and mince 2 cloves of garlic. Toss these in, too. Finally, add 1/2 cup of coconut milk. Whisk everything until it’s smooth and creamy. If it feels too thick, add a splash of water until it’s just right. Now, heat a large skillet or wok. Add a tablespoon of oil over medium heat. Slice 1 red bell pepper, shred 1 cup of carrots, and trim 1 cup of snap peas. Toss these veggies into the skillet. Sauté them for about 3-4 minutes until they are tender but still crisp. This keeps their bright colors and fresh taste. Once the veggies are ready, add the cooked rice noodles to the skillet. Pour the peanut sauce over everything. Toss it all together until the noodles and veggies are coated well. Cook for another 2-3 minutes so everything heats up and flavors blend. Remove from heat and stir in 1/4 cup of sliced green onions. Now your Thai peanut noodles are ready to serve! Garnish with 1/4 cup of crushed peanuts and fresh cilantro if you like. You can even add red pepper flakes for a spicy touch. Enjoy your meal! For the full recipe, check the section above. To keep your rice noodles from sticking, follow a few simple steps. First, cook the noodles according to the package instructions. Once done, drain them well. After draining, toss the noodles in a bit of oil. This small step helps coat the noodles and prevents them from clumping together. If you make your noodles early, rinse them with cold water. This cools them off and stops the cooking process. A great peanut sauce is key to tasty Thai peanut noodles. Start with creamy peanut butter, as it blends smoothly. Mix your peanut butter with soy sauce, lime juice, maple syrup, fresh ginger, minced garlic, and coconut milk. Whisk these together until the sauce is smooth. If your sauce feels thick, add a splash of water. This will help reach the perfect consistency for drizzling over your noodles. Taste the sauce and adjust the flavors. You might want more lime for tang or more maple for sweetness. You can easily make this dish your own. Add cooked chicken, shrimp, or tofu for protein. Toss in more veggies like broccoli or bell peppers for color and crunch. Want a bit of heat? Sprinkle red pepper flakes or add sliced chili peppers. If you prefer a fresh touch, top your noodles with cilantro or lime wedges. Each change can create a new flavor profile. Explore these options to find your favorite version of Thai peanut noodles. For the full recipe, check out the detailed instructions above. {{image_2}} You can easily make Thai peanut noodles vegan and gluten-free. Swap regular soy sauce for tamari. This keeps the dish safe for those with gluten issues. Use maple syrup for sweetness, which is vegan-friendly. Ensure your rice noodles are 100% gluten-free. You can enjoy a delicious meal while following dietary needs. Want some heat? Add red pepper flakes to your sauce! Just a sprinkle makes a big difference. Mix in some chili paste if you like it extra spicy. Start small and taste as you go. You can also add fresh sliced jalapeños for some vibrant flavor. Just remember, spice levels can change the whole dish. Adding protein makes the meal heartier. For a vegan option, use firm tofu. Press it to remove excess water, then cube it. Sauté the tofu until golden and crispy. If you prefer chicken or shrimp, cook them separately. Add them to the pan after cooking the veggies. This gives you a balanced dish packed with flavor and nutrition. For the complete recipe, check out the Full Recipe. To store your leftover Thai peanut noodles, let them cool first. Place them in an airtight container. Make sure to store the noodles and sauce together. This keeps them tasty and moist. You can keep them in the fridge for up to three days. When you reheating, add a splash of water or broth to the noodles. This helps them stay moist. Heat them in a skillet over low heat. Stir gently until warmed through. You can also microwave them. Just cover the bowl to keep them from drying out. You can freeze Thai peanut noodles for later. Just make sure they are completely cool. Portion them into freezer-safe bags or containers. They can last up to three months in the freezer. When you are ready to eat, thaw them overnight in the fridge. Then, reheat as mentioned above. This way, you always have a quick meal on hand. Want the full recipe? Check out the [Full Recipe] for more details! Thai peanut noodles pair well with fresh veggies and herbs. You can serve them with: - Cucumber slices - Fresh cilantro - Lime wedges - Sliced green onions These add brightness and crunch. You can also pair them with grilled chicken or tofu for protein. Yes, you can make the peanut sauce in advance. Store it in a sealed container in the fridge. It stays fresh for up to five days. Just give it a good stir before using. If it is too thick, add a little water. To change the spice level, add or reduce red pepper flakes. Start with a pinch and taste. You can also add fresh chili or Sriracha for more heat. If you want less spice, skip the flakes. Rice noodles work best for Thai peanut noodles. They are light and soak up the sauce well. You can also use egg noodles or whole wheat noodles if you like. Just adjust the cooking time as needed. Yes, for a quick meal, use pre-cooked rice noodles. You can also use store-bought peanut sauce. Just heat the sauce and toss it with the noodles and veggies. This saves time and keeps it simple. Check out the Full Recipe for a detailed guide. In this article, I shared how to create delicious Thai Peanut Noodles. You learned about key ingredients and substitutes, easy cooking steps, and tips for great flavor. Customizing your dish with proteins or making it vegan adds fun. Don't forget about storage options and reheating tips for leftovers. Making these noodles can be simple and rewarding. Enjoy your tasty dish anytime!

Thai Peanut Noodles Flavorful and Easy Recipe Guide

Are you ready to dive into a bowl of pure delight? My Thai Peanut Noodles recipe is your ticket to

To make stuffed bell peppers, you need some simple and fresh ingredients. Here is your list: - 4 large bell peppers (red, yellow, green, or orange) - 1 cup quinoa, rinsed - 2 cups vegetable broth - 1 can black beans, rinsed and drained - 1 cup corn (fresh, frozen, or canned) - 1 medium onion, finely chopped - 2 cloves garlic, minced - 1 teaspoon cumin - 1 teaspoon chili powder - 1 teaspoon smoked paprika - Salt and pepper to taste - 1 cup diced tomatoes (fresh or canned) - 1 cup shredded cheese (cheddar or mozzarella) - Fresh cilantro or parsley for garnish When you gather these ingredients, make sure they are fresh. This helps bring out the best flavors. You can mix and match the bell pepper colors for a fun look. I love using quinoa because it is healthy and filling. The black beans add protein, while the corn gives sweetness. The spices like cumin and chili powder add warmth and depth. Feel free to adjust these spices to fit your taste. You can add more if you like it spicy! The cheese on top melts beautifully, making the dish look inviting. For a finishing touch, sprinkle fresh herbs on top. You can see the full recipe to guide you through the cooking process. Enjoy your time in the kitchen! - Preheat the oven to 375°F (190°C). - Cut the tops off the bell peppers and remove seeds and membranes. Start by preheating your oven. This helps the peppers cook evenly. Next, take your bell peppers and cut off their tops. Make sure to remove all the seeds and membranes inside. This step is key. You want the peppers to be clean for stuffing. - Bring vegetable broth to a boil. - Add rinsed quinoa, reduce to a simmer, cover, and cook. In a medium pot, bring vegetable broth to a boil. The broth adds great flavor to your quinoa. Once it boils, add the rinsed quinoa. Lower the heat to a simmer and cover the pot. Let it cook for about 15 minutes. The quinoa will absorb the broth and become fluffy. - Sauté onions and garlic in olive oil. - Combine black beans, corn, spices, and tomatoes with cooked quinoa. In a large skillet, heat some olive oil over medium heat. Add the chopped onions and sauté until they turn translucent. This usually takes about five minutes. Now stir in minced garlic and cook for one more minute. After that, add black beans, corn, spices, and diced tomatoes. Mix this all together well. Finally, fold in your cooked quinoa. This mixture will be the heart of your stuffed peppers. - Fill the peppers with the quinoa mixture. - Bake covered with foil, then uncovered to melt cheese. Now it’s time to stuff the peppers! Take your quinoa mixture and fill each bell pepper. Press it down a bit so it fits well. Once filled, sprinkle shredded cheese on top of each pepper. Cover the baking dish with foil and bake for 25 minutes. After that, remove the foil and bake for another 10 minutes. This will melt the cheese and give a nice golden color. Enjoy the full recipe for more details! - Always use fresh ingredients for the best flavor. - Adjust spices based on personal taste preferences. Using fresh ingredients brings out vibrant flavors. Fresh bell peppers, ripe tomatoes, and herbs can make a big difference. You can also play with spice levels. If you like heat, add more chili powder. If you prefer mild, stick to less. - Use aluminum foil to prevent over-browning. - Allow filling to cool before stuffing for better flavor melding. Covering the dish with aluminum foil helps cook evenly. It keeps the top from getting too brown before the inside is ready. Letting the filling cool a bit helps the flavors mix. It also makes it easier to stuff the peppers. - Serve with a side salad or homemade salsa. - Pair with a refreshing beverage to balance the dish. I enjoy serving these stuffed peppers with a fresh salad. A side of homemade salsa adds a nice kick. A cool drink, like lemonade or iced tea, can balance the heat. These small touches make every bite more enjoyable. For the full recipe, check out the Rainbow Delight Stuffed Bell Peppers. {{image_2}} You can make stuffed bell peppers even more colorful and tasty. Try adding more veggies like zucchini or spinach. This boosts the flavor and nutrition. You can also swap quinoa for rice or farro. Both options give a nice texture and taste. If you love meat, you can add ground beef, turkey, or shredded chicken. These meats bring a heartiness that many enjoy. For extra flavor, try adding sausage. It adds a nice kick that makes the dish even more satisfying. To keep stuffed bell peppers gluten-free, check that all your ingredients are certified gluten-free. You can use gluten-free grains like rice or quinoa. Also, choose gluten-free cheese options to keep everyone happy. This way, everyone can enjoy a delicious meal without worry. - Allow the stuffed peppers to cool. - Store in an airtight container in the refrigerator. You can keep your leftovers fresh for about three to four days. I find that they taste even better the next day as the flavors meld together. - Reheat in the oven for best texture. - Microwave option for quick meals. For reheating, I suggest using the oven. Preheat it to 350°F (175°C) and place the peppers in for about 15 minutes. If you're in a hurry, the microwave works too. Heat them for about two to three minutes. - Prepare stuffed peppers ahead of time for freezing. - Thaw and bake when ready to serve. You can make stuffed peppers in advance. Just assemble them without baking, wrap them tightly, and freeze. When you want to enjoy them, thaw in the fridge overnight and bake as usual. This method helps you enjoy a quick meal anytime! Cooking stuffed bell peppers takes about 50 minutes. This includes 25 minutes covered and 10 minutes uncovered in the oven. The size of the peppers and the filling can change cooking time. Always check if the peppers are tender and the cheese is melted. Yes, you can prepare stuffed bell peppers ahead of time. Stuff the peppers and store them in the fridge for up to two days. You can also freeze them for later. Just remember to thaw before baking. If you want a different grain, try rice or farro. For a gluten-free option, use riced cauliflower or millet. These substitutes work well with the other ingredients in the recipe. Stuffed bell peppers freeze well. Wrap each pepper in foil or place them in a freezer-safe container. When ready to eat, thaw them overnight in the fridge. Bake as directed until heated through. Stuffed bell peppers are very healthy! They are low in calories and high in fiber. The filling has protein from black beans and quinoa. Plus, you get vitamins from the bell peppers and other veggies. This dish offers a balanced meal for everyone. Stuffed bell peppers are easy to make and packed with flavor. You need simple ingredients, like quinoa and veggies, cooked perfectly. Follow the steps to create a delicious dish that fits many tastes. You can add meat or change grains based on your needs. Enjoy your stuffed peppers with a salad or some salsa. They reheat well, and storing them is simple. So gather your ingredients and start cooking a meal everyone will love!

Stuffed Bell Peppers Flavorful and Easy Recipe

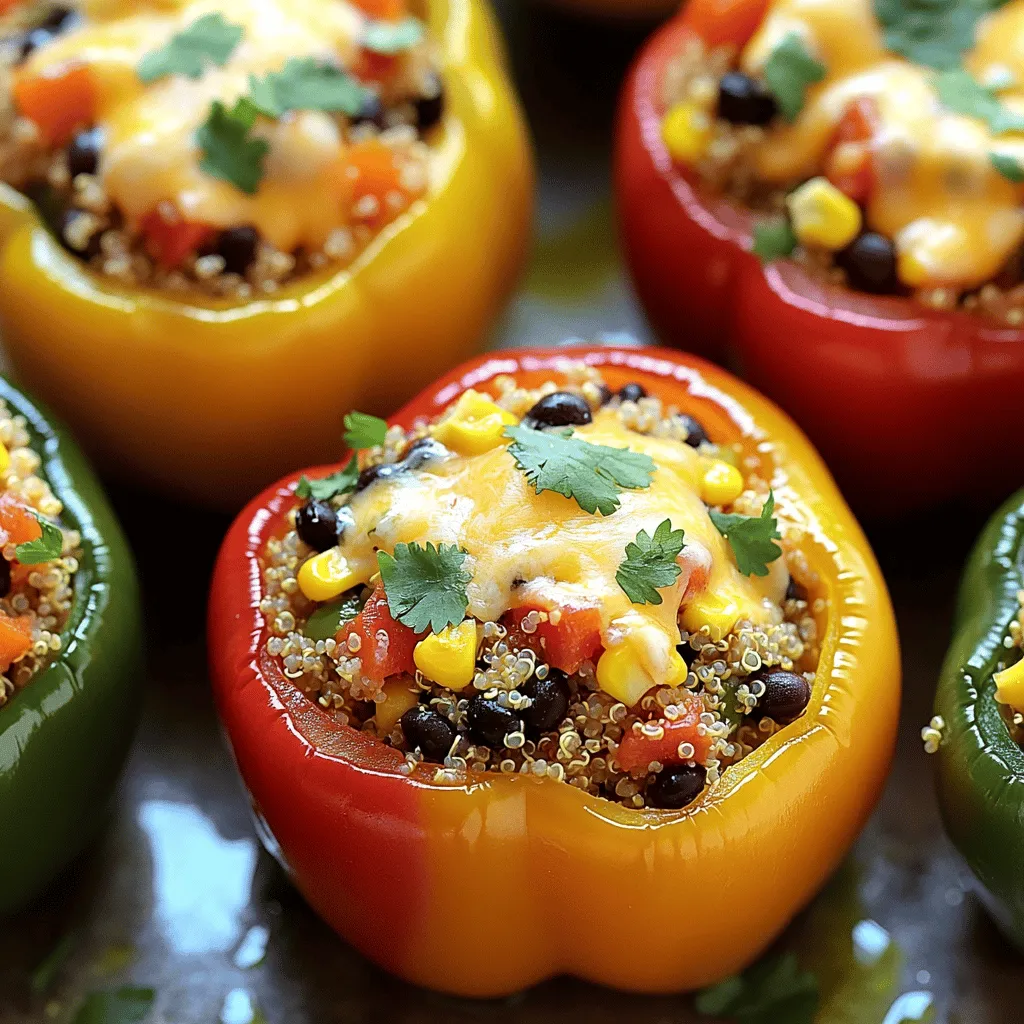
Looking for a delicious and easy meal that pleases everyone? Stuffed bell peppers are just for you! With a mix

To make tasty breakfast burritos, gather these key ingredients: - 4 large flour tortillas - 4 large eggs - ½ cup black beans, rinsed and drained - 1 cup shredded cheese (cheddar or Mexican blend) - ½ cup diced bell peppers (any color) - ¼ cup diced onion - 2 tablespoons olive oil - 1 avocado, sliced - Salsa, for serving - Salt and pepper to taste These ingredients create a hearty and flavorful meal. The flour tortillas wrap everything up perfectly, holding in all the goodness. The eggs provide protein, while black beans add fiber. Cheese brings a creamy texture, and bell peppers and onions give a fresh crunch. Feel free to add your own twist with these optional items: - Fresh cilantro, for a burst of flavor - Additional toppings like sour cream or hot sauce These extras can make your burritos even more special. Fresh cilantro brightens the dish. Sour cream adds creaminess, and hot sauce gives a spicy kick. You can easily swap certain ingredients for variety: - Use corn or whole wheat tortillas for a change. - Try vegan cheese for a dairy-free option. - Substitute cooking oil with butter or avocado oil. These substitutions let you cater to your preferences. Experimenting with different flavors keeps breakfast fun and exciting. For the full recipe, check out the Delicious Morning Burritos! Start by heating olive oil in a skillet over medium heat. Add diced onion and bell peppers. Sauté them for about 3-4 minutes. You want them soft, not mushy. Season the veggies with salt and pepper. This step boosts the flavor and makes your burrito taste great. While the veggies cook, crack the eggs into a bowl. Add a pinch of salt and pepper. Whisk the eggs until they blend well. Pour the eggs into the skillet. Scramble them gently with the veggies. After about 3-4 minutes, add black beans and half of the cheese. Mix it all together until well combined. Now it’s time to assemble! Lay out the flour tortillas on a clean surface. Spoon about a quarter of the egg mixture into the center of each tortilla. Fold the sides over the filling, then roll from the bottom up. This creates a neat burrito. For a crispy finish, place the rolled burritos seam-side down in the same skillet. Cook them for 1-2 minutes on each side until they turn golden brown. Serve warm, topped with sliced avocado and your favorite salsa. Optionally, sprinkle some fresh cilantro on top for a burst of color. Enjoy your delicious breakfast burritos! For the full recipe, check out the detailed instructions above. To make tasty breakfast burritos, focus on even cooking. Use medium heat when cooking your veggies. This helps them soften without burning. Stir often to mix flavors. For a fluffy texture, whisk your eggs well. This adds air and lightness. You can add a splash of milk for extra fluffiness. To save time, make burritos ahead of time. You can prepare the filling in advance. Store it in the fridge for up to three days. When ready, fill the tortillas and roll them up. For longer storage, freeze the burritos. Wrap each burrito in foil or plastic wrap. They can last up to three months in the freezer. To reheat, microwave on high for about two minutes. You can also bake them in the oven at 350°F for 15-20 minutes. Serve your burritos with salsa for a burst of flavor. You can also pair them with fresh avocado slices. For a hearty side, try a simple salad. A fruit salad adds a sweet touch. Feel free to garnish with chopped cilantro for more color and taste. {{image_2}} You can make your breakfast burritos fun and tasty by adding different veggies or proteins. For a vegetarian option, try adding spinach, mushrooms, or zucchini. You can also add proteins like chicken or sausage. These choices boost flavor and nutrition. Mixing and matching ingredients helps you create a meal that fits your taste. If you like some heat, add jalapeños or spicy salsa to your burrito. Jalapeños can be fresh or pickled. They add a nice kick. Spicy salsa can change the flavor profile and make your burrito exciting. Adjust the spice level based on your preference. You can always start small and add more heat. If you want a different twist, try making breakfast burrito bowls. Instead of wrapping your ingredients in a tortilla, serve them in a bowl. Start with a base of rice or quinoa, then add your scrambled eggs and veggies. Top it with cheese, avocado, and salsa. This way, you get all the great flavors without the tortilla. Plus, it’s a fun way to enjoy your breakfast! For the Full Recipe, you can refer to the previous section. To keep your easy breakfast burritos fresh, use these tips: - Refrigeration: Place leftovers in an airtight container. This keeps them safe and fresh. Store them in the fridge for up to four days. - Freezing: Wrap each burrito in plastic wrap. Then, place them in a freezer bag. This helps prevent freezer burn. You can freeze them for up to three months. When you're ready to enjoy your burritos again, reheating is simple: - Microwave: Place the burrito on a microwave-safe plate. Heat for 1-2 minutes, flipping halfway through. Check if it's warm all the way through. - Skillet: Heat a skillet over medium heat. Add a little oil, then place the burrito seam-side down. Cook for about 2-3 minutes on each side until it’s crispy and hot. Leftover burritos can last: - In the fridge: Up to four days. - In the freezer: Up to three months. Keep track of the dates. This helps ensure the best taste and safety. Enjoy your easy breakfast burritos anytime! You can make breakfast burritos ahead by prepping the filling. Start by cooking the eggs, beans, and veggies. Once they cool, wrap them in tortillas. Then, store them in the fridge for up to three days. For longer storage, freeze them. Just wrap each burrito in plastic wrap and place them in a freezer bag. When you are ready to eat, just reheat! Yes, you can make breakfast burritos vegetarian! Simply skip the eggs or use a plant-based egg substitute. You can add more veggies like spinach, mushrooms, or zucchini. Tofu is also a great protein option. Just cook it as you would the eggs, and mix it with your favorite veggies and beans. The best way to reheat breakfast burritos is in the oven or on a skillet. For the oven, preheat it to 350°F (175°C). Place the burrito on a baking sheet for about 15 minutes. If you use a skillet, heat it on medium. Cook each side for about 3-4 minutes until warm and crispy. This method keeps the burrito tasty and fresh. Breakfast burritos are easy and fun to make. We covered essential and optional ingredients to get you started. You learned how to prepare veggies, cook eggs, and assemble your burritos. Tips on perfecting your burrito and meal prep strategies help save time. Plus, we explored tasty variations and storage techniques to prolong freshness. Now, you’re equipped to create your own delicious meals with these ideas. Enjoy the process of making and sharing these tasty treats!

Easy Breakfast Burritos Tasty and Quick Recipe

Ready to spice up your mornings? These Easy Breakfast Burritos are quick to make and packed with flavor! In just

- 1 pound baby carrots (or regular carrots, peeled and cut into sticks) - 3 tablespoons olive oil - 4 cloves garlic, minced - 1 teaspoon fresh thyme leaves (or ½ teaspoon dried thyme) - 1 teaspoon fresh rosemary, chopped (or ½ teaspoon dried rosemary) - Salt and black pepper, to taste - 1 tablespoon honey (optional for sweetness) - Fresh parsley, chopped for garnish Using fresh herbs makes a big difference. Fresh thyme and rosemary bring bright flavors. If you can’t find them, dried herbs work well too. Just use less since dried herbs are stronger. For sweetness, honey is great, but you can use maple syrup or brown sugar. These options add a lovely caramel taste. Adjust to your liking! Preheating the oven Start by preheating your oven to 425°F (220°C). This high heat helps the carrots roast well. Mixing the marinade ingredients In a large bowl, combine 3 tablespoons of olive oil, 4 minced garlic cloves, 1 teaspoon of fresh thyme, and 1 teaspoon of fresh rosemary. Add salt and black pepper to taste. If you want extra sweetness, mix in 1 tablespoon of honey. This marinade adds depth and flavor to the carrots. Coating the carrots evenly Add 1 pound of baby carrots to the bowl. Toss them well to coat each carrot with the herb and garlic mixture. Make sure every piece gets some flavor. Spreading carrots on the baking sheet Next, take a large baking sheet and spread the coated carrots in a single layer. This step is key for even roasting. If the carrots are too close together, they will steam instead of roast. Recommended oven settings Roast the carrots in your preheated oven for 25-30 minutes. The high heat caramelizes the sugars in the carrots, making them sweet and tender. Tips for perfect roasting Halfway through cooking, toss the carrots again for even browning. Check for tenderness with a fork. You want them soft with caramelized edges. Enjoy this simple yet flavorful dish as a side to any meal. For the full recipe, check out the detailed instructions above. To boost the taste of your garlic herb roasted carrots, try using different herbs and spices. Fresh dill or oregano can add a unique twist. You can also mix in a pinch of cumin or paprika for warmth. Adding citrus zest, like lemon or orange, brightens the dish. Just a small amount can make a big difference. Caramelization brings out the natural sweetness of carrots. Always spread them in a single layer on the baking sheet. This helps them cook evenly and develop that nice golden color. Roast at 425°F for 25-30 minutes. Toss them halfway through for even cooking. If they start to brown too fast, lower the heat slightly. These roasted carrots pair wonderfully with many main dishes. They go great with chicken, pork, or even fish. For a fun twist, serve them over a bed of quinoa or rice. Finish with a sprinkle of fresh parsley or a drizzle of balsamic glaze for extra flavor. You can also add nuts, like walnuts or pecans, for crunch and richness. Enjoy your garlic herb roasted carrots as a tasty side! For the full recipe, check the complete instructions above. {{image_2}} You can add a sweet touch to your garlic herb roasted carrots. Consider mixing in brown sugar or maple syrup. This small change can create a delightful contrast to the savory garlic and herbs. It adds a caramelized layer that enhances the flavor. Another sweet option is using honey. Drizzle honey over the carrots before roasting. This gives them a beautiful glaze and a rich taste. Honey pairs well with garlic and herbs, making your dish even more special. For a heartier dish, add other root vegetables. Potatoes, parsnips, or beets work great with carrots. Just cut them to the same size for even cooking. This mix brings different flavors and textures to your table. You can also make a vegetable medley. Try combining carrots with bell peppers or zucchini. The added colors and tastes will make your dish more appealing and nutritious. If you need vegan options, simply skip the honey. Use maple syrup instead for sweetness. This keeps the dish plant-based while still tasty. For low-sodium choices, reduce the salt. You can add more herbs or spices to enhance flavor without extra sodium. This keeps your meal healthy while still being full of flavor. Explore these variations to make your garlic herb roasted carrots unique. You can find the full recipe in the earlier section. To keep your Garlic Herb Roasted Carrots fresh, use proper storage methods. Place them in an airtight container. This helps lock in flavor and moisture. If you have a lot, you might divide them into smaller containers. This makes it easy to grab a portion later. Store the carrots in the fridge. They can last up to four days this way. When it's time to enjoy your leftovers, a few methods work best. The oven is my favorite. Preheat it to 350°F (175°C). Spread the carrots on a baking sheet. Heat for about 10-15 minutes until warm. If you prefer the microwave, use it for about one to two minutes. Make sure to cover them to keep moisture. Avoid sogginess during reheating by not using too much liquid. Also, don't overheat them, as this can change their texture. Enjoy your tasty Garlic Herb Roasted Carrots again with ease! To make Garlic Herb Roasted Carrots, follow these simple steps: 1. Preheat your oven to 425°F (220°C). 2. In a large bowl, mix 3 tablespoons of olive oil with 4 minced garlic cloves, 1 teaspoon of thyme, 1 teaspoon of rosemary, salt, and black pepper. You can add 1 tablespoon of honey for sweetness if you like. 3. Add 1 pound of baby carrots to the bowl. Toss them well until they are coated in the marinade. 4. Spread the carrots on a baking sheet in a single layer. 5. Roast them for 25-30 minutes. Toss them halfway through for even cooking. 6. When they are tender and caramelized, take them out and let them cool slightly. 7. Transfer to a serving dish and garnish with chopped parsley. This recipe is easy and brings great flavor to your meal! Yes, you can use different types of carrots! Each type brings its own flavor and texture. - Baby carrots are sweet and tender. - Regular carrots have a strong flavor and are crisp. Just peel and cut them into sticks. - Rainbow carrots add color and mild sweetness. They look great on the plate! Feel free to mix different kinds for fun flavors! Garlic Herb Roasted Carrots pair well with many dishes. Here are some tasty ideas: - Grilled chicken or turkey makes a great main dish. - Roasted meats like pork or beef also go well. - Quinoa or rice can round out your meal and soak up the flavors. These carrots are a lovely side that brightens any plate! Roasted carrots can last about 3 to 5 days in the fridge. Here’s how to store them: - Place them in an airtight container to keep them fresh. - Avoid leaving them out at room temperature for too long. For best taste, enjoy them within a few days! In this post, we covered how to make Garlic Herb Roasted Carrots. I shared the ingredients, including fresh herbs and optional honey for sweetness. You learned about preparation steps and cooking tips to get perfect caramelization. We also explored variations, storage info, and answered common questions. Try these tips for tasty roasted carrots that fit any meal. Enjoy your cooking adventure!

Garlic Herb Roasted Carrots Flavorful and Simple Recipe

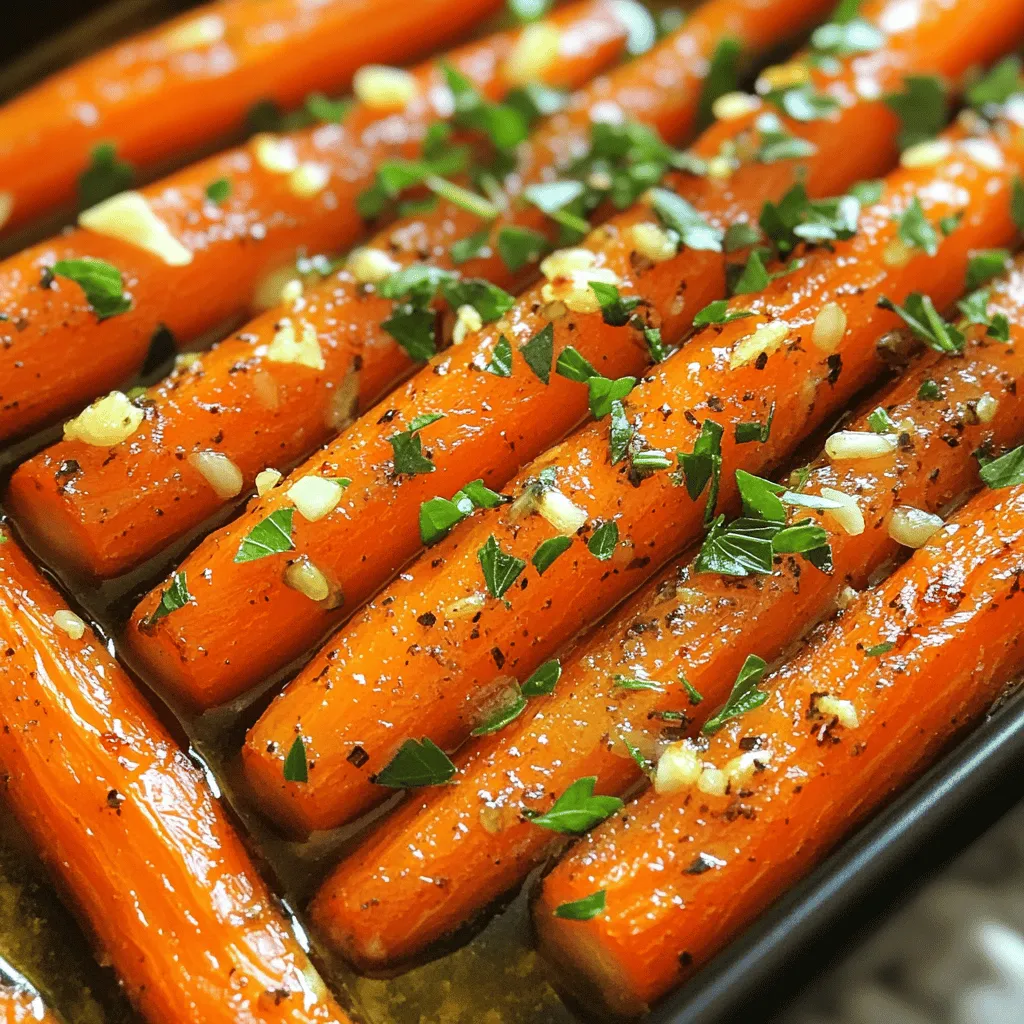
Carrots don’t have to be boring! In this recipe, I’ll show you how to make Garlic Herb Roasted Carrots that

- 2 medium sweet potatoes, peeled and diced - 1 can (15 oz) black beans, drained and rinsed - 1 tablespoon olive oil - 1 teaspoon smoked paprika - 1 teaspoon ground cumin - 1/2 teaspoon chili powder - Salt and pepper to taste - 8 small corn tortillas - 1 avocado, sliced - 1/2 cup diced red onion - Fresh cilantro, chopped (for garnish) - Lime wedges (for serving) When I make sweet potato black bean tacos, I love using fresh sweet potatoes. They give a nice flavor and texture. You can also use canned black beans. They save time and still taste good. If you want a crunch, use fresh onion. It adds a great bite. For the best taste, choose ripe avocados. They should feel slightly soft when you press them. Fresh cilantro adds a nice touch. It makes the tacos look pretty and taste bright. You can use corn tortillas or flour tortillas. Corn tortillas are gluten-free, which is a big plus. If you want a quick meal, canned beans and pre-diced onions work well. Just remember, fresh ingredients always deliver the best taste. Check the [Full Recipe] for more details on cooking these tacos! 1. First, preheat your oven to 425°F (220°C). This high heat helps the sweet potatoes roast well. 2. Next, peel and dice two medium sweet potatoes into small cubes. Place them in a large bowl. 3. Drizzle one tablespoon of olive oil over the sweet potatoes. This oil helps them crisp up nicely. 4. Add one teaspoon of smoked paprika, one teaspoon of ground cumin, and half a teaspoon of chili powder. Sprinkle in salt and pepper to taste. Toss everything well. Make sure the potatoes are coated in the spices. 5. Spread the sweet potatoes evenly on a baking sheet lined with parchment paper. This helps with easy cleanup. 6. Roast the sweet potatoes for 20 to 25 minutes. Flip them halfway through. They should be tender and slightly caramelized when done. 1. While the sweet potatoes roast, open a can of black beans. Drain and rinse them well. 2. In a small saucepan, heat the black beans over medium heat. Warm them for about five minutes. 3. Season the beans with a pinch of salt and pepper. Stir them well and set aside for later. 1. Warm eight small corn tortillas in a skillet over medium heat. Heat them for about 30 seconds on each side. This makes them soft and easy to fold. 2. For each taco, place a generous spoonful of roasted sweet potatoes on the tortilla. 3. Next, add a spoonful of seasoned black beans on top of the sweet potatoes. 4. Top it off with slices of avocado, diced red onion, and fresh cilantro. This adds great flavor and color. 5. Serve your tacos with lime wedges on the side. A squeeze of lime adds brightness to the dish. For the full recipe, check out the Sweet Potato Black Bean Tacos section. Enjoy your cooking! To ensure even roasting for sweet potatoes, cut them into similar-sized pieces. This helps them cook at the same rate. Spread them out on the baking sheet, leaving space between each piece. Crowding them leads to steaming, not roasting. For customizing spice levels, start with less chili powder. You can always add more later. Taste the beans before serving and adjust the seasoning as needed. Pair your tacos with a fresh salsa or a tangy crema. A dollop of Greek yogurt can also add creaminess. For garnishing, try adding sliced jalapeños for heat or crumbled feta for a salty kick. Fresh lime juice brightens the flavors, so don’t skip the lime wedges! Each serving has about 300 calories, 50 grams of carbs, and 10 grams of protein. Sweet potatoes are rich in vitamins A and C. They also have fiber, which is great for digestion. Black beans provide protein and iron, making this meal not just tasty but healthy too. Enjoying these tacos helps you eat more plant-based foods, which can benefit your overall health. For the full recipe, check out the Sweet Potato Black Bean Tacos . {{image_2}} You can switch up the beans in this recipe. Try pinto beans or kidney beans instead of black beans. Each type brings its own flavor. You can also add more veggies. Roasted corn or bell peppers work well. If you need gluten-free tacos, use corn tortillas. They are tasty and safe for gluten-free diets. To make these tacos even better, add spices. Try oregano or garlic powder for extra taste. Cheese is a great topping too. Feta or shredded cheese adds creaminess. You can also make it spicy by adding jalapeños. Chop them finely and mix them in with the sweet potatoes or sprinkle them on top. This recipe is already plant-based. To make it more filling, add quinoa or rice. Both add protein and keep you satisfied. You can also serve these tacos with a side salad. It adds crunch and freshness to your meal. For more ideas, check out the Full Recipe. To store your sweet potato black bean tacos, keep the fillings separate from the tortillas. This helps maintain the tortilla's texture. Place the sweet potato and black bean mixture in an airtight container. Store the tortillas in a zip-lock bag to avoid drying out. Refrigerate both for the best taste. When you’re ready to eat, reheat the sweet potato black bean mixture in a small saucepan over medium heat. Stir until warmed through, about 5 minutes. If you prefer, you can microwave it for about 1-2 minutes. To keep tortillas fresh, warm them in a dry skillet for 30 seconds on each side. This makes them soft and pliable again. The prepared sweet potato black bean mixture lasts about 4-5 days in the fridge. If you freeze it, it can last up to 3 months. Look for signs like a sour smell or discoloration to know when to throw leftovers away. Trust your senses; if it doesn’t smell or look right, it’s best to discard it. If you don't have sweet potatoes, you can use: - Butternut squash - Regular potatoes - Carrots - Zucchini These options give a similar texture and taste, ensuring your tacos stay delicious. Yes, you can prepare these tacos in advance. - Roast the sweet potatoes and cook the black beans the day before. - Store them in separate airtight containers in the fridge. - Assemble the tacos right before serving for the best taste. To add heat, try these tips: - Mix in diced jalapeños or serranos with the sweet potatoes. - Add a pinch of cayenne pepper to the black beans. - Serve with a spicy salsa on top. These options will boost flavor without overpowering the dish. Absolutely! Here are some tips for meal prepping: - Prepare a double batch of sweet potatoes and black beans. - Store them in separate containers for easy assembly during the week. - Reheat the sweet potato and black bean mixture before serving. This method saves time and keeps your meals fresh and tasty. In this blog post, we explored making sweet potato and black bean tacos. We discussed key ingredients, step-by-step instructions, and helpful tips. You learned about variations and how to store leftovers properly. These tacos are not only tasty but also healthy. They offer a great way to enjoy plant-based meals. I hope you feel ready to try this recipe at home. Enjoy experimenting with flavors and making it your own!

Savory Sweet Potato Black Bean Tacos Recipe

Are you ready to spice up your taco night? These Savory Sweet Potato Black Bean Tacos are not only delicious

- 8 ounces rotini or penne pasta - 1 cup cherry tomatoes, halved - 1 cup mozzarella pearls (bocconcini) - 1 cup fresh basil leaves, torn - 3 tablespoons extra-virgin olive oil - 2 tablespoons balsamic glaze - 1 clove garlic, minced - Salt and pepper to taste - Optional: add avocado, olives, or grilled chicken for variations When making Easy Caprese Pasta Salad, you need fresh and simple ingredients. The main ingredients create a vibrant mix. I use rotini or penne pasta as my base. Their twisty shapes hold the dressing well. Cherry tomatoes add a burst of sweetness, and mozzarella pearls bring a creamy texture. Fresh basil leaves give it a lovely aroma and flavor. For the dressing, I blend olive oil and balsamic glaze. This adds a rich, tangy kick. A touch of minced garlic amps up the taste. Don't forget to season with salt and pepper to make it perfect. If you want to mix things up, consider adding avocado or olives. Grilled chicken also works well for some protein. These options let you customize your salad to your liking. For the full recipe, check here: [Full Recipe]. Start by boiling salted water in a large pot. Add 8 ounces of rotini or penne pasta. Cook the pasta until it is al dente, which usually takes about 8-10 minutes. Once done, drain the pasta in a colander. Rinse it under cold water to stop the cooking process. This helps keep the pasta firm and fresh. While the pasta cools, take 1 cup of cherry tomatoes. Halve them to release their juicy goodness. Next, tear 1 cup of fresh basil leaves into smaller pieces. This adds a nice touch of flavor and aroma to the salad. In a large mixing bowl, combine the cooled pasta, halved cherry tomatoes, 1 cup of mozzarella pearls, and the torn basil leaves. Gently mix everything together. This step is where the colors and flavors come together beautifully. In a small bowl, whisk together 3 tablespoons of extra-virgin olive oil, 2 tablespoons of balsamic glaze, and 1 minced garlic clove. Add a pinch of salt and a dash of pepper. Mix until everything is well combined. This dressing adds a rich and tangy flavor to your salad. Pour the dressing over your salad mixture. Toss everything gently to coat the pasta and veggies evenly. Let the salad chill for at least 30 minutes in the fridge. This allows the flavors to blend and develop. After chilling, serve it cold or at room temperature for a refreshing dish. Enjoy your Easy Caprese Pasta Salad! For a full recipe, check the [Full Recipe]. To make your Easy Caprese Pasta Salad shine, start with fresh ingredients. Fresh basil, ripe tomatoes, and creamy mozzarella bring out the best taste. Adjust the salt and pepper according to your personal preference. This simple step can elevate your dish from good to great. Chilling the salad is key for enhancing the flavors. It helps the ingredients meld together. For easy entertaining, prepare the salad ahead of time. This way, you can focus on enjoying your time with guests instead of rushing in the kitchen. This salad is versatile and pairs well with grilled meats. It can also serve as a refreshing side dish. Feel free to serve it at picnics, parties, or as a light meal. With its bright colors and fresh taste, it’s sure to impress. For the full recipe, see above. {{image_2}} You can make your Caprese pasta salad even better by adding more veggies. Try including bell peppers for a sweet crunch. Cucumbers add a cool bite. Spinach brings a lovely green color and boosts nutrition. Mix and match these veggies to find your favorite blend. Want to change up the flavor? Experiment with a lemon vinaigrette. This bright dressing adds a zesty kick. Pesto is another great option. Its rich taste pairs perfectly with the fresh ingredients. You can switch things up based on your mood or what you have at home. You can serve this salad in different ways too. Turn it into a Caprese pasta bake for a warm dish. Just mix everything in a baking dish and bake until bubbly. Or, try serving it in lettuce wraps for a fun twist. This makes a great appetizer or light meal option. For the full recipe, check out the Easy Caprese Pasta Salad section. Store your Caprese pasta salad in an airtight container in the refrigerator. This keeps it fresh and safe to eat later. Make sure the lid seals tightly to prevent any air from getting in. For the best taste, eat the salad within 2-3 days. After that, the flavors might fade and the ingredients can lose their crunch. Keeping track of the days helps you enjoy it at its best. Freezing this salad is not recommended. The tomatoes and mozzarella may change texture after thawing. This change can affect the overall taste and feel of your dish. Enjoy it fresh for the best experience! For the full recipe, you can check out the Easy Caprese Pasta Salad. Yes, it's best if allowed to sit in the fridge for 30 minutes to an hour before serving. This chilling time helps all the flavors mix well. You can prepare it in advance and save time on busy days. Just keep it covered in the fridge. Rotini or penne works best due to their ability to hold the dressing. Their shape grabs the sauce and other ingredients. This makes every bite packed with flavor. I love using rotini for its fun, twisty shape. It adds a nice touch to the salad. Substitute mozzarella with vegan cheese or skip it altogether for a vegan option. You can use a nut-based cheese or tofu for creaminess. This way, you keep the salad tasty without dairy. Fresh herbs and ripe tomatoes still shine in this version. Yes, grilled chicken or shrimp can make it more filling. Adding protein turns this salad into a complete meal. You can also use chickpeas for a plant-based option. Just mix them in with the other ingredients for a hearty dish. This blog post covered a bright and tasty Caprese pasta salad. You learned the main ingredients, like rotini pasta, cherry tomatoes, and mozzarella. I walked you through step-by-step instructions for cooking and mixing it all together. You also found helpful tips for great flavor and suggestions for custom extras. Now, you can enjoy this salad at home or impress guests. It's easy, fresh, and full of flavor. Don't forget to try different variations for even more fun!

Easy Caprese Pasta Salad Tasty and Fresh Delight

Are you ready to impress your friends and family with a fresh, tasty dish? This Easy Caprese Pasta Salad is

To make your vibrant sheet pan roasted vegetables, gather these simple ingredients: - 1 cup cherry tomatoes, halved - 1 bell pepper (any color), chopped - 1 medium zucchini, sliced - 1 medium yellow squash, sliced - 1 red onion, cut into wedges - 2 cups broccoli florets - 3 tablespoons olive oil - 2 teaspoons garlic powder - 1 teaspoon smoked paprika - 1 teaspoon dried oregano - Salt and pepper to taste - Fresh parsley, chopped (for garnish) These fresh ingredients make the dish colorful and packed with flavor. I love using cherry tomatoes for their sweetness. Bell peppers add crunch and color. Zucchini and yellow squash bring a tender bite. Red onion adds a hint of sharpness, while broccoli gives a nice green touch. The olive oil helps all the spices stick and adds richness. Garlic powder infuses a warm flavor, while smoked paprika gives a subtle smokiness. The oregano rounds out the taste. Adjust salt and pepper to your liking. I often garnish with fresh parsley. It adds a pop of color and freshness. Using these ingredients makes cooking easy and fun. For the full recipe, check out the instructions that follow. Enjoy creating this wholesome and simple dish! 1. Preheat your oven to 425°F (220°C). This high heat helps the veggies roast nicely. 2. Grab a large mixing bowl. Combine the cherry tomatoes, bell pepper, zucchini, yellow squash, red onion, and broccoli. 3. Drizzle 3 tablespoons of olive oil over the veggies. Add 2 teaspoons of garlic powder, 1 teaspoon of smoked paprika, 1 teaspoon of dried oregano, and salt and pepper to taste. 4. Toss everything until the vegetables are well-coated. This step adds flavor to every bite. 5. Spread the seasoned vegetables evenly on your sheet pan. Make sure they are not crowded. Crowded veggies can steam instead of roast. 1. Place the sheet pan in the preheated oven. Roast the vegetables for 20 to 25 minutes. This time helps them become tender and caramelized. 2. About halfway through cooking, toss the veggies gently. This step ensures they cook evenly. 3. Check for doneness by piercing a piece with a fork. If it feels soft and tender, they are ready. Remove the pan from the oven and let them cool for a few minutes. 4. Plate the roasted vegetables and garnish with chopped fresh parsley for a pop of color. For the complete process, refer to the Full Recipe. Enjoy your healthy and simple dish! To get the best flavor, you need to roast your veggies just right. Here are some tips: - Roasting Times: Different vegetables need different times. For instance, bell peppers and zucchini take about 15-20 minutes. Broccoli and onion take around 20-25 minutes. Always check for tenderness. - Spacing: Make sure to space the vegetables on the pan. This helps them roast evenly. If they are too close, they will steam instead of roast. Aim for a single layer for the best results. Flavor is key to making your vegetables shine. Here are some tasty ideas: - Herbs and Spices: Try using garlic powder, smoked paprika, and dried oregano. These add a nice depth to your veggies. You can also use thyme or rosemary for a fresh touch. - Tailoring Flavors: Want a taste of Italy? Add Italian herbs. For a Mexican twist, sprinkle cumin and chili powder. You can easily adapt the flavors to fit any cuisine you like. These tips will elevate your sheet pan roasted vegetables. Check out the Full Recipe to get started! {{image_2}} You can switch out vegetables based on what is fresh. In spring, use asparagus or peas. Summer brings eggplant and bell peppers. Fall is perfect for carrots and Brussels sprouts. Winter is great for root veggies like sweet potatoes and parsnips. This keeps your dish exciting and full of flavor! You can also add protein to make it heartier. Chickpeas or tofu work well. Just toss them in with your veggies. They soak up the flavors and add a nice bite. This dish can fit many diets. It's vegan, gluten-free, and low-carb friendly. To keep it low-carb, focus on non-starchy veggies like zucchini and bell peppers. You can skip the potatoes and corn. Meal prep is easy with this recipe. Roast a big batch and store it. You can grab it for lunches or dinners. It tastes great warm or cold. Just check the [Full Recipe] for all the details! To keep your sheet pan roasted vegetables fresh, store them in an airtight container. Place them in the fridge within two hours of cooking. This helps to keep them safe to eat. They will stay fresh for about three to four days. For longer storage, you can freeze the leftovers. First, let the vegetables cool completely. Then, spread them on a baking sheet. Freeze them for about an hour. Once frozen, transfer them to a freezer-safe bag. This way, they won’t stick together. You can keep them in the freezer for up to three months. When it's time to enjoy your roasted veggies again, reheat them in the oven. Set the oven to 350°F (175°C). Place the vegetables on a baking sheet and cover them with foil. Heat for about 10 to 15 minutes. This keeps them warm and tasty. You can also use the microwave for quicker reheating. Place the vegetables in a microwave-safe bowl. Cover the bowl with a damp paper towel. Heat for one to two minutes, stirring halfway. This method helps keep the texture nice and avoids sogginess. If you want to add some crispiness back, toss them in a hot pan for a few minutes. This works well to revive their flavor and texture. Enjoy your delicious veggie dish! For the full recipe, check the section above. How can I make Sheet Pan Roasted Vegetables taste even better? To enhance the flavor, try adding fresh herbs. Basil and thyme work well. You can also squeeze fresh lemon juice on top after roasting. This gives the dish a bright, fresh taste. Can I use frozen vegetables for this recipe? Yes, you can use frozen vegetables. Just remember they may need longer to cook. Thaw them first and pat dry. This helps prevent sogginess. What’s the best way to adapt roasting times for different vegetable types? Different vegetables cook at different speeds. Harder veggies like carrots take longer than soft ones like zucchini. Cut all vegetables into similar sizes to ensure even cooking. Check them often and adjust times as needed. Is this recipe considered low-carb? Yes, this recipe is low in carbs. The veggies used are mostly non-starchy. This makes it a great choice for low-carb diets. What can I serve with Sheet Pan Roasted Vegetables? You can serve these vegetables with grilled chicken or fish. They pair well with quinoa or rice, too. Add a light salad for a fresh touch. How do I know when the vegetables are done roasting? The vegetables are done when they are tender and slightly caramelized. You can poke them with a fork to check. They should have a nice golden color on the edges. In this blog post, we explored how to make sheet pan roasted vegetables. We covered the best ingredients, step-by-step instructions, and helpful tips. You learned about seasonal variations and storage methods. Remember, roasting veggies brings out their sweet flavor. You can easily adapt this dish to fit your taste or diet. Now, go ahead and enjoy colorful, healthy meals that are simple to prepare! Enjoy experimenting with your own flavor combinations.

Sheet Pan Roasted Vegetables Wholesome and Simple Dish

If you want a simple and healthy meal, look no further than sheet pan roasted vegetables. This dish mixes fresh

To make crispy air fryer zucchini chips, you need a few simple items. Here’s what you will need: - 2 medium zucchinis - 1 cup breadcrumbs (panko suggested) - 1/2 cup grated Parmesan cheese - 1 teaspoon garlic powder - 1 teaspoon onion powder - 1/2 teaspoon paprika - Salt and pepper to taste - 1/4 cup olive oil (or cooking spray for a lighter version) These ingredients work together to create a tasty snack that is both crunchy and flavorful. The zucchinis provide a fresh base, while the breadcrumbs and cheese add the perfect crunch and savory taste. The spices enhance the flavor, making each bite exciting. Using panko breadcrumbs will give your chips an extra crispy texture, which I highly recommend for the best results. For the oil, you can use olive oil for a richer taste, or opt for cooking spray if you're looking for a lighter option. The combination of these ingredients makes it easy to enjoy a healthy treat at home. Check out the Full Recipe for complete cooking instructions! Start by preheating your air fryer to 375°F (190°C). This step helps the chips cook evenly. Preheating ensures a nice crisp texture, which we all love in zucchini chips. Next, take your two medium zucchinis. Slice them into thin rounds, about 1/8 inch thick. You can use a sharp knife or a mandoline for even slices. Thin slices cook better and become crispier. In a large bowl, mix the breadcrumbs, Parmesan cheese, garlic powder, onion powder, paprika, salt, and pepper. This mix adds flavor to each chip. Drizzle olive oil over the zucchini slices. Toss until they are coated. Now, dip each slice into the breadcrumb mixture. Press gently to make sure the crumbs stick. Arrange the coated zucchini slices in a single layer in the air fryer basket. Avoid overcrowding to allow hot air to circulate. Cook them for 10-12 minutes, flipping halfway through. When they turn golden brown and crispy, they are ready. After cooking, let the chips cool for a few minutes. They will get even crisper as they cool. For the full recipe, you can always refer to the link provided earlier. Enjoy your crunchy zucchini chips! To get that perfect crunch, slice your zucchinis thin. Aim for about 1/8 inch thick. This lets them cook evenly. If they are too thick, they won't crisp up well. I like using a mandoline for uniform slices. Also, make sure your air fryer is preheated. This step helps the chips cook faster and crispier. Don’t hold back on flavor! Add more spices to your breadcrumb mix. Try cayenne pepper for heat or herbs like oregano and thyme. You can also use lemon zest for a fresh twist. Feel free to experiment! Mix and match until you find your favorite blend. The more flavor you add, the tastier your chips will be. Avoid overcrowding the air fryer basket. Lay the zucchini slices in a single layer. If they touch or stack, they won’t cook right. Cook in batches if needed. Flip the chips halfway through cooking. This ensures both sides get nice and crispy. Following these tips will give you perfect, crunchy chips every time. Explore more in the Full Recipe! {{image_2}} You can easily change the flavor of your zucchini chips. Try adding spices like cayenne pepper for heat or Italian herbs for a savory kick. Mixing in some cumin can give it a warm, earthy taste. Just remember to adjust the salt when adding new spices. This lets you personalize your chips to match your mood or meal. If you need a gluten-free option, use almond flour or crushed nuts instead of breadcrumbs. This keeps the chips crunchy and adds a nice nutty flavor. You can also use cornmeal for a different texture. Just sprinkle it on the zucchini slices after you coat them in oil. This will create a delightful crunch. Zucchini chips are great on their own, but they pair well with dips. Try serving them with ranch dressing or a spicy sriracha mayo for a tasty twist. You can also use them as a side with sandwiches or burgers. For a snack platter, mix them with other chips or fresh veggies for a fun, colorful spread. Enjoy making your crispy air fryer zucchini chips! Check out the Full Recipe for more details. To keep your crispy air fryer zucchini chips fresh, store them in an airtight container. Use parchment paper to separate layers if you stack them. This helps prevent them from getting soggy. Keep the container in a cool, dry place. Avoid storing them in the fridge, as moisture can ruin their crunch. Crispy air fryer zucchini chips can last for about 2 to 3 days when stored properly. After this time, they may lose their crisp texture. If you notice them getting soft, it’s best to eat them soon. For longer storage, you can freeze them, but they won’t be as crispy when thawed. To reheat your zucchini chips, use the air fryer again. Set it to 350°F (175°C) and cook for about 3 to 5 minutes. This will help bring back their crunch. You can also use an oven. Place them on a baking sheet and heat at 350°F (175°C) for 5 to 7 minutes. Avoid microwaving, as this will make them soggy. To make air fryer zucchini chips crispy, slice the zucchini thinly. Aim for about 1/8 inch. This helps them cook evenly. Next, coat them lightly with olive oil. The oil helps the breadcrumbs stick, which adds crunch. Use panko breadcrumbs for extra crispiness. Arrange the slices in a single layer in the air fryer basket. Avoid overcrowding to allow hot air to circulate. Cook at 375°F for 10 to 12 minutes, flipping halfway. This gives you a golden brown, crispy chip. Yes, you can use many different vegetables for air frying. Carrots, sweet potatoes, and eggplant work great too. Just cut them into similar thin slices. For best results, adjust cooking times based on the vegetable. Harder veggies may need longer cooking times. Softer veggies, like bell peppers, may cook faster. Experiment with your favorites to find the best taste and texture. If you don’t have breadcrumbs, don’t worry! You can use crushed crackers or cornmeal as a substitute. Ground nuts like almonds or walnuts can add a yummy crunch too. Just make sure to season them well. You can also make your own breadcrumbs by toasting and crushing bread. This way, you control the flavor and texture. You learned how to make tasty air fryer zucchini chips. We covered the key ingredients, from zucchini to panko. I shared step-by-step instructions for perfect cooking. Tips helped you get that crispy texture and extra flavor. You can try fun variations and discover smart storage tips too. Remember, air frying is not just easy; it makes veggies yummy. Enjoy making these chips and share them with friends. Your kitchen adventures are just starting!

Crispy Air Fryer Zucchini Chips Simple Tasty Treat

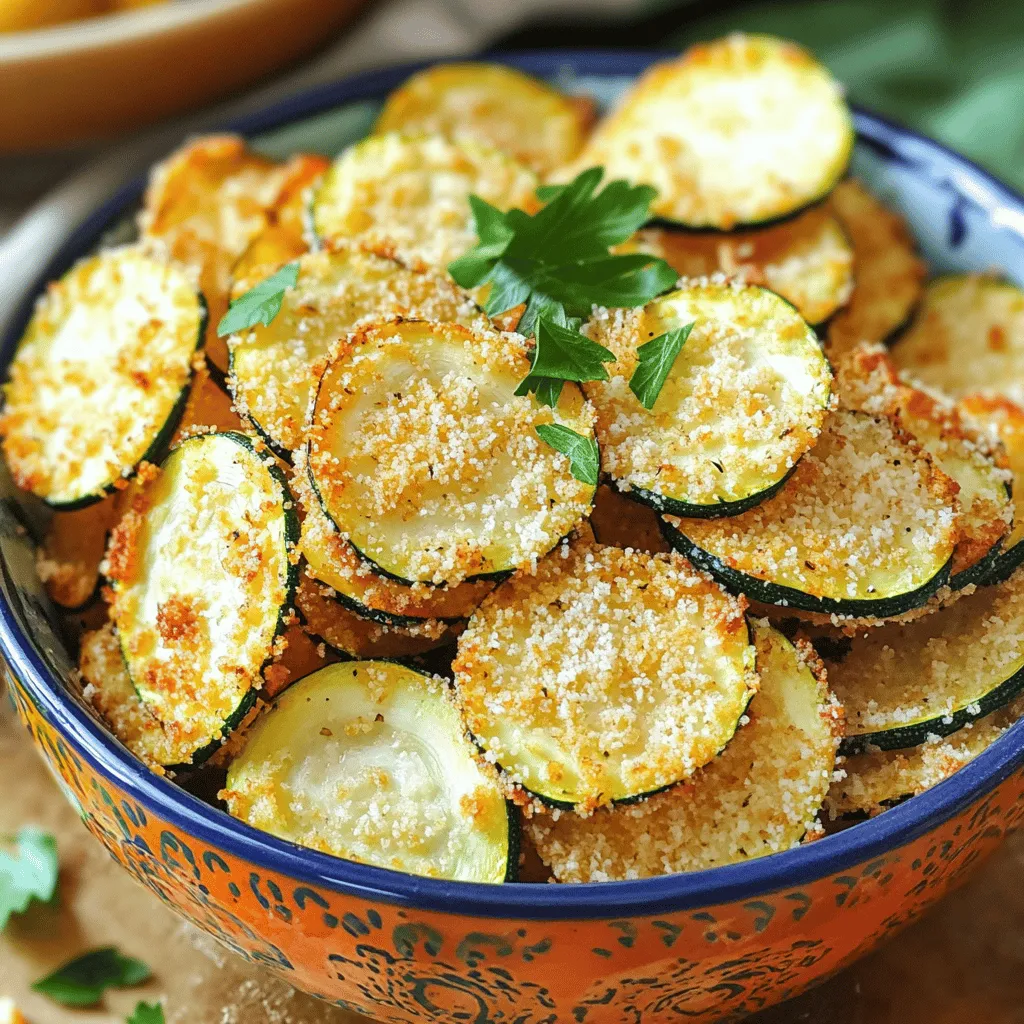
If you’re looking for a fun and easy snack, crispy air fryer zucchini chips are the answer! In just a

Older posts
Page1 Page2 … Page161 Next →
© 2025 Chelles Recipes • Built with GeneratePress

More Information

  • Home
  • Contact
  • About
  • Dinner
  • Appetizers
  • Dessert

Our Policies

  • Privacy Policy
  • GDPR Policy
  • Terms Of Use
  • Copyright Policy
  • Cookie Policy
  • Disclaimer
©2025, Chelles Recipes About Privacy Policy Back To Top