In the world of homemade pizza, convenience meets flavor with Quick and Cheesy Bisquick Pizza Dough. This recipe not only simplifies the pizza-making process but also delivers a deliciously cheesy crust that is sure to be a hit with family and friends. With just a few basic ingredients and minimal prep time, you can create a delightful pizza that caters to all taste preferences. In this article, we will explore the versatility of Bisquick as a baking mix, delve into the step-by-step process of making this easy pizza dough, and discuss a variety of topping options to elevate your pizza experience.
Understanding Bisquick and Its Versatility in Baking
Exploring the Origins of Bisquick
Bisquick is a versatile baking mix that has been a staple in American kitchens since its inception in the 1930s. Originally created by the General Mills company, the mix was designed to simplify the baking process for home cooks. The idea was simple yet revolutionary: by combining flour, baking powder, and fat, home bakers could easily whip up a variety of baked goods, from pancakes to biscuits to pizza dough, without the need for extensive measuring and ingredient preparation.
The creation of Bisquick was rooted in the growing trend of convenience foods during the early 20th century. As more families began to prioritize quick meal solutions, Bisquick quickly gained popularity, and its presence in American households became ubiquitous. Today, it remains a go-to ingredient for those seeking to save time in the kitchen while still enjoying homemade meals. The versatility of Bisquick extends beyond traditional baking; it can be used for savory dishes, sweet treats, and, of course, pizza!
The Advantages of Using Bisquick for Pizza Dough
When it comes to making pizza, Bisquick offers numerous advantages that make it an ideal choice for busy cooks.
– Time-Saving Benefits: One of the most significant perks of using Bisquick for pizza dough is the speed at which you can prepare it. Traditional pizza dough recipes often require time-consuming steps such as proofing yeast and allowing the dough to rise. With Bisquick, you can skip these steps entirely, resulting in a pizza ready to bake in a matter of minutes.
– Consistency and Reliability: When you use Bisquick, you can trust that your pizza dough will turn out consistently well. The baking mix is formulated to provide excellent results, eliminating the guesswork that often comes with baking from scratch. You can rest assured that your crust will be cheesy, flavorful, and perfectly cooked every time.
– Gluten-Free Options: For those with dietary restrictions, Bisquick offers gluten-free baking mixes that can be used to create a delightful pizza dough without compromising on taste or texture. This inclusivity allows everyone to enjoy the experience of homemade pizza.
Key Ingredients for Quick and Cheesy Bisquick Pizza Dough
Overview of Essential Ingredients
Creating a delicious Quick and Cheesy Bisquick Pizza Dough requires just a few essential ingredients, all of which contribute to the overall flavor and texture of the crust.
– Bisquick Baking Mix: The star of the show, Bisquick baking mix is a combination of flour, leavening agents, and fat. It serves as the foundation for the pizza dough, providing the necessary structure and rise.
– Shredded Mozzarella Cheese: To achieve that cheesy goodness that pizza lovers crave, shredded mozzarella cheese is a key ingredient. Not only does it add flavor, but it also contributes to the dough’s texture, making it stretchier and more enjoyable to eat.
– Milk: Milk is used to hydrate the dough and create the right consistency. It also enhances the flavor of the crust, making it richer and more satisfying.
– Seasonings: A blend of oregano, garlic powder, salt, and black pepper elevates the flavor profile of the pizza dough. These seasonings add depth and ensure that each bite is bursting with taste.
– Options for Greasing: While preparing your pizza dough, you’ll need to grease your baking surface. Options include olive oil or butter, both of which will contribute to a beautiful, golden crust.
Understanding the Choice of Toppings
The beauty of making your own pizza lies in the freedom to customize it to your liking. Here are some popular topping options to consider:
– Classic Toppings: For a traditional pizza experience, consider classic toppings such as pepperoni, mushrooms, and bell peppers. These ingredients are beloved for their combination of flavors and textures.
– Vegetarian Options: If you prefer a meatless pizza, there are plenty of delicious vegetarian options. Spinach, artichokes, and olives are excellent choices that add freshness and complexity to your pizza.
– Gourmet Toppings: For those looking to elevate their pizza game, gourmet toppings like goat cheese, arugula, and prosciutto can transform your dish into a culinary masterpiece. These ingredients offer unique flavors that will impress even the most discerning palates.
Step-by-Step Guide to Making Quick and Cheesy Bisquick Pizza Dough
Prepping Your Kitchen and Ingredients
Before diving into the pizza-making process, it’s essential to prepare your kitchen and gather all the necessary ingredients. Start by preheating your oven to the recommended temperature, usually around 425°F (220°C). This ensures that your pizza will bake evenly and achieve that perfect crust.
Next, measure out the Bisquick baking mix, shredded mozzarella cheese, and milk. Having everything ready will streamline the process and make it easier to follow the recipe.
Once you have your ingredients organized, gather your mixing bowls, measuring cups, and a baking sheet or pizza stone. If you’re using a baking sheet, lightly grease it with olive oil or butter to prevent sticking and promote a golden crust.
With your kitchen prepped and ingredients at hand, you’re ready to start making your Quick and Cheesy Bisquick Pizza Dough.
Stay tuned for the next steps, where we will guide you through the simple process of mixing and baking your pizza dough to perfection!
Essential Kitchen Tools and Equipment Needed
Before diving into the delightful process of making your Quick and Cheesy Bisquick Pizza, it’s crucial to gather the essential kitchen tools and equipment that will make your cooking experience smooth and enjoyable. Here’s what you’ll need:
1. Mixing Bowls: A large mixing bowl for combining your dry and wet ingredients and a smaller bowl for any toppings.
2. Measuring Cups and Spoons: Accurate measurements are key to achieving the perfect dough.
3. Rolling Pin: Although this recipe allows for a more rustic approach, a rolling pin can help shape your dough evenly.
4. Baking Sheet or Pizza Stone: A baking sheet lined with parchment paper or a pizza stone will provide the perfect surface for your pizza.
5. Spatula: Useful for spreading sauce and toppings evenly across the dough.
6. Oven Mitts: Safety first! Protect your hands when handling hot trays.
7. Cooling Rack: This will help your pizza cool evenly after baking, preventing a soggy bottom.
Having these tools at your disposal will enhance your cooking experience, allowing you to focus on the joy of creating your pizza masterpiece.
Importance of Measuring Ingredients Accurately
When it comes to baking, precision is paramount. Accurate measurement of your ingredients not only ensures the right consistency and flavor but also contributes to the overall success of your pizza dough. For instance, too much flour can lead to a dry, crumbly dough, while too little can result in a soggy base. Use dry measuring cups for solids and liquid measuring cups for liquids to guarantee the best results. Always level off dry ingredients with a straight edge, and use a liquid measuring cup with a spout for wet ingredients to avoid spills.
Creating the Dough: A Detailed Walkthrough
Preheating the Oven and Greasing the Pan
Start by preheating your oven to 425°F (220°C). This step is essential for ensuring your pizza cooks evenly and achieves that golden-brown crust. While the oven is heating, prepare your baking sheet or pizza stone by greasing it lightly with cooking spray or brushing it with olive oil. This will prevent your pizza from sticking and make for easy cleanup.
Mixing Dry Ingredients and Incorporating Cheese
In a large mixing bowl, combine 2 cups of Bisquick mix, 1 cup of shredded mozzarella cheese, and 1 teaspoon of Italian seasoning (optional for added flavor). The cheese not only adds richness to the dough but also contributes to a delightful texture. Mix these dry ingredients thoroughly to ensure that the cheese is evenly distributed throughout the mixture.
Gradually Adding Wet Ingredients for Optimal Texture
Next, make a well in the center of your dry ingredients and add 2/3 cup of milk and 1 tablespoon of olive oil. Stir gently with a spatula until the mixture begins to come together. Avoid over-mixing; just blend until you no longer see dry flour. This will help maintain the light and fluffy texture of the dough.
Kneading the Dough: Techniques for Best Results
Turn the dough out onto a floured surface. Lightly flour your hands and the surface to prevent sticking. Knead the dough gently for about 1-2 minutes until it is smooth and elastic. Be cautious not to over-knead, as this can result in a tough crust. The goal is to create a dough that feels soft and pliable.
Shaping the Dough: Tips for Achieving the Perfect Crust
Once kneaded, shape the dough into a ball and flatten it into a disc. Using a rolling pin or your hands, gently stretch and flatten the dough to your desired thickness, typically about 1/4 inch for a crispy crust. If you prefer a thicker crust, you can roll it out to about 1/2 inch. Transfer the shaped dough onto your prepared baking sheet or pizza stone, carefully pressing it out to fit the shape of the pan.
Pre-Baking and Topping Your Pizza
The Significance of Pre-Baking the Dough
Pre-baking the dough is a crucial step that enhances the pizza’s overall texture and prevents a soggy base. Place the dough in the preheated oven and bake for about 5-7 minutes, or until it begins to set but is not fully cooked. This initial baking phase creates a sturdy foundation for your toppings, allowing for a perfect balance of crispy edges and a chewy center.
Layering Sauces and Toppings for Flavor Enhancement
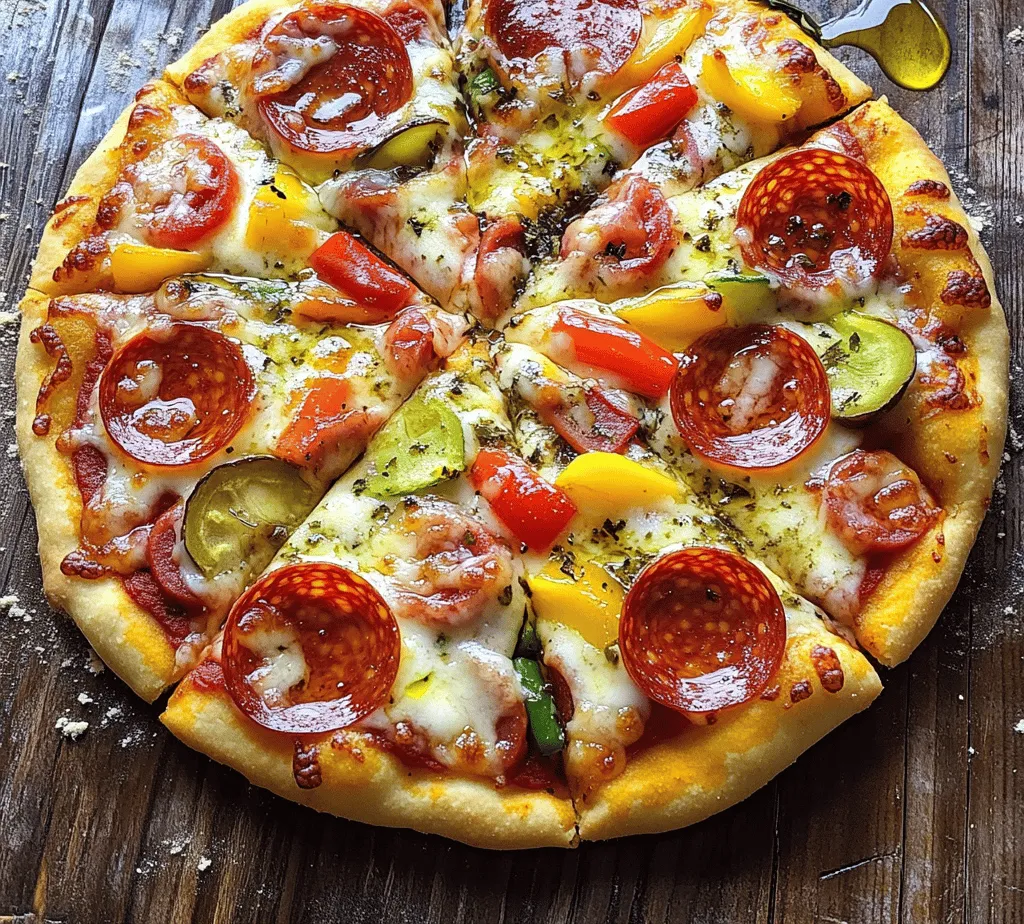
Once the dough has pre-baked, remove it from the oven and allow it to cool slightly. Spread your favorite pizza sauce evenly over the surface, leaving a small border around the edges. Next, layer on your choice of toppings. Popular options include pepperoni, bell peppers, onions, mushrooms, or even fresh basil for a burst of flavor. The key is to distribute toppings evenly to ensure every slice is packed with flavor.
Incorporating Additional Cheese for a Rich Finish
To achieve that classic cheesy goodness, sprinkle a generous amount of shredded mozzarella cheese over the top of your pizza. Feel free to get creative with other types of cheese as well—Parmesan, cheddar, or even goat cheese can elevate your pizza experience.
Final Baking: Achieving the Perfect Pizza
Signs of a Perfectly Baked Pizza
Return your pizza to the oven and bake for an additional 10-15 minutes, or until the cheese is melted and bubbly, and the crust is golden brown. Keep an eye on it during the last few minutes of baking; the aroma will be irresistible, and you want to catch it at just the right moment.
Timing and Temperature for Optimal Results
The ideal baking temperature for your Quick and Cheesy Bisquick Pizza is 425°F (220°C). Baking at this temperature allows the crust to become crispy while ensuring the cheese melts perfectly. Remember, every oven is different, so adjust the time as needed based on how your pizza is progressing.
Serving and Enjoying Your Homemade Pizza
Letting the Pizza Rest
Once your pizza is baked to perfection, remove it from the oven and let it cool for about 5 minutes. This resting period is important as it allows the cheese to set slightly, making slicing easier and preventing the toppings from sliding off.
Optimal Slicing Techniques for Presentation
Using a sharp pizza cutter or a large knife, slice your pizza into even triangles or squares, depending on your preference. For a clean cut, press down firmly rather than dragging the cutter across the pizza. Serve the slices on a platter, and don’t forget to garnish with fresh herbs or a sprinkle of Parmesan cheese for an inviting presentation.
Pairing Suggestions for Your Bisquick Pizza
Beverage Pairings: Wines, Beers, and Sodas
To complement your delicious homemade pizza, consider pairing it with a refreshing beverage. A light beer, such as a lager or pale ale, balances the cheesy richness. If you prefer wine, a medium-bodied red like Chianti or a crisp white like Pinot Grigio works wonderfully. For non-alcoholic options, a classic soda or a sparkling water with a slice of lemon can cleanse the palate beautifully.
Side Dishes that Complement Your Pizza
Enhance your pizza night with a few simple side dishes. A fresh garden salad with a tangy vinaigrette can provide a refreshing contrast to the richness of the pizza. Alternatively, garlic bread or a platter of antipasto can add variety and flavor to your meal.
Conclusion: The Joy of Homemade Quick and Cheesy Bisquick Pizza
Homemade pizza is not just a meal; it’s an experience. The Quick and Cheesy Bisquick Pizza Dough recipe offers a simple yet flavorful foundation that allows for endless creativity with toppings and flavors. Whether you’re hosting a pizza night or simply craving a quick meal, this recipe is your go-to solution. Embrace the joy of cooking and the satisfaction of enjoying a homemade pizza that is both delicious and easy to prepare. With just a few minutes of prep and a little bit of baking, you can create a delightful pizza that brings everyone together around the table. So gather your loved ones, roll up your sleeves, and relish the delightful process of making and enjoying your very own Bisquick pizza.