Introduction
Dips have become a staple at social gatherings, celebrations, and festive occasions, beloved for their versatility and ability to bring people together. From casual get-togethers to formal events, a well-crafted dip can elevate any spread, making it more enticing and enjoyable. One standout option that has captured the hearts of many is the Cheesy Roasted Garlic Dip. This delectable, creamy appetizer not only tantalizes the taste buds but also beckons guests to gather around the snack table for a flavorful experience.
The allure of Cheesy Roasted Garlic Dip lies in its rich and indulgent nature, making it perfect for sharing. Its creamy texture and robust flavor profile make it a crowd-pleaser, whether served with crispy bread, crunchy vegetables, or hearty crackers. The beauty of creating your own dips at home is that you have complete control over the ingredients, allowing you to enhance the flavor profile of any meal or gathering. Homemade dips are also devoid of preservatives and additives typically found in store-bought varieties, ensuring a fresher and more wholesome taste.
Understanding the Flavor Profile of Cheesy Roasted Garlic Dip
To appreciate the wonderful experience that is Cheesy Roasted Garlic Dip, it’s important to understand the key ingredients that contribute to its unique flavor profile. The magic starts with roasted garlic, which adds a depth of flavor that is both sweet and savory. Roasting garlic mellows its pungency while releasing its natural sugars, resulting in a rich, buttery flavor that forms the backbone of this dip.
The combination of cheeses is another critical element that elevates the dip’s taste and texture. Cream cheese provides a creamy base that ensures stability and richness, while sour cream introduces a tangy note that perfectly balances the dip’s overall flavor. Mozzarella cheese contributes a delightful stretchiness, giving the dip a satisfying texture when served hot. Meanwhile, Parmesan cheese imparts a nutty flavor that rounds out the dish, creating a symphony of tastes.
Together, these ingredients create a dip that is not only delicious but also incredibly satisfying, providing a perfect accompaniment to various snacks and dishes.
Ingredients Breakdown
To create the perfect Cheesy Roasted Garlic Dip, it’s essential to understand the significance of each ingredient that goes into this delightful recipe. Here’s a detailed breakdown of what you’ll need and why each component matters:
1. Cream Cheese: This ingredient is the foundation of the dip, providing a rich and creamy texture that acts as a canvas for the other flavors. Cream cheese also helps stabilize the dip, ensuring it holds its shape when served.
2. Sour Cream: Adding tanginess, sour cream enhances the overall flavor profile of the dip. It contributes an additional layer of creaminess, balancing the richness of the cream cheese and making the dip lighter on the palate.
3. Mozzarella Cheese: Known for its stretchiness, mozzarella cheese adds a delightful texture to the dip. Its mild flavor allows the other ingredients, particularly the roasted garlic, to shine through, creating a harmonious blend.
4. Parmesan Cheese: This cheese brings a nutty and slightly salty flavor that deepens the taste of the dip. Parmesan also adds complexity, enriching the overall dish with its unique characteristics.
5. Garlic: The star of the show, roasted garlic provides a sweet and savory punch to the dip. When roasted, garlic loses its harsh bite and develops a buttery, caramelized flavor that elevates the entire dish.
6. Olive Oil: A drizzle of olive oil adds moisture and enhances the flavor profile of the dip. It also aids in the roasting process of the garlic, ensuring it becomes tender and delicious.
7. Dried Thyme: This herb complements the roasted garlic beautifully, adding a fragrant note that brightens the dip. Dried thyme infuses the mixture with subtle earthy flavors, enhancing the overall taste.
8. Garlic Powder: While roasted garlic is the primary garlic component, garlic powder intensifies the garlic flavor throughout the dip. This additional layer of garlic ensures a robust flavor that garlic lovers will appreciate.
9. Salt and Pepper: Essential seasonings, salt and pepper provide balance to the dip. They enhance the natural flavors of the ingredients and help create a well-rounded taste experience.
10. Fresh Parsley: Used as a garnish, fresh parsley adds a pop of color and a refreshing note to the dip. It also serves as a visual appeal, making the dish look even more inviting.
Step-by-Step Guide to Making Cheesy Roasted Garlic Dip
Preparation Phase
Before diving into the cooking process, it’s crucial to set the stage for a successful dip-making experience. Begin by preheating your oven to 400°F (200°C). This temperature is ideal for roasting the garlic, ensuring it becomes perfectly tender and flavorful. While the oven heats up, gather your baking materials, including a small baking dish or oven-safe skillet for roasting the garlic and mixing the dip.
It’s important to use fresh ingredients for optimal flavor. Fresh garlic, high-quality cheeses, and fresh herbs will significantly enhance the overall taste of the dip, making it a memorable addition to your gathering. With everything in place, you’re ready to start the delicious journey of creating Cheesy Roasted Garlic Dip.
Roasting the Garlic
Roasting garlic is a simple yet transformative process that brings out its sweetness and mellows its harshness. To begin, take a whole head of garlic and slice off the top quarter, exposing the individual cloves. Drizzle a bit of olive oil over the cut surface to ensure the garlic roasts evenly and becomes tender. Wrap the garlic head in aluminum foil to create a sealed pouch, which helps trap steam and moisture.
Place the wrapped garlic in your preheated oven and roast for about 30-35 minutes, or until the cloves are soft and golden brown. The fragrant aroma of roasted garlic will fill your kitchen, signaling that your dip is on its way to greatness. Once roasted, allow the garlic to cool slightly before squeezing the soft cloves out of their skins. This roasted garlic will be the star ingredient in your Cheesy Roasted Garlic Dip, contributing its deep, rich flavor.
As you embark on this culinary adventure, remember that the journey of creating this dip is as enjoyable as the final product itself. The blend of flavors, the joy of cooking, and the anticipation of sharing with friends and family all come together to make this experience truly special. In the next section, we’ll dive into mixing the dip and preparing it for serving, ensuring that your Cheesy Roasted Garlic Dip is a hit at your next gathering.
Tips on How to Know When the Garlic is Perfectly Roasted
Achieving the perfect roast on garlic is crucial for your Cheesy Roasted Garlic Dip, as it enhances the overall flavor profile of the dish. Here are several tips to determine when your garlic is perfectly roasted:
1. Color: Look for a golden brown color on the outer layers of the garlic cloves. This indicates that the sugars have caramelized, imparting a sweet, rich flavor.
2. Texture: The cloves should feel soft when gently pressed. You can also check by squeezing a clove; it should easily pop out of its skin.
3. Aroma: As garlic roasts, it releases a sweet, nutty aroma. If your kitchen starts to smell heavenly, the garlic is likely nearing perfection.
4. Timing: Generally, roasting garlic at 400°F (200°C) takes about 30-40 minutes. However, keep an eye on it during the last 10 minutes to avoid burning.
Mixing the Dip
Once the garlic has been roasted to perfection, it’s time to mix the dip. The technique you use here can significantly impact the final texture and flavor.
Step-by-Step Instructions on Combining Ingredients
1. Prepare Ingredients: Gather the roasted garlic cloves, softened cream cheese, sour cream, grated Parmesan cheese, shredded mozzarella, and any seasonings you wish to add, such as salt, pepper, or herbs.
2. Blend the Roasted Garlic: Using a fork, mash the roasted garlic cloves in a bowl until they reach a smooth consistency. This step ensures that the garlic flavor is evenly distributed throughout the dip.
3. Combine Creamy Ingredients: In a large mixing bowl, add the softened cream cheese and sour cream. Use an electric mixer or a whisk to blend these ingredients until smooth.
4. Add Cheese and Garlic: Gradually mix in the mashed roasted garlic, Parmesan cheese, and shredded mozzarella. Continue to mix until everything is well combined. The mixture should be creamy with a few chunks of garlic for texture.
5. Season to Taste: Taste the mixture and adjust the seasoning with salt, pepper, or any additional herbs you prefer.
Importance of Blending Techniques for Achieving the Desired Texture
The blending technique plays a crucial role in the final texture of your dip. A few tips to keep in mind:
– Avoid Overmixing: While you want a smooth dip, overmixing can lead to a grainy texture. Aim for a balance where the dip is creamy but still has some body to it.
– Use a Food Processor: If you prefer an ultra-smooth dip, consider using a food processor. This method ensures that all ingredients are thoroughly blended, giving you a silky texture.
– Chunky vs. Smooth: If you enjoy a bit more texture, reserve some of the roasted garlic cloves to fold into the dip after mixing. This will create a delightful contrast between the creamy base and the chunky garlic bits.
Baking the Dip
Now that your dip is mixed, it’s time to bake it, which enhances the flavors and melds the ingredients together beautifully.
Instructions on Transferring the Mixture to a Baking Dish
1. Choose the Right Dish: Select a baking dish that allows for even cooking. A shallow dish works best as it maximizes surface area, helping the dip to heat evenly.
2. Transfer the Mixture: Carefully spoon the garlic dip mixture into the baking dish, spreading it evenly to ensure consistent cooking.
How to Achieve the Perfect Baked Consistency: Timing and Temperature
1. Preheat Oven: Preheat your oven to 375°F (190°C). This temperature allows the cheeses to melt and develop a golden crust without overcooking.
2. Baking Time: Bake the dip for about 25-30 minutes. Keep an eye on it during the last few minutes to prevent burning.
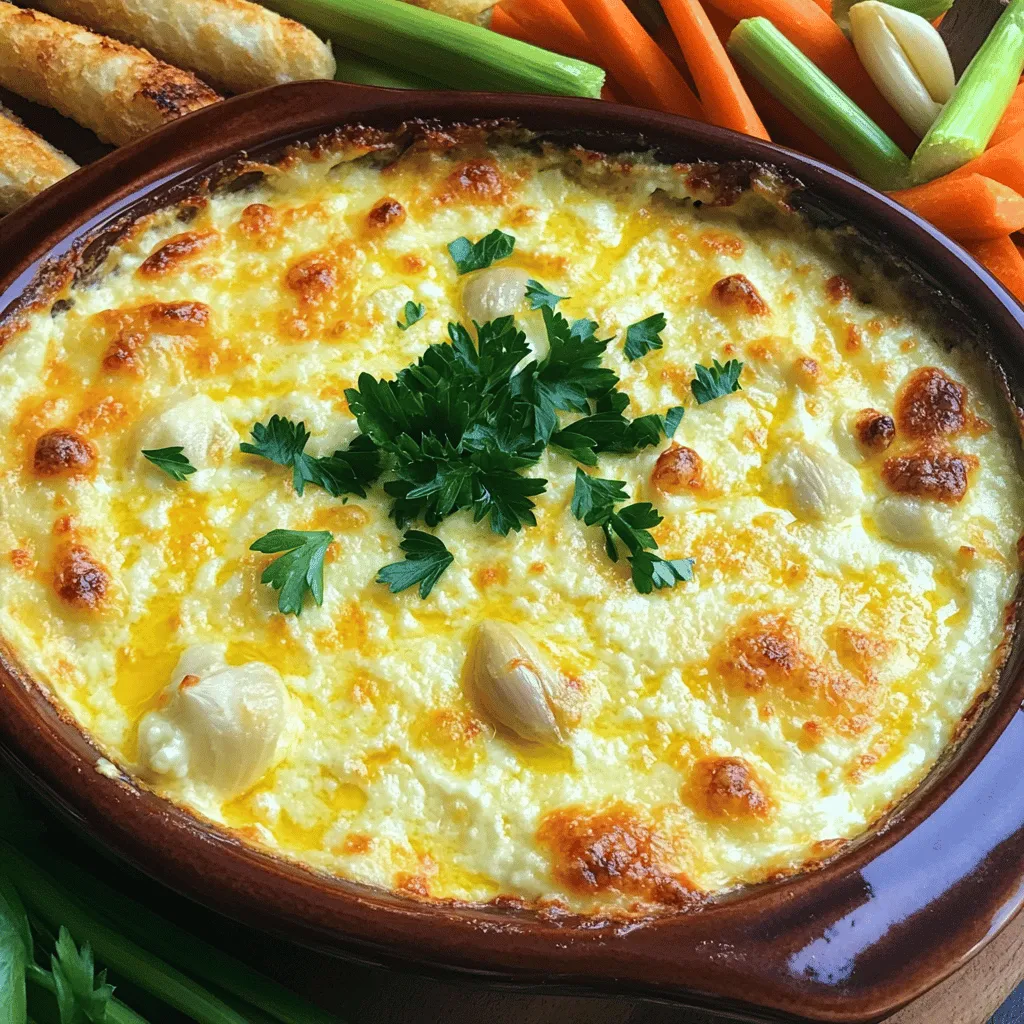
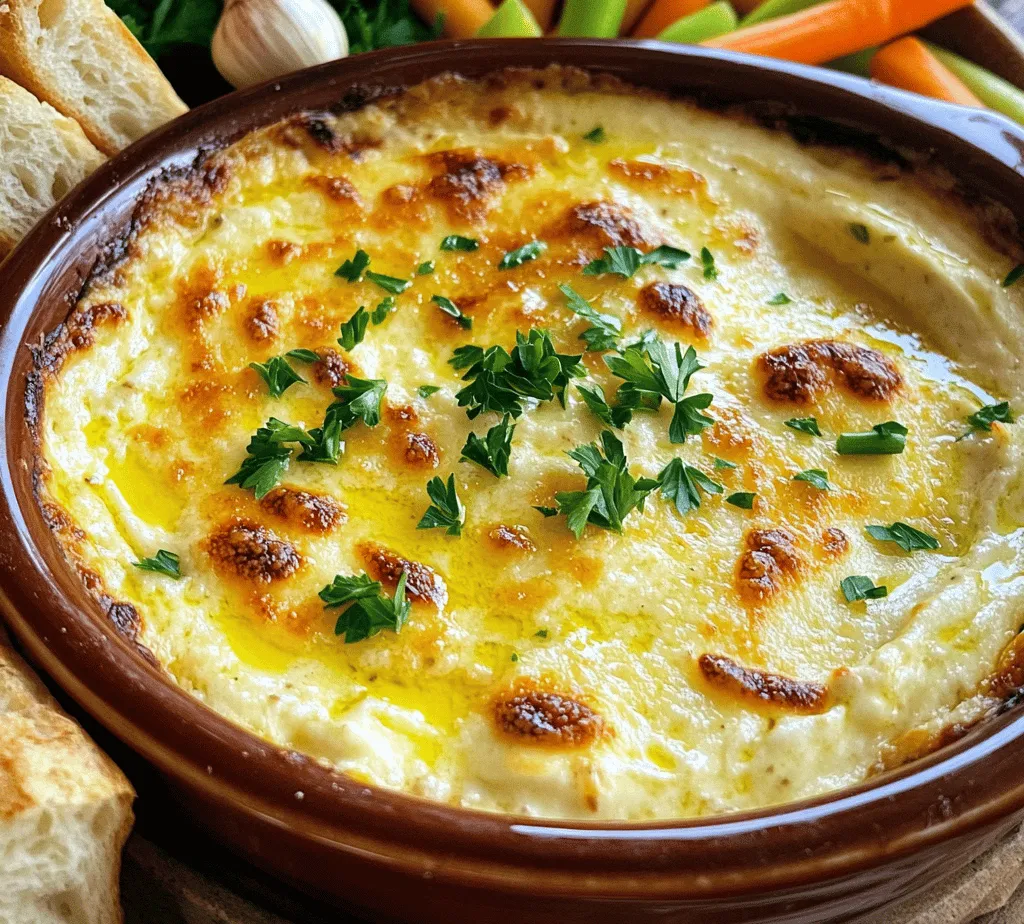
3. Visual Cues for Knowing When the Dip is Ready: The dip is done when the edges are bubbling, and the top is golden brown. If you want an extra crispy top, you can broil it for an additional 2-3 minutes, but watch closely to avoid burning.
Serving Suggestions for Cheesy Roasted Garlic Dip
The way you serve your Cheesy Roasted Garlic Dip can elevate the entire experience. Here are some recommended accompaniments:
– Breadsticks: Warm, soft breadsticks are perfect for dipping. Their texture complements the creamy dip beautifully.
– Pita Chips: Crunchy pita chips add a delightful contrast, making each bite satisfying.
– Fresh Vegetable Sticks: Carrot, celery, and cucumber sticks offer a refreshing crunch that balances the richness of the dip.
Importance of Textures: Crunchy vs. Creamy
The combination of textures is key to a memorable dipping experience. Pairing the creamy dip with crunchy sides not only enhances the taste but also keeps each bite interesting. The interplay between creamy and crunchy enriches the overall flavor profile and makes for a more enjoyable tasting experience.
Presentation Tips
How you present your dip can make a significant impact, especially when hosting gatherings. Consider these creative ways to serve the dip:
1. Serving in Individual Portions: Use small ramekins or bowls for individual servings. This adds a personal touch and makes it easy for guests to help themselves.
2. Garnish with Fresh Parsley: A sprinkle of fresh parsley not only adds a pop of color but also a hint of freshness that enhances the overall dish.
3. Create a Dipping Platter: Arrange assorted dippers like breadsticks, pita chips, and vegetable sticks around the dip. This visually appealing presentation invites guests to dive in.
4. Themed Serving Dishes: Use seasonal or themed platters to align with your event. For example, a rustic wooden board can create a cozy, inviting atmosphere.
Nutritional Information Breakdown
Understanding the nutritional profile of your Cheesy Roasted Garlic Dip is essential for those who are health-conscious yet want to indulge.
1. Overview of the Nutritional Profile: This dip combines dairy and garlic, offering a good balance of protein, fats, and carbohydrates. The dip is rich in calcium from the cheese and provides beneficial compounds found in garlic.
2. Discussion on Portion Control and Serving Sizes: To enjoy this dip without overindulgence, consider serving sizes. A typical serving is about ¼ cup, which allows you to savor the flavors while managing calorie intake.
3. Highlighting the Balance Between Indulgence and Moderation: While the dip is rich and creamy, incorporating fresh vegetables as dippers can help balance indulgence with healthier choices.
Why Homemade Dips Are Better Than Store-Bought
Homemade dips, like this Cheesy Roasted Garlic Dip, come with several advantages over store-bought varieties:
1. Control Over Ingredients and Flavors: When you make your dip at home, you control every ingredient. You can opt for fresher garlic, higher-quality cheeses, and avoid preservatives or artificial flavors found in many store-bought options.
2. Customization: You can adjust the recipe to fit your taste preferences. Want it spicier? Add more garlic or a kick of hot sauce. Prefer a creamier texture? Increase the cream cheese. The possibilities are endless.
3. The Joy of Creating and Sharing Homemade Food: There’s something special about creating food from scratch and sharing it with loved ones. The pride in serving a homemade dish can enhance the dining experience, making gatherings more memorable.
Conclusion
Indulging in Cheesy Roasted Garlic Dip is a delightful experience that brings people together. Its creamy texture, rich flavor, and versatility make it a perfect addition to any gathering. Whether you’re hosting a party or enjoying a cozy night in, this dip is sure to impress.
We encourage you to try making this dip for your next gathering. It’s a simple yet impressive dish that will have your guests raving. Remember, sharing delicious food experiences with loved ones is what makes cooking worthwhile. So gather your ingredients, follow the steps, and enjoy the process of creating something truly delightful. Your friends and family will thank you for it!