Are you ready for a snack that will make your taste buds dance? These delicious cheesy garlic bombs are the perfect treat for any occasion! Easy to make and packed with flavor, they are sure to impress your friends and family. In this post, I’ll share how to whip up these tasty bites from scratch. Get ready to transform your snack game with this mouthwatering recipe!
What Are Delicious Cheesy Garlic Bombs?
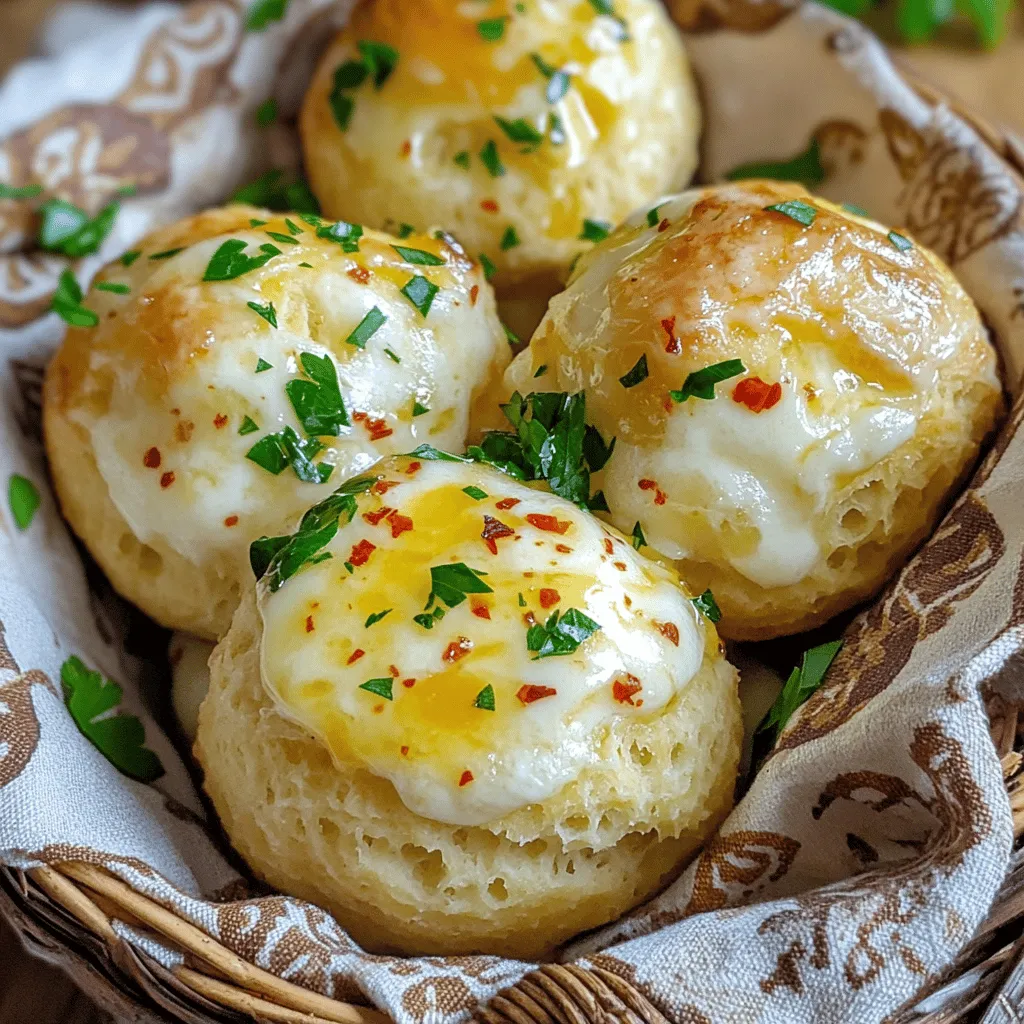
Delicious cheesy garlic bombs are bite-sized snacks that are full of flavor. They combine warm, gooey cheese with a buttery garlic coating. Each bite offers a mix of comfort and craveability. These bombs are perfect for parties, game nights, or just a cozy night at home.
How are cheesy garlic bombs made?
To make cheesy garlic bombs, you start with refrigerated biscuit dough. This dough is easy to work with and puffs up nicely when baked. First, flatten each biscuit. Then, place a spoonful of mozzarella cheese inside. Seal the biscuit around the cheese to form a ball. After that, you dip each ball in garlic butter before rolling it in Parmesan cheese. Finally, bake until golden and delicious!
What ingredients are necessary for this recipe?
You will need just a few simple ingredients. Grab a package of refrigerated biscuit dough, mozzarella cheese, and butter. You will also need garlic, dried parsley, oregano, and red pepper flakes if you like some heat. Don’t forget salt and grated Parmesan cheese for that extra kick. These ingredients work together to create an amazing flavor.
What makes garlic bombs a crowd-pleaser?
Garlic bombs are a crowd-pleaser because they are warm, cheesy, and full of flavor. They appeal to both kids and adults. The buttery garlic coating adds a rich taste that everyone loves. Plus, they are easy to eat with your hands, making them perfect for gatherings. Each bite brings gooey cheese and a burst of garlic, making them hard to resist.
How Do You Prepare to Make Cheesy Garlic Bombs?
Before you start making cheesy garlic bombs, gather your ingredients. You will need biscuit dough, mozzarella cheese, and some tasty spices.
What steps should you take before starting?
First, preheat your oven to 375°F (190°C). This helps the bombs cook evenly. Next, take out a baking sheet. You can grease it or line it with parchment paper. This step is key for easy cleanup.
How do you prepare the garlic butter mixture?
In a small bowl, mix melted butter with minced garlic, parsley, oregano, and salt. If you like a little heat, add red pepper flakes. This mix gives the bombs their rich flavor. Make sure to set this aside for later.
What type of baking sheet works best?
A standard baking sheet works well. It gives enough space for the cheesy garlic bombs. If you want a crispier bottom, use a metal sheet instead of a glass one. Glass can trap heat and may not brown the bottoms nicely.Enjoy crafting these cheesy snacks!
What Are the Step-by-Step Instructions for Making Cheesy Garlic Bombs?
Making cheesy garlic bombs is easy and fun. Here are the steps you need to follow.
How do you shape and fill the dough?
Start by preheating your oven to 375°F (190°C). Then, grease a baking sheet or use parchment paper. Open the package of refrigerated biscuit dough. Separate it into individual biscuits. Flatten each one into a circle with your hands or a rolling pin. In the center of each biscuit, place about 1 tablespoon of shredded mozzarella cheese. Gather the edges of the biscuit around the cheese. Pinch them to seal tightly, making a ball. It’s important to ensure the cheese is fully enclosed.
What is the best method for coating the garlic bombs?
Next, mix melted butter, minced garlic, parsley, oregano, red pepper flakes, and salt in a bowl. This will be your garlic butter mixture. Dip each cheese-filled biscuit ball into this mixture. Make sure each ball gets well-coated. After that, roll the balls in grated Parmesan cheese. This adds a nice crust and flavor. Place them seam side down on your baking sheet.
How do you bake them for optimal results?
Now it’s time to bake! Place the baking sheet in your preheated oven. Bake for 15 to 20 minutes. Look for a golden-brown color on top. Once they are ready, take them out. Brush any leftover garlic butter on top for extra flavor. Serve warm and get ready to enjoy these cheesy garlic bites.
What Variations Can Be Made to the Garlic Bombs?
You can have a lot of fun with garlic bomb variations. Think about adding different cheeses. Cheddar brings a sharp taste, while cream cheese makes it creamy. You can even try pepper jack for a spicy kick. Each cheese-filled bread pleasure can have its own unique twist!
For popular flavor variations, consider adding cooked bacon or ham. These will give a savory touch. You might also mix in some sun-dried tomatoes for a sweet and tangy option. If you love heat, toss in jalapeños or spicy sausage. The choices are endless!
When it comes to customizing the cheese fillings, you can use a blend of cheeses. Mixing mozzarella with gouda gives a rich flavor. You could even stuff them with feta for a Mediterranean flair. Just remember to keep the cheese soft so it melts inside.
Adding herbs and spices can make your garlic bombs even better. Fresh basil or thyme can add a fragrant note. For a zesty kick, try adding lemon zest or citrus peel. A sprinkle of Italian seasoning will make it taste like Italy in each bite. These small changes can turn a basic garlic lovers recipe into a gourmet treat.Enjoy experimenting with your garlic bombs!
What Are Some Serving Suggestions for Cheesy Garlic Bombs?
Cheesy garlic bombs are great for any gathering. You can serve them as a fun appetizer for game night or as a quick snack. Place them in a large bowl or basket. This makes it easy for guests to grab and enjoy.
For dipping, marinara sauce is a classic choice. Its rich flavor pairs well with the garlic and cheese. You can also try ranch dressing for a cool contrast. If you like a kick, spicy aioli adds a nice touch.
When it comes to drinks, think light and refreshing. A cold soda or iced tea works well. If you want something stronger, a light beer or white wine complements the flavors nicely.
These cheesy garlic bombs are not just tasty; they also bring a fun vibe to your table. So, gather your friends and enjoy this delightful treat together.
How Do You Store and Reheat Leftover Cheesy Garlic Bombs?
Leftover cheesy garlic bombs are a treat. To keep them fresh, follow these steps.
How do you properly store leftover garlic bombs?
First, let the garlic bombs cool down. Place them in an airtight container. Make sure they are not touching each other. This helps prevent sticking. You can also wrap them in plastic wrap. Store them in the fridge for up to three days. For longer storage, put them in the freezer. They can last up to two months in the freezer.
What is the best way to reheat them for freshness?
To reheat, you want to keep them nice and warm. The oven is best for this. Preheat your oven to 350°F (175°C). Place the garlic bombs on a baking sheet. Heat them for about 10-15 minutes. This keeps the cheese gooey and the outside crispy. If you’re in a hurry, use the microwave. Heat them for about 30 seconds. However, the oven gives better results.
How long do they last in the fridge or freezer?
In the fridge, cheesy garlic bombs last for three days. In the freezer, they can stay fresh for two months. Just remember to store them well. This way, you can enjoy quick and easy snacks whenever you want. If you follow this plan, you’ll always have delicious cheesy garlic bombs ready to eat!
In this post, we explored how to make mouth-watering cheesy garlic bombs. We discussed essential ingredients, preparation steps, and baking tips for perfect results. You can even customize these treats with different fillings and flavors. Remember to serve them fresh with tasty dips for the best experience. These bombs are a hit at any gathering. Proper storage and reheating keep leftovers tasty. Enjoy making and sharing these fun snacks!
