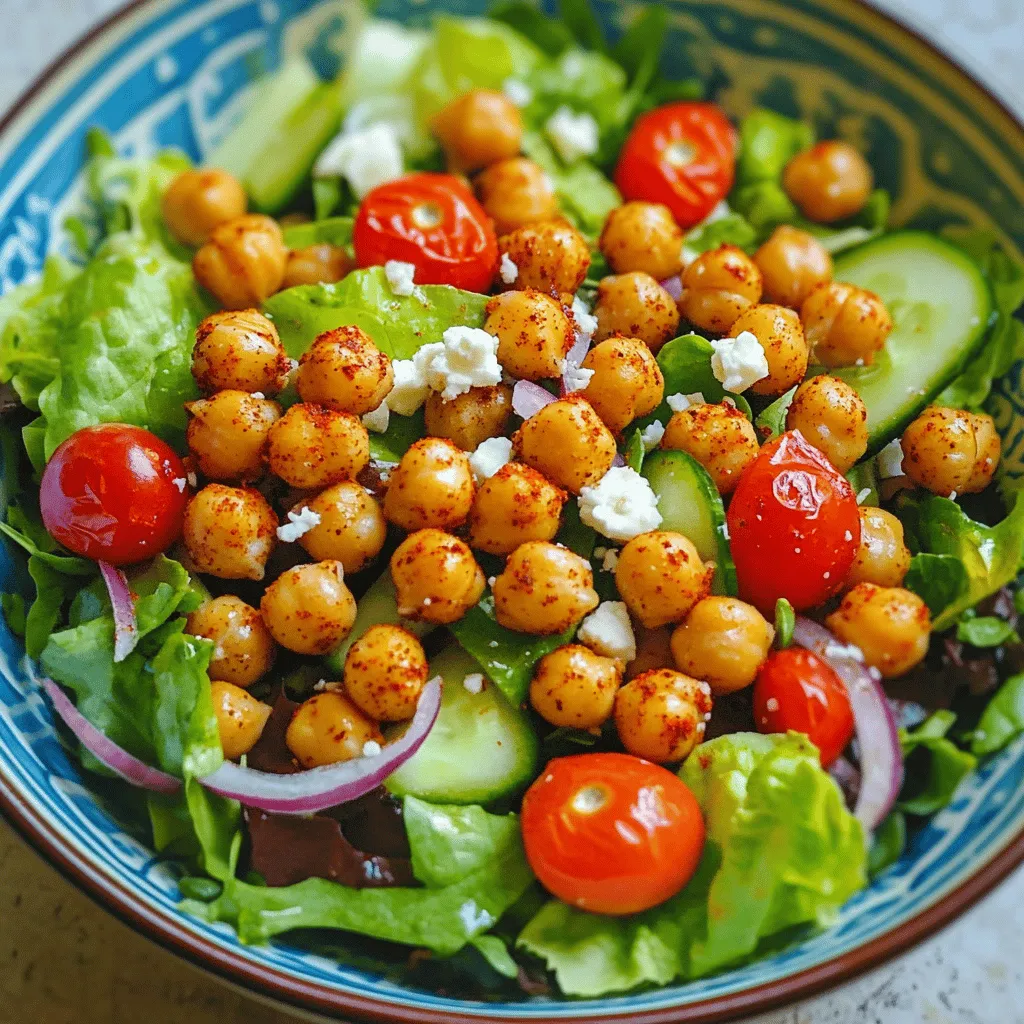
Looking for a burst of flavor in a healthy dish? Try my Crispy Chickpea Salad! This vibrant salad combines perfectly seasoned chickpeas with fresh greens and veggies, bringing together crunch and zest in every bite. Not only is it tasty, but it also packs a nutritional punch. Join me as I guide you through the simple steps to create this delightful meal that’s sure to impress!
Ingredients
Essential Ingredients for Crispy Chickpea Salad
– 1 can (15 oz) chickpeas, drained and rinsed
– 2 tablespoons olive oil
– 1 teaspoon smoked paprika
– 1/2 teaspoon garlic powder
– Salt and black pepper to taste
– 4 cups mixed salad greens (arugula, spinach, and romaine)
– 1 cup cherry tomatoes, halved
– 1 cucumber, diced
– 1/4 red onion, thinly sliced
– 1/4 cup feta cheese, crumbled (optional)
Salad Dressing Ingredients
– 2 tablespoons lemon juice
– 1 tablespoon balsamic vinegar
This salad is a great way to enjoy healthy and tasty food. Start with chickpeas. They are full of protein and fiber. I love using canned chickpeas for convenience. Just drain and rinse them well. This cuts down on sodium and helps get them crispy.
Next, we use olive oil. It adds healthy fats and a nice flavor. Smoked paprika gives the chickpeas a warm, smoky taste. Garlic powder adds depth, while salt and pepper bring it all together.
For the salad, mixed greens make a great base. I often use arugula, spinach, and romaine. They add color and crunch. Cherry tomatoes bring sweetness, while cucumber adds a refreshing bite. A little red onion gives a nice zing. If you want to, sprinkle feta cheese on top for creaminess.
For the dressing, lemon juice adds brightness. Balsamic vinegar gives a touch of sweetness and tang. This simple mix elevates the salad’s taste.
Want the full details on how to make this dish?
Step-by-Step Instructions
Preparing the Crispy Chickpeas
First, preheat your oven to 400°F (200°C). This step helps the chickpeas get nice and crunchy. Next, take a can of chickpeas, drain and rinse them well. Spread the chickpeas on a baking sheet in a single layer. Pat them dry with a paper towel. This is key for crispiness!
Now, let’s season the chickpeas. Drizzle 2 tablespoons of olive oil over them. Then, sprinkle on 1 teaspoon of smoked paprika, 1/2 teaspoon of garlic powder, and add salt and black pepper to taste. Toss the chickpeas to coat them evenly. Roast them for 25-30 minutes, shaking the pan halfway through. You want them golden and crispy.
Assembling the Salad
While the chickpeas roast, it’s time to make the salad. In a large bowl, mix 4 cups of your choice of salad greens. I like a mix of arugula, spinach, and romaine. Add 1 cup of halved cherry tomatoes, 1 diced cucumber, and 1/4 of a thinly sliced red onion. This mix brings great colors and flavors!
For the dressing, whisk together 2 tablespoons of lemon juice and 1 tablespoon of balsamic vinegar in a small bowl. Drizzle this over the salad and toss to combine.
Final Steps
Once the chickpeas are crispy and golden, let them cool slightly. Then, add them to the salad. If you want to, sprinkle 1/4 cup of crumbled feta cheese on top. Toss the salad gently to mix everything. Serve it right away for the best texture and flavor! Enjoy every bite of your crispy chickpea salad!
Tips & Tricks
Tips for Perfectly Crispy Chickpeas
To make great crispy chickpeas, drying them is key. After rinsing, use a paper towel to pat them dry. This step helps them crisp up in the oven. For roasting, spread them out in a single layer on a baking sheet. This ensures even cooking. Bake at 400°F for 25-30 minutes. Shake the pan halfway through to get all sides crispy.
Salad Preparation Tips
To keep your salad fresh, wash all greens and veggies just before serving. Store prepped ingredients separately if you make it ahead. This way, they won’t wilt. Serve your salad right after mixing. This keeps the texture perfect and the chickpeas crunchy.
Flavor Enhancements
Add a twist to your salad with herbs and spices. Fresh basil or parsley can brighten the dish. For a kick, try adding crushed red pepper flakes. Toppings like avocado or nuts can add texture. You can also sprinkle some sunflower seeds for extra crunch. These small changes can elevate your Crispy Chickpea Salad even more.

Variations
Additional Protein Options
You can boost the protein in this salad easily. Grilled chicken adds a nice taste and texture. Simply cook the chicken on the grill and slice it. It pairs well with the chickpeas. Tofu is a great option, too. Just press the tofu, cube it, and sauté it until golden. This makes it crispy and adds a fun bite. If you want a vegetarian option, consider using tempeh. It has a nutty flavor that complements the salad well.
Seasonal Adaptations
Using seasonal veggies makes this salad even better. In spring, try adding asparagus or peas for freshness. Summer calls for sweet corn and bell peppers. Fall is perfect for roasted squash or beets. In winter, consider adding hearty greens like kale. You can also switch up the dressing. Try adding honey or mustard to your lemon and vinegar mix. This gives a new twist to the flavor.
Special Dietary Modifications
If you want a vegan version, skip the feta cheese. You can add avocado for creaminess instead. It gives a rich feel without dairy. For gluten-free diets, this salad is already safe. Just make sure your dressing has no gluten ingredients. You can also add quinoa for a gluten-free grain option. This keeps the meal filling and healthy.
Storage Info
Storing Leftovers
To keep your crispy chickpea salad fresh, you need a good plan. First, store the salad and chickpeas separately. This step keeps the chickpeas crunchy. Use an airtight container for the salad greens and veggies. A glass container works best because it seals well. If you have feta, keep it in its own small container. This way, it stays fresh and does not mix with the salad.
Reheating Crispy Chickpeas
When you want to enjoy your crispy chickpeas again, reheating is key. Preheat your oven to 375°F (190°C). Spread the chickpeas on a baking sheet. Bake for about 5 to 10 minutes. Watch them closely to maintain their crunchiness. Avoid using the microwave, as it will make them soft.
Suggested Storage Duration
For the best taste, eat the salad within two days. The salad greens will start to wilt after that. Store the chickpeas for up to one week in the fridge. They will stay crispy if stored correctly. If you want to keep them longer, freeze them. Just remember to thaw before reheating.
FAQs
How to make chickpeas crispy without oven?
You can make chickpeas crispy on the stove. Use a skillet over medium heat. Add olive oil, then add rinsed chickpeas. Stir them often for about 10-15 minutes. They will become crunchy and golden. This method works well if you don’t have an oven.
Can I prepare this salad ahead of time?
Yes, you can prepare parts of the salad ahead of time. Chop the veggies and store them in the fridge. Keep the crispy chickpeas separate until you serve. This way, your salad stays fresh and crunchy.
What can I substitute for feta cheese?
If you want to skip feta cheese, try using goat cheese or a vegan cheese. You can also use avocado for creaminess. Each option adds a unique flavor to the salad.
Is this salad suitable for meal prep?
Yes, this salad is great for meal prep. Just store the ingredients separately. Keep the dressing in a jar. This keeps everything fresh. When ready to eat, combine and enjoy!
Can I use canned chickpeas for this recipe?
Absolutely! Canned chickpeas work well in this recipe. Just drain and rinse them before use. They save you time and still taste great.
This blog post shared how to make a crispy chickpea salad. We covered essential ingredients, step-by-step instructions, and tips for perfect results. You learned how to add flavor and adjust for your diet. Freshness is key, so serve right away for the best taste. Remember, this salad is easy to make and can fit any meal. Enjoy trying different variations! Your kitchen will thank you.