Are you ready to revolutionize your snacking game? Cheesy Garlic Bombs are the perfect treat for any occasion. Packed with rich flavors and melted cheese, they’re easy to make and will impress your guests. In this guide, I’ll walk you through the necessary ingredients, preparation steps, and serving tips. Let’s dive into this cheesy goodness and create a snack that’s sure to be a hit!
What Ingredients Are Needed for Cheesy Garlic Bombs?
To make cheesy garlic bombs, you need a few simple ingredients. The main items are:
– 1 can of refrigerated biscuit dough (8 count)
– 1 cup shredded mozzarella cheese
– 4 tablespoons unsalted butter, melted
– 3 cloves garlic, minced
– 1 tablespoon fresh parsley, chopped
– 1 teaspoon Italian seasoning
– ½ teaspoon salt
– ¼ teaspoon black pepper
– Marinara sauce (for dipping)
These ingredients come together to create a tasty snack. The buttery garlic flavor and gooey cheese are key.
What are the essential ingredients for this recipe?
The dough forms the base of the cheesy garlic bombs. The cheese provides a melty center. Garlic adds a strong flavor. The butter makes everything rich and golden. Fresh parsley gives a nice touch. Italian seasoning adds depth. Salt and pepper bring it all together.
Are there any substitutes for the main ingredients?
Yes, you can swap some ingredients. If you don’t have biscuit dough, use pizza dough or crescent roll dough. For cheese, try cheddar or a mix of cheeses. You can use garlic powder instead of fresh garlic. If you don’t have fresh parsley, dried parsley works too.
How can I enhance flavors with additional ingredients?
You can add more flavor by trying different spices. A pinch of red pepper flakes gives heat. Fresh basil can add a sweet taste. For a twist, mix in cooked bacon or spinach. You could also use different dipping sauces. Ranch or garlic aioli are great options.Enjoy making these cheesy garlic bombs!
How Do I Prepare Cheesy Garlic Bombs Step-by-Step?
To make cheesy garlic bombs, you follow a few simple steps. First, gather your ingredients. You will need refrigerated biscuit dough, mozzarella cheese, butter, garlic, parsley, Italian seasoning, salt, and pepper.
What steps should I follow for perfect preparation?
Start by preheating your oven to 375°F (190°C). Line a baking sheet with parchment paper. In a bowl, mix melted butter, minced garlic, parsley, Italian seasoning, salt, and pepper. Open the biscuit dough and flatten each piece on a clean surface. Place a spoonful of cheese in the center. Fold the dough over the cheese and pinch it shut. Dip each ball into the garlic butter mixture and place it on the baking sheet. Drizzle any leftover butter on top. Bake for 15-20 minutes until golden brown and bubbly.
What techniques can help achieve a desirable texture?
To get a great texture, ensure the cheese is sealed well inside the dough. A good pinch helps keep the cheese from leaking out. Soaking the dough balls in garlic butter adds flavor and moisture, making them soft inside. Baking them until golden brown gives a crispy outside while keeping the inside gooey.
How important is the order of preparation in this recipe?
The order is key for success. Mixing the garlic butter first lets the flavors blend well. Preparing the dough balls before baking ensures they cook evenly. Following the steps in order helps you avoid mess and get the best result.
What Are Some Cooking Tips for Baking Cheesy Garlic Bombs?
To bake easy garlic bombs, I focus on a few key tips to ensure they turn out perfect.
What temperature should I set my oven to?
Set your oven to 375°F (190°C). This temperature is ideal for baking the dough evenly. It helps the cheese melt nicely while giving the outside a golden color.
How long should I bake them for optimal results?
Bake the cheesy garlic bombs for 15 to 20 minutes. Watch them closely. You want the tops to be golden brown and the cheese to be bubbly. If they look golden earlier, take them out.
What can I do to prevent the dough from burning?
To prevent burning, use parchment paper on your baking sheet. This layer protects the dough from direct heat. Also, keep an eye on them near the end of the baking time. If they brown too fast, cover them with foil for the remaining time.
By following these tips, your cheesy garlic bombs will be a hit at every gathering.Enjoy every cheesy bite!
How Can I Serve and Present Cheesy Garlic Bombs?
Cheesy garlic bombs are fun to serve. They look great and taste even better. Here are some ideas to make your presentation shine.
What are some creative serving suggestions?
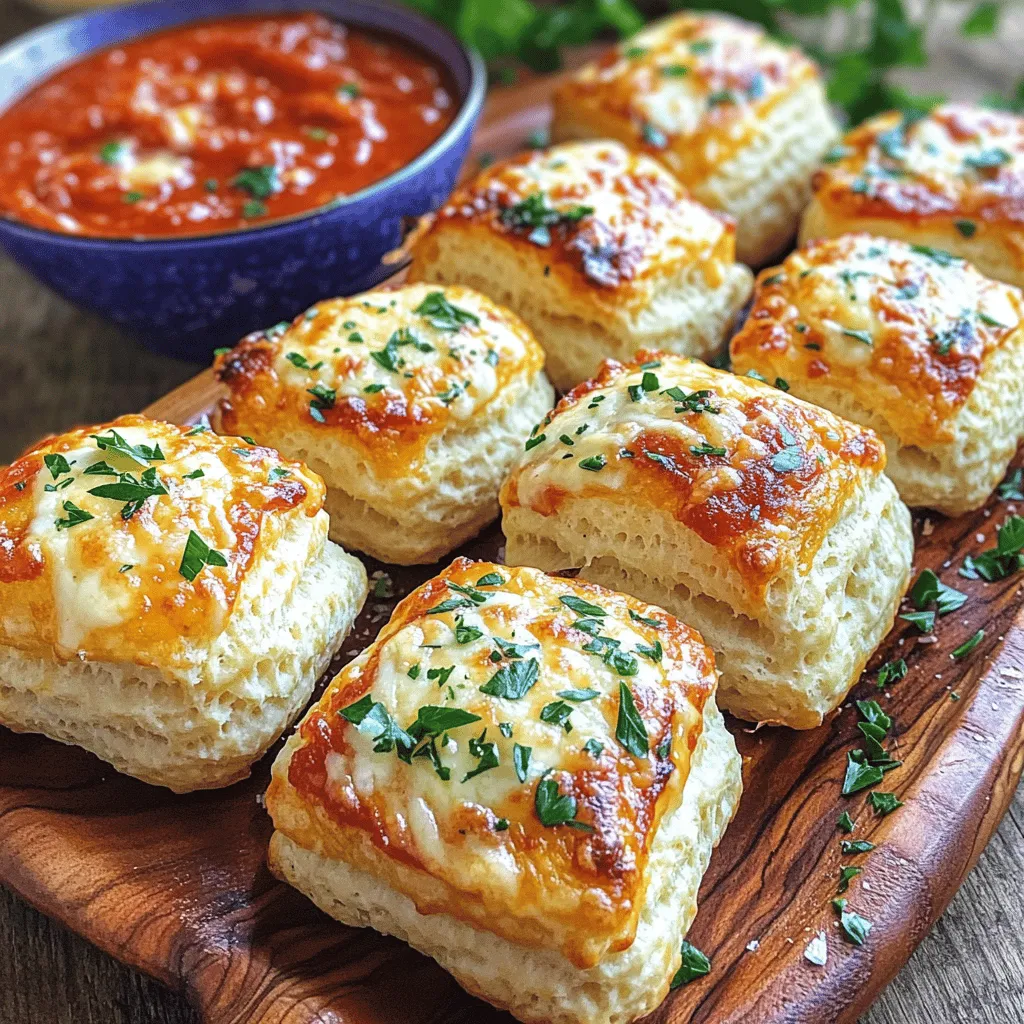
You can serve cheesy garlic bombs warm on a big platter. Stack them high for a fun look. Drizzle some melted garlic butter on top for extra flavor. Sprinkle fresh parsley on the bombs for a pop of color.
How can I arrange them for a party setting?
When arranging for a party, place the bombs in a circle on a large plate. Leave some space in the middle for a dipping sauce. This makes it easy for guests to grab a bomb. You can also use small individual plates for each guest.
What dips pair well with cheesy garlic bombs?
Marinara sauce is a classic choice. Its rich flavors balance the cheesy bites well. You can also try ranch dressing for a creamy option. Garlic aioli adds a nice twist. Each dip brings out a different taste in the bombs.
These ideas will make your cheesy garlic bombs the star of any gathering.
What Variations Can I Make to the Cheesy Garlic Bomb Recipe?
You can have fun with cheesy garlic bomb variations. Start with cheese. Yes, you can use different types of cheese. Try sharp cheddar or creamy brie. These cheeses add unique tastes. Mix mozzarella with pepper jack for a spicy kick. You can even use vegan cheese if you prefer.
Next, think about flavor combinations. Garlic pairs well with herbs like rosemary or thyme. Adding sun-dried tomatoes gives a sweet and tangy taste. You can also include crispy bacon for a savory twist. If you love heat, add jalapeños or crushed red pepper.
If you want to make these vegan or gluten-free, it is simple. Use gluten-free biscuit dough instead of regular. For a vegan option, choose plant-based butter and cheese. You can also swap the butter with olive oil. This keeps the flavor while fitting your diet.
These cheesy garlic bomb variations make the dish fun and tasty.Try experimenting with these ideas to create your perfect cheesy garlic bomb!
Why Are Cheesy Garlic Bombs a Great Snack for Gatherings?
Cheesy garlic bombs are a must-have for any gathering. Their warm, gooey center and crispy outer layer make them irresistible. Everyone loves cheese, and the garlic adds a punch of flavor. The best part? They are easy to make and even easier to share.
What makes cheesy garlic bombs a crowd-pleaser?
These bites please all ages. Kids love the cheese, while adults enjoy the garlic. They are fun to eat and can be dipped in marinara. This adds even more flavor. Plus, they are small, making them perfect for mingling. You can grab one and keep chatting.
How can they fit into different dining occasions?
Cheesy garlic bombs fit any occasion. Serve them at birthday parties, game nights, or family gatherings. They can replace chips or crackers for a fun twist. You can even use them as a side dish for pasta. Their versatility makes them a great choice.
What are some related recipes that also make great party snacks?
If you enjoy cheesy garlic bombs, try other easy party snacks. Stuffed mushrooms are a hit, filled with cheese and herbs. Spinach and cheese dip served with crusty bread is another favorite. Mini sliders can also add variety to your snack table. Each of these dishes brings its own flavor and fun to your gatherings.Enjoy making them!
Cheesy garlic bombs are fun to make and taste amazing. We discussed the key ingredients, possible substitutes, and flavor boosts. You learned step-by-step prep, tips for baking, and serving ideas. Variations let you mix it up, too!
In the end, these bites are perfect for any gathering. They are easy to make and sure to impress your guests. Enjoy experimenting and sharing these delicious snacks!