Skip to content
DisclaimerTerms Of UseGDPR PolicyCookie Policy

Chelles Recipes

  • Home
  • Drinks
  • Appetizers
  • Dinner
  • Dessert
  • About
  • Contact
  • Privacy Policy
DisclaimerTerms Of UseGDPR PolicyCookie Policy

Rosie

- 8 ounces elbow macaroni - 4 tablespoons unsalted butter - 1/4 cup all-purpose flour - 4 cups whole milk - 2 cups shredded sharp cheddar cheese - 1 cup shredded mozzarella cheese - 1 teaspoon mustard powder - 1/2 teaspoon garlic powder - 1/2 teaspoon onion powder - Salt and black pepper to taste - 1 cup breadcrumbs (for topping) - 1/4 cup grated Parmesan cheese (for topping) Choosing the right type of cheese: Use sharp cheddar for rich flavor. Mixing in mozzarella makes the dish creamy. You can also try Gruyère for a nutty taste. Importance of using whole milk: Whole milk adds creaminess. It makes the sauce thick and smooth. Skim milk will not give the same texture. How to season the pasta water: Always add salt to the boiling water. This step flavors the pasta as it cooks. It enhances the overall taste of the mac and cheese. For a detailed look at the recipe, check out the Full Recipe. To cook elbow macaroni correctly, start with a large pot. Fill it with water and add salt. The water should taste like the sea. This salting helps flavor the pasta. Bring the water to a rolling boil before adding the macaroni. Cook it according to the package instructions until it's al dente, which means it should still have a slight bite. Drain the pasta and set it aside, but don’t rinse it. Rinsing removes the starch that helps the sauce stick. To create a roux, melt the butter in the same pot over medium heat. Once it’s melted, add the flour. Stir it constantly for about two minutes. This cooks the flour and gives your sauce a nice base. Next, slowly add the whole milk while whisking. This helps avoid lumps. Keep whisking for about five to seven minutes. When the sauce thickens and coats the back of a spoon, it’s ready. Remove the pot from heat and stir in the sharp cheddar and mozzarella. Mix until the cheese is melted and smooth. Then add mustard powder, garlic powder, onion powder, salt, and pepper. Now it’s time to assemble your dish. Fold the cooked macaroni into the cheese sauce. Make sure every piece of pasta is coated. Transfer this mix into a greased 9x13-inch baking dish. For the topping, combine breadcrumbs and grated Parmesan cheese in a bowl. Sprinkle this evenly over the mac and cheese. Bake it in the preheated oven for 25 to 30 minutes. You want the top to be golden brown and bubbly. Let it cool for about five minutes before serving. This helps set the dish and makes it easier to serve. For the full recipe, check the earlier section. Adding spice can change the whole taste. Try these: - Paprika: It adds a nice smoky flavor. - Cayenne pepper: For a little heat, use sparingly. - Nutmeg: Just a pinch can bring warmth to the dish. You can also boost flavor by adding protein or veggies: - Cooked bacon: It gives a tasty crunch. - Diced tomatoes: They add freshness and color. - Spinach: It brings nutrition and a nice green touch. Two big mistakes can ruin your dish. - Overcooking the pasta: Cook it just until al dente. It will keep cooking in the oven. - Skipping the resting time: Let it sit for 5 minutes before serving. This helps it set and makes serving easier. Serving matters! Here are ways to make your dish shine: - Use individual bowls: This makes it feel special. - Garnish with parsley: A sprinkle adds color and freshness. - Drizzle extra cheese sauce: It looks great and tastes even better. These tips will make your Classic Baked Mac and Cheese look and taste amazing! If you're ready to create this dish, check the Full Recipe for all the details. {{image_2}} You can switch up the cheese in your mac and cheese for new flavors. Try gouda for a smoky taste. Monterey Jack adds a creamier texture. If you want a kick, use pepper jack cheese. For a lighter dish, swap elbow macaroni with whole wheat or chickpea pasta. These options are healthier and still delicious. Make a gluten-free version by using gluten-free pasta and flour. Many brands offer great gluten-free options that taste just as good. For a vegan alternative, use plant-based milk, like almond or oat milk. You can replace cheese with nutritional yeast for a cheesy flavor without dairy. There are also vegan cheese options available now. Add unique spices to create a fusion dish. A dash of curry powder gives a warm, spicy kick. You can also mix in some taco seasoning for a fun twist. Try regional variations, like adding crab for a coastal flair or jalapeños for a Tex-Mex kick. These ideas bring new life to your classic baked mac and cheese recipe. For a full recipe, check out the full recipe section. To keep your mac and cheese fresh, store leftovers in an airtight container. This helps keep moisture in and prevents it from drying out. Place the container in the fridge. It will last for about three to five days. When you reheat mac and cheese, add a splash of milk. This helps restore creaminess. Heat it in the microwave in short bursts. Stir it every 30 seconds to keep it smooth. You can also reheat it on the stove, adding a bit of milk as you go. If you want to save your baked mac and cheese for later, freezing is a great option. Let the dish cool completely before you freeze it. You can use a freezer-safe container or wrap it tightly in plastic wrap and then foil. This helps keep out air and prevents freezer burn. To thaw, place the mac and cheese in the fridge overnight. This gentle method ensures it thaws evenly. When you are ready to reheat, add a bit of milk to the dish. This will help bring back that creamy texture. Reheat it in the oven at 350°F (175°C) until it's hot throughout. Enjoy your creamy comfort dish whenever you crave it! For the full recipe, check out the full recipe section. Classic Baked Mac and Cheese lasts for about three to five days in the fridge. Make sure to store it in an airtight container. This helps keep it fresh and tasty. If you want the best flavor, eat it within three days. Yes, you can make this dish ahead of time. Prepare the mac and cheese, but do not bake it yet. Cover it well and store it in the fridge. When you're ready to serve, bake it straight from the fridge. You may need to add a few extra minutes to the baking time. Baked Mac and Cheese pairs well with many dishes. Try serving it with a fresh salad for crunch. Grilled chicken adds protein and flavor. You can also add steamed broccoli for a healthy touch. Barbecue ribs make a fun, hearty pairing too. If your mac and cheese turns out dry, don't worry! You can fix it easily. Add a splash of milk to the dish. Stir well until it feels creamy again. You can also bake it with more cheese on top for extra moisture and flavor. In this post, we explored how to make classic baked mac and cheese. We discussed the key ingredients, tips for cooking, and ways to enhance flavor. It's essential to pick the right cheese and season well. Following proper steps when cooking and layering helps create the best dish. Remember to store leftovers correctly to keep them fresh. You can also try fun variations to suit your taste. With these tips and tricks, you’ll create a tasty meal that everyone loves. Now, it’s time to get cooking!

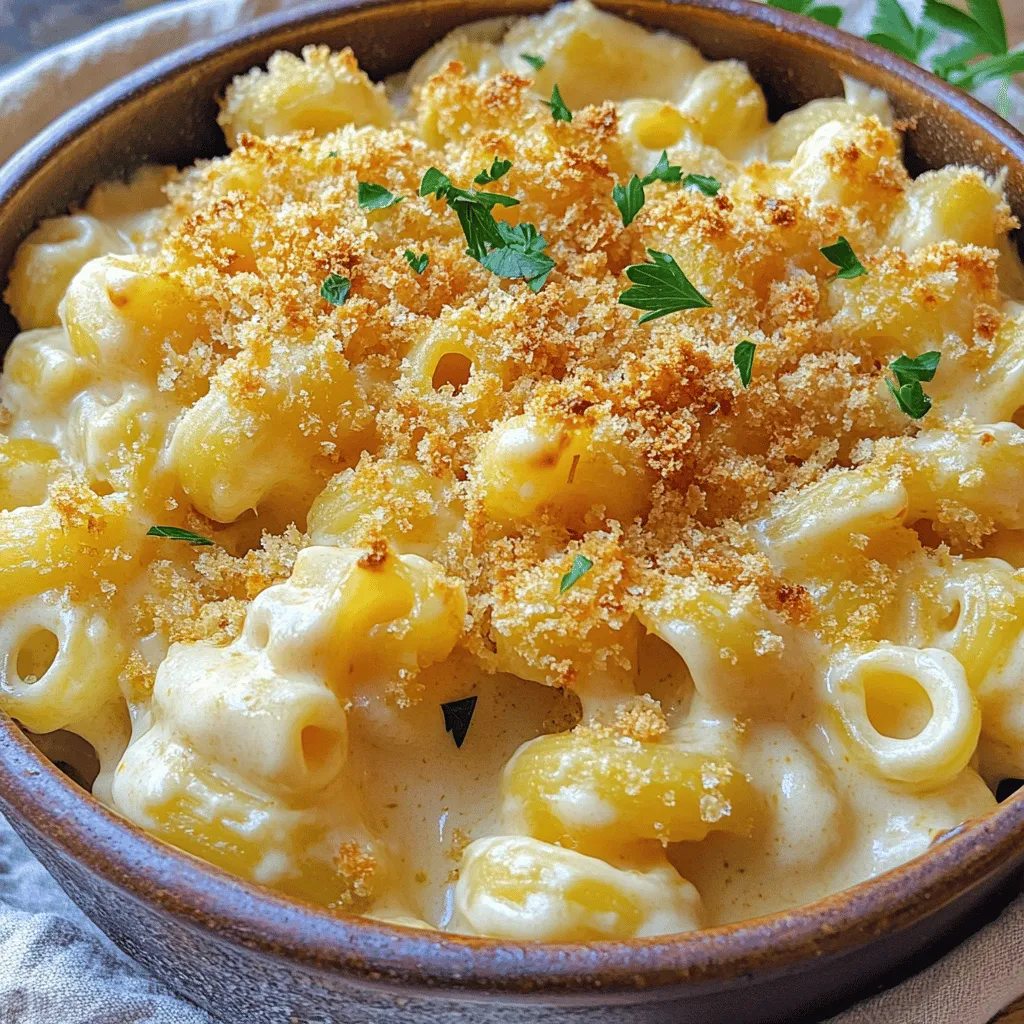
Classic Baked Mac and Cheese Creamy Comfort Dish

Are you ready to dive into the world of creamy, cheesy comfort? Classic Baked Mac and Cheese is the ultimate

- 2 cups fresh Hatch chiles, roasted, peeled, and diced - 2 cups sharp cheddar cheese, shredded - 1 cup cream cheese, softened - 1 small onion, finely chopped - 2 cloves garlic, minced The fresh Hatch chiles give this dip its unique flavor. Roasting them brings out their smoky notes. I like to use sharp cheddar for a bold taste. Cream cheese adds creaminess and richness. The onion and garlic bring a savory base that ties everything together. - 1 tablespoon olive oil - 1 teaspoon smoked paprika - 1/2 teaspoon cumin - 1/4 teaspoon cayenne pepper (optional) - Salt and pepper to taste - Fresh cilantro, chopped (for garnish) - Tortilla chips (for serving) Adding spices like smoked paprika gives depth. Cumin adds warmth, while cayenne brings heat. You can garnish with cilantro for color and freshness. Tortilla chips are a must for dipping! Fresh Hatch chiles shine in this recipe. They have a sweet, smoky taste. If you can’t find fresh ones, canned chiles work too. Just look for high-quality brands. When picking fresh chiles, choose firm ones with vibrant color. Look for ones that feel heavy for their size. Avoid any with soft spots or wrinkles. Using fresh chiles gives your queso the best flavor. Trust me, it’s worth the extra effort! To prepare fresh Hatch chiles, start by roasting them. You can use an open flame or a broiler. Roast the chiles until they are charred all over. This process brings out their rich flavor. After roasting, place the chiles in a bowl and cover it with plastic wrap. Let them steam for about 10 minutes. This makes peeling easier. Once they cool, peel off the charred skin, remove the seeds, and dice the chiles. If fresh chiles are not available, you can use canned Hatch chiles. They save time and still add great flavor. Next, heat a medium saucepan over medium heat and add one tablespoon of olive oil. Once hot, add one small chopped onion. Sauté it for about 3-4 minutes until it softens. Then, add two minced garlic cloves, one teaspoon of smoked paprika, and half a teaspoon of cumin. If you like heat, stir in a quarter teaspoon of cayenne pepper. Cook this mixture for one minute. This step is key. Cooking the spices brings out their full flavor and makes your dip taste amazing. Now, reduce the heat to low and add your cheeses. Use two cups of shredded sharp cheddar and one cup of softened cream cheese. Stir the cheeses until they start to melt. This will create a smooth base for your dip. To adjust the consistency, add half a cup of milk. Stir continuously until you reach a creamy texture. If it's too thick, add more milk. Finally, fold in the prepared Hatch chiles and season with salt and pepper. Cook on low heat for about five more minutes, stirring occasionally. This ensures all the flavors meld together perfectly. For the full recipe, check the complete instructions above. To achieve a creamy consistency, start with room temperature cream cheese. This helps it blend smoothly with the other cheeses. When you add the milk, do so gradually. Stir as you add it. This way, you can control the dip's thickness. If your queso gets lumpy, it might be due to cooking it too quickly or at too high heat. Always keep the heat low and stir often. Want to add more depth? Try adding a splash of lime juice or diced tomatoes. This brightens up the flavors. You can also toss in some cooked chorizo for a spicy kick. For pairing, serve it with crispy tortilla chips. It also goes well with fresh veggies like bell peppers or cucumbers. You can explore different flavors by adding toppings like pickled jalapeños or fresh herbs. The best way to serve queso is warm. Transfer it to a nice bowl and garnish with fresh cilantro. You can keep it warm in a slow cooker during a party. For accompaniments, consider crunchy tortilla chips and fresh salsa. You can even serve it with soft flour tortillas for a hearty meal. This creamy dip is perfect for gatherings or game days. For the full recipe, check out the link above. {{image_2}} You can easily make your Smoky Hatch Chile Queso hotter. Add diced jalapeños for a kick. Other peppers, like serranos, also work well. Mix them in when you cook your onions. This adds a nice depth of flavor. You can also sprinkle in some red pepper flakes during cooking. For more heat, try adding a dash of hot sauce to the finished dip. If sharp cheddar isn't your favorite, you have options. Use a mix of Monterey Jack and pepper jack for a different taste. Cream cheese keeps the dip creamy, but you can try goat cheese for tang. For plant-based versions, use cashew cream or vegan cheese. Both give you that rich texture without dairy. Change your dip with the seasons. In fall, add roasted butternut squash for a sweet twist. During summer, mix in fresh corn or diced tomatoes for a vibrant touch. For holiday parties, stir in cranberries for a festive flair. These variations keep your queso exciting and fun for any occasion. To keep your queso fresh, start by letting it cool. Once it’s cool, store it in an airtight container. This helps keep moisture in and air out. Place a piece of plastic wrap directly on the surface of the queso before sealing it. This step prevents a skin from forming. Refrigerate it right away. It can last about 3 to 5 days in the fridge. When you are ready to enjoy leftover queso, reheating it can be simple. The best way is to use a stovetop. Pour the queso into a saucepan and heat it on low. Stir often to keep it from sticking. If the queso seems thick, add a splash of milk to bring back its creamy texture. You can also use a microwave. Heat it in short bursts of 30 seconds, stirring in between. This way, you keep it smooth and tasty. You can freeze queso, but it may change a bit in texture. To freeze, let the queso cool completely. Then pour it into a freezer-safe container. Leave some space at the top for expansion. Seal the container tightly and label it. It can last for about 2 to 3 months in the freezer. When you’re ready to use it, thaw it in the fridge overnight. Reheat and stir well before serving. If it looks a little grainy, add some milk and mix well. Enjoy your creamy dip again! Hatch chiles come from Hatch, New Mexico. They have a unique flavor that blends heat with sweetness. The chiles are famous for their rich, earthy taste. You can use them in many dishes like stews, salsas, and, of course, queso. Their flavor shines in this dip, making it a standout. Yes, you can make this queso ahead of time. Prepare it, let it cool, and store it in the fridge. When ready to eat, reheat it gently on the stove or in the microwave. Stir in a little milk to keep it creamy. This makes meal prep easy and fun. You can do so much with leftover queso! Use it as a sauce for nachos or pour it over baked potatoes. You can even mix it into pasta for a cheesy dish. The options are endless, so get creative and enjoy! This recipe is naturally gluten-free. The ingredients do not contain gluten, making it safe for those with gluten sensitivities. Always check your cheese and other ingredients for hidden gluten. Enjoy this creamy dip worry-free! In this blog post, we explored the key ingredients for Smoky Hatch Chile Queso. We discussed fresh Hatch chiles, various cheeses, and aromatics. You learned how to prepare, cook, and combine these elements into a creamy dip. We also shared tips for perfecting texture and flavor, along with variations and storage options. Crafting this queso is simple and fun. With fresh ingredients and a few tricks, you create a dish that impresses. Enjoy experimenting with flavors and serving suggestions. Your smoky queso will surely be a hit!

Smoky Hatch Chile Queso Delightfully Creamy Dip

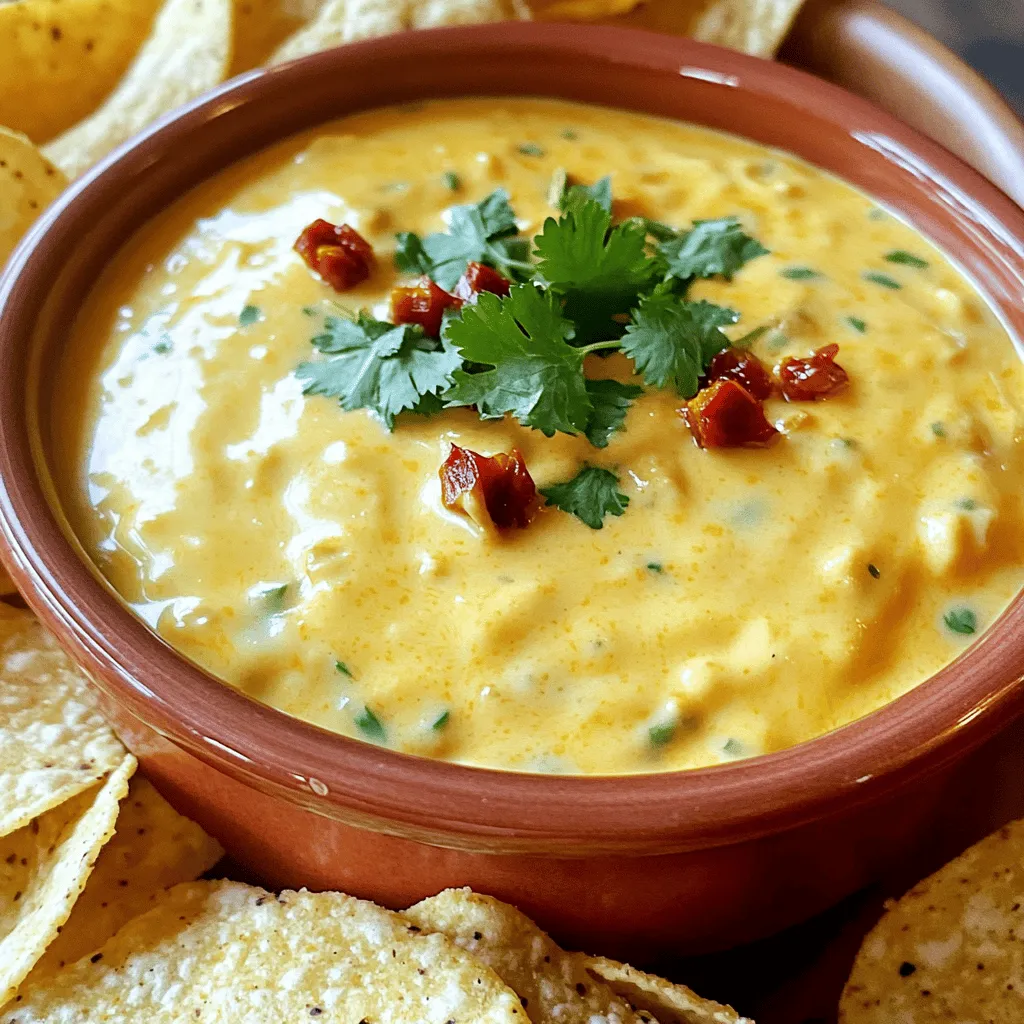
If you’re ready to elevate your dip game, you need to try my Smoky Hatch Chile Queso. This delightfully creamy

- 1 lb (450g) boneless, skinless chicken breasts - 1 can (15 oz) white beans, drained and rinsed - 1 can (4 oz) diced green chilies - 1 medium onion, diced - 3 cloves garlic, minced - 1 cup frozen corn - 4 cups chicken broth - 1 teaspoon cumin - 1 teaspoon chili powder - 1 teaspoon oregano - ½ teaspoon salt (or to taste) - ½ teaspoon pepper (or to taste) - 1 cup heavy cream - 1 cup shredded Monterey Jack cheese - Fresh cilantro, for garnish When I make Slow Cooker Creamy White Chicken Chili, I start with boneless chicken breasts. They cook well and shred easily. White beans add creaminess and protein. Diced green chilies bring a mild heat that balances the dish. I like using fresh onion and garlic for flavor. Frozen corn gives a nice sweetness. The chicken broth is key; it makes everything juicy. Spices like cumin and chili powder bring warmth. Oregano adds depth too. Salt and pepper enhance all the flavors. - Cheese - Fresh herbs I love to finish my chili with a sprinkle of cheese. Monterey Jack melts perfectly and adds richness. Fresh herbs, like cilantro, add brightness. You can mix and match garnishes to fit your taste. - Slow cooker requirements - Recommended serving utensils For this recipe, you need a good slow cooker. It should hold all your ingredients well. I recommend one with a locking lid. This keeps heat in and helps the chili cook evenly. For serving, a ladle works best. It scoops the chili easily. A large bowl is perfect for people to help themselves. You can find the Full Recipe for more details and tips! Start by placing the boneless chicken breasts at the bottom of your slow cooker. This helps them cook evenly and stay moist. You want the chicken to soak up all those yummy flavors. After cooking, take the chicken out and shred it using two forks. This method ensures you get tender pieces. If you find it hard to shred, let the chicken rest for a few minutes. The heat will help it break apart easily. Next, grab a mixing bowl. Combine the drained white beans, diced green chilies, diced onion, minced garlic, and frozen corn. Add the chicken broth, cumin, chili powder, oregano, salt, and pepper. Stir well to mix everything evenly. This step is key for great flavor. You want every bite to taste delicious. Once mixed, pour this mixture over the chicken in the slow cooker. Now, it's time to set your slow cooker. Cook on low for 6-7 hours or high for 3-4 hours. The chicken should be fully cooked and easy to shred. After cooking, return to the slow cooker and add in the heavy cream and shredded Monterey Jack cheese. Stir until the cheese melts, making the chili creamy. Cook on low for another 30 minutes to let all the flavors blend nicely. Enjoy your creamy white chicken chili from the Full Recipe! To get the right creaminess in your chili, you can adjust the heavy cream. If you like it richer, add more cream. For a lighter version, use less. You can also use sour cream for a tangy twist. If you find your chili too thin, try these methods to thicken it: - Cornstarch: Mix 1 tablespoon with cold water and add it to the chili. - Mashed beans: Take some beans and mash them, then stir them back into the chili. Spices make a big difference in flavor. You can increase the chili powder for more heat or add smoked paprika for a smoky taste. Tasting as you cook helps you find your favorite mix. For the best broth, make your own. Use chicken bones, vegetables, and herbs. This adds depth to your chili that store-bought broth can’t match. This chili pairs well with many sides. You can serve it with cornbread, tortilla chips, or a fresh salad. Each adds a nice crunch and flavor contrast. If you have a large group, it’s easy to adjust servings. Just double the ingredients. The slow cooker can hold a lot, making it perfect for gatherings. You can also make it ahead of time and reheat it, saving you stress on the big day. For the full recipe, refer to the Slow Cooker Creamy White Chicken Chili. {{image_2}} You can easily change up the proteins in this chili. Turkey works well if you want a leaner option. You could also use tofu for a vegetarian version. Simply cube it and add it in the same way as chicken. Swapping out the beans is another fun twist. If you prefer black beans, they add a nice flavor. You can also mix in some diced bell peppers or zucchini for extra color and nutrition. Spices can change the entire taste of your chili. Try adding smoked paprika for a deeper flavor. If you like it spicy, add more chili powder or even cayenne pepper. Consider regional flavors too. For a southwestern twist, mix in some taco seasoning or roasted corn. These changes can make your chili feel fresh and exciting every time you make it. If you're looking for gluten-free options, you’re in luck! This recipe is naturally gluten-free. Just make sure the chicken broth you use is labeled as gluten-free. For a dairy-free alternative, swap heavy cream with coconut milk. It gives a nice creaminess and a hint of sweetness. This small change keeps the dish rich while meeting dietary needs. For more details on making this delicious dish, check the Full Recipe. After cooking your Slow Cooker Creamy White Chicken Chili, let it cool down. Transfer it to an airtight container. Store it in the fridge. This keeps it fresh for up to four days. To maintain the best taste, eat it within this time. If you want to keep it longer, consider freezing it. Always label your containers with the date. For freezing, use freezer-safe containers or heavy-duty bags. Leave a little space at the top for expansion. This chili can be frozen for up to three months. When you’re ready to eat, move it to the fridge to thaw overnight. You can also thaw it in the microwave. When reheating, do it on the stove or in the microwave. Heat until hot, stirring often to avoid hot spots. If stored properly, your chili lasts up to four days in the fridge. In the freezer, it stays good for about three months. Watch for signs of spoilage. If you see any mold or notice a sour smell, throw it out. Always trust your nose. Safety first! Yes, you can make this chili a day ahead. The flavors deepen when it sits. Store it in the fridge for up to three days. Just reheat on the stove or in the slow cooker. Best practices for make-ahead meals: - Let the chili cool before storing. - Use an airtight container to keep it fresh. - Add toppings just before serving for the best taste. I love pairing this chili with warm cornbread or tortilla chips. A side salad also balances the meal well. You can top the chili with cheese, sour cream, or avocado. Suggestions for side dishes and toppings: - Cornbread for a sweet touch. - Tortilla chips for crunch. - Fresh cilantro for garnish. - Sliced jalapeños for heat. Yes, you can make it vegetarian! Swap the chicken for beans or tofu. Use vegetable broth instead of chicken broth. This keeps the flavor rich and satisfying. Tips for substitution and maintaining flavor: - Use a mix of beans for texture. - Add extra spices to enhance taste. - Consider using a vegan cream for richness. To add heat, try diced jalapeños or hot sauce. You can also use spicy chili powder instead of regular. Mix in some cayenne pepper for an extra kick. Additives and techniques to increase heat: - Fresh diced chilies for a bold flavor. - Red pepper flakes for a long-lasting heat. - Adjust spices to match your taste. Yes, you can use frozen chicken in this recipe. Just add extra cooking time. Check that the chicken reaches 165°F for safety. Cooking adjustments for frozen poultry: - Cook on high for 4-5 hours instead of 3-4 hours. - Ensure the chili bubbles well before serving. For the full recipe, check out the Slow Cooker Creamy White Chicken Chili. This blog post covered a delicious creamy white chicken chili recipe. We explored key ingredients, cooking steps, and useful tips. You learned how to mix flavors, adjust textures, and even try variations. Proper storage ensures your chili stays fresh. Now, you have the tools to impress at your next meal. Remember, cooking is about fun and creativity. Enjoy the process and let your taste lead the way!

Slow Cooker Creamy White Chicken Chili Delight

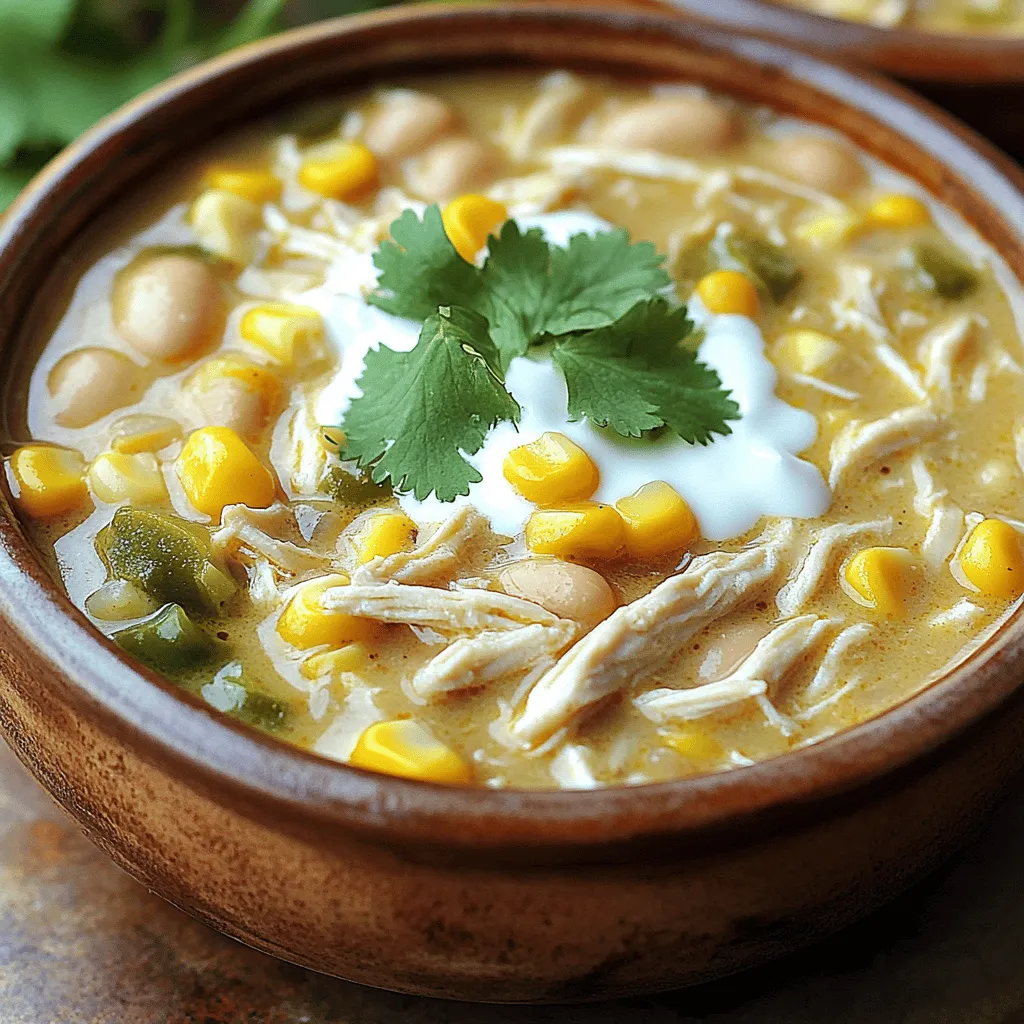
Looking for a cozy meal that cooks itself? Try my Slow Cooker Creamy White Chicken Chili Delight! This dish combines

To make garlic herb roasted veggies, gather these fresh vegetables: - 2 cups broccoli florets - 2 cups baby carrots, halved - 1 bell pepper, chopped (any color) - 1 zucchini, diced - 1 red onion, cut into wedges These colorful veggies not only look nice but also taste great together. You will need these key seasonings and herbs: - 4 cloves garlic, minced - 3 tablespoons olive oil - 1 teaspoon dried oregano - 1 teaspoon dried thyme - 1 teaspoon smoked paprika - Salt and black pepper to taste These herbs bring out the best flavor in your veggies. To add some flair, consider using: - Fresh parsley, chopped (for garnish) This garnish adds a bright touch and fresh flavor to your dish. For the full recipe, check out the section above. First, set your oven to 425°F (220°C). This high heat helps the veggies roast well. Next, take a large baking sheet and line it with parchment paper. This makes cleanup easy and keeps the veggies from sticking. In a big bowl, add the broccoli, baby carrots, bell pepper, zucchini, and red onion. These vegetables create a colorful mix. In another bowl, whisk the olive oil, minced garlic, oregano, thyme, smoked paprika, salt, and black pepper. This mixture adds great flavor. Pour this oil mix over the veggies and toss them well. Make sure every piece is coated. Spread the veggies on the lined baking sheet in a single layer. This helps them cook evenly. Place the sheet in the oven and roast for 20-25 minutes. Stir the veggies halfway through to ensure they brown nicely. They should be tender and slightly caramelized when done. After roasting, take them out and let them cool for a few minutes. Serve them on a platter and sprinkle fresh parsley on top for a beautiful finish. For the full recipe, check the earlier section. To get those veggies just right, start by cutting them evenly. This helps them roast at the same time. Use a high oven temperature, like 425°F (220°C). This gives the veggies a nice, crispy edge. Toss them well in oil and seasonings. Make sure every piece gets coated. This way, you get flavor in every bite. Stir them halfway through cooking. This ensures even roasting. Some veggies cook faster than others. For softer veggies like zucchini and bell pepper, aim for about 20 minutes. For harder ones like carrots and broccoli, you may need 25 minutes. If you mix different types, check them often. You can remove the softer ones early. This will keep everything at the perfect texture. To spice things up, try adding herbs like rosemary or basil. A splash of balsamic vinegar can also add zest. For a kick, sprinkle in some red pepper flakes. You can even mix in a squeeze of fresh lemon juice after roasting. This brightens the flavors and adds freshness. Experimenting with flavors can make your dish unique. For the full recipe, check the earlier section. {{image_2}} You can easily swap out vegetables based on what’s in season. For example, in spring, try using asparagus or peas. In fall, add butternut squash or Brussels sprouts. This keeps your dish fresh and fun. Just remember to cut the veggies into similar sizes. This helps them cook evenly. Want to make this meal more filling? You can add proteins like chickpeas or chicken. For chickpeas, use one can, drained and rinsed. If you prefer chicken, cut it into small pieces and toss it with the veggies. This will give you a complete meal in one pan. This recipe is naturally vegan and gluten-free! To keep it that way, just check that your seasonings are gluten-free. You can also add tofu for more protein. Cube firm tofu and toss it with the veggies before roasting. This adds texture and flavor without changing the dish much. For more details on the full recipe, check out the Garlic Herb Roasted Veggies section. After enjoying your Garlic Herb Roasted Veggies, let them cool first. Place the leftovers in an airtight container. Store them in the fridge for up to three days. This keeps the flavors fresh and the veggies crisp. If you want to keep them longer, consider freezing. To reheat, use the oven for best results. Preheat your oven to 350°F (175°C). Spread the veggies on a baking sheet. Heat for about 10-15 minutes until warmed through. You can also use a microwave. Place the veggies in a microwave-safe dish. Cover it to keep moisture. Heat in 30-second intervals until hot. To freeze, pack the cooled veggies in freezer bags. Remove as much air as possible before sealing. These can last up to three months in the freezer. When ready to use, thaw in the fridge overnight. For quick use, you can cook them straight from frozen. Just add a few extra minutes to your cooking time. You can change the herbs in this dish easily. For a fresh taste, try rosemary or basil. Use about one teaspoon of dried herbs or two teaspoons of fresh herbs. Mix these herbs into the olive oil before you toss them with the veggies. This adds a nice twist. You can also use Italian seasoning for a mixed herb flavor. Yes, you can use frozen vegetables! They work well, but they may need more time to roast. Start by roasting them for about 25-30 minutes. Keep an eye on them. Stir halfway to help them cook evenly. They might not get as crispy as fresh veggies, but they are still tasty. Roasted veggies pair well with many dishes. You can serve them with grilled chicken or fish. They also work great in tacos, wraps, or salads. For a light meal, add them to quinoa or rice. You can even serve them as a side for pasta. The options are endless! For the full recipe, check out the Garlic Herb Roasted Veggies section. Roasting vegetables is simple and fun. You need the right ingredients and seasonings for great taste. Prepping your oven and baking sheet makes the process easy. Remember to adjust cook times based on what veggies you use. You can change things up by adding proteins or different herbs. Store leftovers well, and you can enjoy them later, too. Roasted veggies are healthy and versatile, making them a perfect side for any meal. Try out these tips and enjoy your cooking!

Garlic Herb Roasted Veggies Flavorful and Simple Recipe

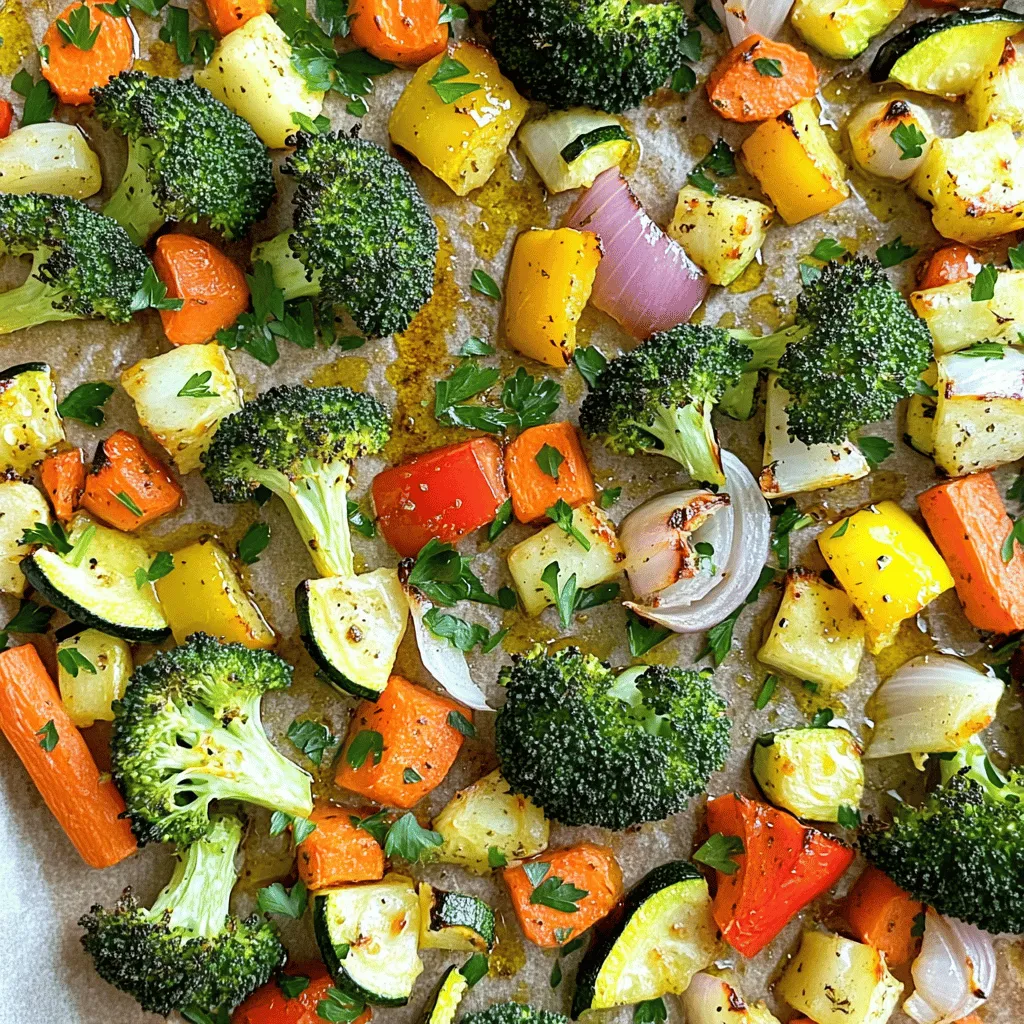
Are you ready to make a dish that’s packed with flavor? This Garlic Herb Roasted Veggies recipe is not only

Here is what you need to prepare Queso Rice with Steak Strips: - 1 cup long-grain rice - 2 cups beef broth - 1 tablespoon olive oil - 1 pound flank steak, cut into thin strips - 1 tablespoon taco seasoning - 1 cup queso blanco cheese, shredded - 1 cup bell peppers (mixed colors), sliced - ½ cup red onion, sliced - 2 cloves garlic, minced - Salt and pepper to taste - Fresh cilantro, chopped (for garnish) - Sour cream (for serving) Gather these ingredients before you start. Each one plays a key role in making this dish tasty and fun. The long-grain rice gives a nice texture. Beef broth adds depth to the flavor. Flank steak brings a hearty element, while taco seasoning adds a kick. The queso blanco cheese melts beautifully, making everything creamy. Fresh veggies like bell peppers and red onion add color and crunch. Don't forget the garlic for extra flavor! Fresh cilantro and sour cream are perfect for finishing touches. If you want to see how to combine all these ingredients, check out the Full Recipe. To start, heat 2 cups of beef broth in a medium saucepan over medium heat. Once it’s hot, add 1 cup of long-grain rice. Bring the mix to a boil. After that, reduce the heat to low and cover the pot. Let the rice simmer for 18-20 minutes. When ready, the rice should be tender and the broth fully absorbed. While the rice cooks, it’s time to get the steak ready. Take 1 pound of flank steak, cut it into thin strips. Season it with 1 tablespoon of taco seasoning, plus salt and pepper to taste. In a large skillet, heat 1 tablespoon of olive oil over medium-high heat. Add the steak strips and cook for 3-4 minutes. You want them browned and cooked to your liking. Once done, remove the steak from the skillet and set it aside. Next, let’s add some color and flavor. In the same skillet, toss in 1 cup of mixed bell peppers, ½ cup of sliced red onion, and 2 cloves of minced garlic. Cook them for about 5 minutes. You want the veggies to be tender and fragrant. Now, let’s bring it all together. Once the rice is cooked, fluff it with a fork. Mix in the sautéed vegetables and 1 cup of shredded queso blanco cheese. Stir until the cheese melts and combines well with the rice. Finally, return the cooked steak strips to the skillet. Mix everything together until it’s all combined. Adjust the seasoning with extra salt and pepper if needed. For the full recipe, check the instructions above. Using homemade taco seasoning makes this dish shine. You can mix chili powder, cumin, garlic powder, and paprika for a great taste. Adjust the spice to fit your liking. Choosing the right queso cheese is also key. Queso blanco melts well and adds creaminess. You can also try cheddar for a sharper taste. Mixing cheeses can create a unique flavor. Adjusting the doneness of the steak is important. For medium-rare, cook for about 3 minutes on each side. If you prefer it more cooked, extend the time. Always let the steak rest before slicing for juiciness. Adding spices to taste can elevate your dish. A pinch of cayenne or black pepper adds warmth. Taste as you go to find your perfect mix. For serving suggestions, use deep bowls to showcase the rice. Layer the rice, steak, and veggies for a colorful look. For garnishing ideas, sprinkle fresh cilantro on top. A dollop of sour cream adds creaminess and tang. You can also add sliced jalapeños for extra flair. Check out the Full Recipe for more details on making this dish! {{image_2}} You can make Queso Rice without steak. Use tempeh or mushrooms instead of steak. Tempeh gives a nice texture and absorbs flavors well. Mushrooms add a savory taste that enhances the dish. Swap out beef broth for vegetable broth to keep it vegetarian. This change still adds depth to the flavor. While queso blanco is great, you can try other cheeses. Cheddar brings a sharp taste that many love. Pepper jack adds a spicy kick. You can mix different cheeses for more flavor. Combining cheeses can create a creamy and rich taste that delights your palate. Want more heat? Add jalapeños or hot sauce to the mix. This gives your dish a nice kick. If you prefer a milder taste, simply skip spicy seasonings. Adjust the spice level to fit your taste. You can make it as fiery or mild as you like. To store leftover queso rice with steak strips, place it in an airtight container. Let the dish cool to room temperature first. This helps keep it fresh. You can store it in the fridge for up to three days. To prevent spoilage, make sure to seal it well. When you're ready to eat your leftovers, use a microwave or stovetop. If using a microwave, cover the dish with a damp paper towel. This keeps the rice moist. Heat it in short bursts, stirring between each one. On the stovetop, add a splash of beef broth to prevent drying out. Heat over medium-low, stirring gently until warm. To freeze queso rice with steak strips, portion it into freezer-safe bags or containers. Remove as much air as possible before sealing. This helps prevent freezer burn. You can freeze it for up to three months. When ready to eat, thaw it overnight in the fridge. Reheat it gently using the stovetop method for the best texture. For the full recipe, check out the Queso Rice with Steak Strips recipe! Queso Rice with Steak Strips takes about 35 minutes. You spend 10 minutes prepping the ingredients and 25 minutes cooking. This quick time makes it a great weeknight meal. Yes, you can make it in advance. Cook the rice and steak, then store them separately. When ready to eat, just reheat and combine. This makes meal prep easy and saves time. You can serve it with several tasty sides. Here are a few ideas: - Black beans for added protein - A fresh salad for crunch - Tortilla chips for a fun crunch These sides make your meal more complete and satisfying. Yes, this dish can be gluten-free. Just make sure to use gluten-free beef broth and taco seasoning. Always check labels to ensure no hidden gluten. This way, everyone can enjoy this delicious meal. In this post, we covered a tasty recipe for Queso Rice with Steak Strips. You learned about ingredients, step-by-step cooking, and ways to enhance flavors. We talked about variations for different diets and shared storage tips for leftovers. This dish is fun to make and easy to share. You can impress friends and family with your new skills. Enjoy this recipe and make it your own with your favorite flavors!

Queso Rice with Steak Strips Flavorful and Easy Meal

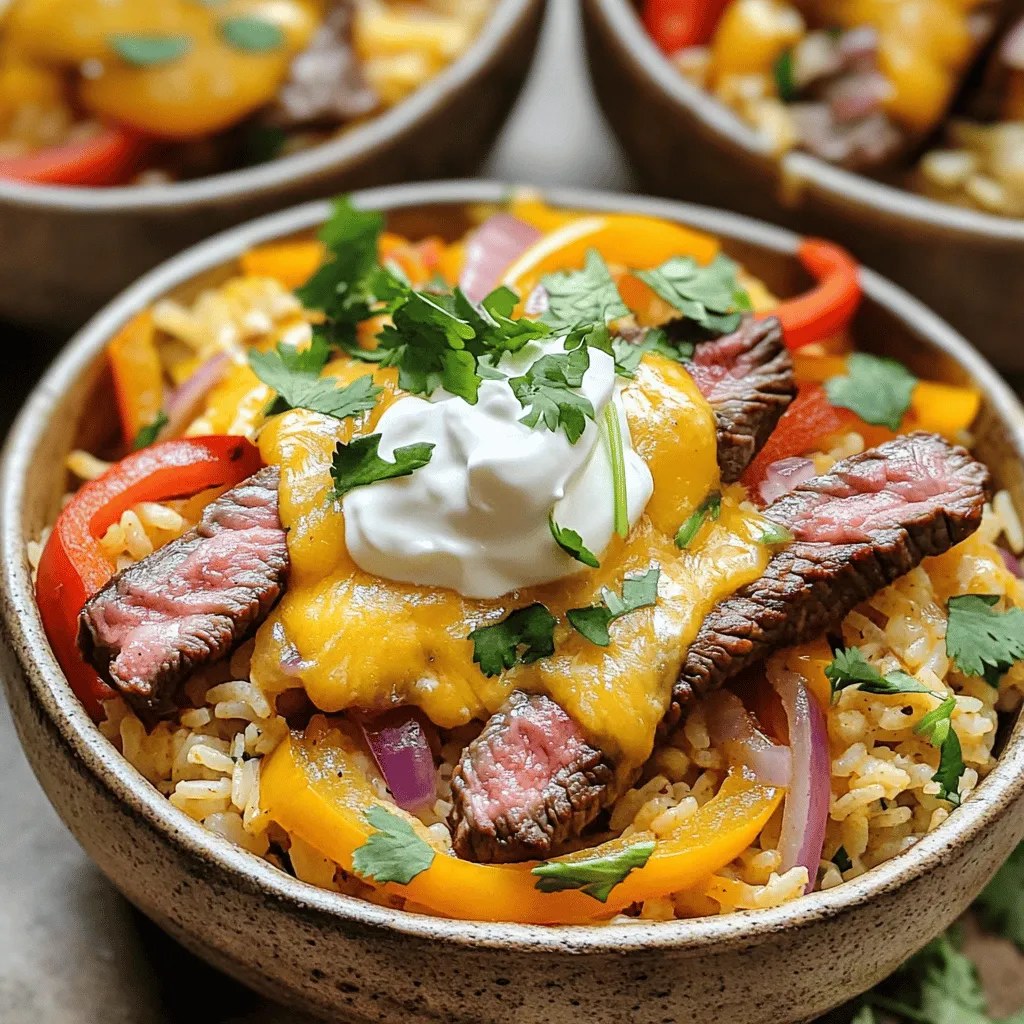
Are you ready to treat your taste buds? Queso Rice with Steak Strips is a flavorful and easy meal that

To make brown sugar glazed carrots, you need just a few simple items: - 1 pound baby carrots (or regular carrots cut into sticks) - 3 tablespoons unsalted butter - 1/4 cup brown sugar - 1 teaspoon cinnamon - 1/4 teaspoon nutmeg - Salt to taste - Fresh parsley, chopped (for garnish) Each ingredient plays a role in creating that sweet, sticky glaze. The butter helps the sugar melt and caramelize, while the spices add warmth and depth. Want to mix things up? You can try: - Alternative sweeteners like honey or maple syrup. - Additional herbs or spices such as thyme or ginger for a fresh twist. These options let you customize the dish to fit your taste or what you have on hand. Before you start cooking, gather these tools: - A skillet or frying pan for even cooking. - Measuring cups and spoons for accurate portions. Having the right equipment makes the cooking process easier and more enjoyable. For the full recipe, check the detailed instructions above. 1. Start by washing the baby carrots. If you use regular carrots, peel them first. Cut them into even sticks, about 2 inches long. This helps them cook evenly. 2. Next, take a large skillet and melt the unsalted butter over medium heat. Watch for it to foam. This means it’s ready for the next step. 3. Add the brown sugar to the melted butter. Stir until the sugar dissolves and forms a syrupy mixture. This sweet base is key for the glaze. 4. Now, stir in the cinnamon and nutmeg. Let them toast slightly in the butter and sugar mix for about 30 seconds. This adds warmth and depth to the flavor. 1. Carefully add the carrots to the skillet. Stir well to coat them evenly with the brown sugar glaze. This step ensures each carrot gets that sweet goodness. 2. Lower the heat to low and cover the skillet. Let the carrots cook for about 10-12 minutes. Stir occasionally to keep them from sticking. They should become tender but not mushy. 3. After the carrots are tender, remove the lid. Increase the heat back to medium. Stir occasionally for another 3-5 minutes. This helps the glaze thicken and caramelize nicely. 4. Once the glaze thickens, sprinkle a light dash of salt over the carrots. This enhances the flavor and balances the sweetness. 5. Finally, transfer the glazed carrots to a serving dish. Garnish with freshly chopped parsley for a colorful touch. These brown sugar glazed carrots make a delightful side. For the complete recipe, check out the [Full Recipe]. - Overcooking the carrots: This can make them mushy. You want tender carrots but not too soft. Cook them just until they are fork-tender. - Incorrect butter and sugar ratios: Too much sugar can make the dish overly sweet. Stick to the recipe for a perfect balance. - Suggestions for additional spices: Try adding ginger or cloves for a warm twist. A dash of cayenne can add a nice kick too. - Garnishing options for presentation: Fresh parsley looks great on top. You can also use chopped nuts for crunch or a drizzle of honey for extra sweetness. - Best practices for caramelization: Start with medium heat to melt the butter. Watch closely as the sugar begins to caramelize. Stir gently to avoid burning. - Ensuring even cooking: Cut the carrots into similar sizes. Stir them often in the glaze to coat them evenly. This helps each piece absorb the sweet flavor. For the complete recipe, check out the Full Recipe. {{image_2}} You can switch up the carrots based on the season. In spring, try using fresh baby carrots. In fall, use roasted squash or sweet potatoes for a unique taste. These swaps add fun flavors and colors to your dish. For holidays, you can add spices like cloves or ginger. This makes the dish festive and special for gatherings. If you want a healthier version, consider low-sugar alternatives. You can use coconut sugar or maple syrup instead of brown sugar. This keeps the sweetness but cuts down on calories. You can also replace butter with olive oil. This change adds healthy fats and makes the dish lighter. Mixing in flavors from different cuisines can make this dish exciting. For an Asian twist, add soy sauce and sesame oil. This creates a sweet and savory blend. You can also add a bit of chili for a spicy kick. Sweet and savory combinations work well, too. Try adding balsamic vinegar or honey for depth. These ideas make your carrots stand out at any meal. For the complete recipe, check out the Full Recipe section. To store your brown sugar glazed carrots, place them in an airtight container. This will keep them fresh. They can last in the fridge for up to four days. Make sure to let them cool before sealing. To reheat, use a skillet over low heat. This method helps maintain texture. Stir gently to avoid sticking. If the glaze thickens, add a splash of water or broth. This will refresh the glaze and keep it smooth. If you want to freeze glazed carrots, first cool them completely. Then, place them in a freezer-safe bag or container. They can last up to three months in the freezer. To thaw, simply move them to the fridge overnight. When ready to enjoy, reheat them in a skillet. This brings back their flavor and texture. To make brown sugar glazed carrots, start by washing your carrots. If you use regular carrots, peel them and cut them into sticks. Next, melt butter in a skillet over medium heat. Add brown sugar and stir until it melts into a syrup. Once it bubbles, mix in cinnamon and nutmeg. Add the carrots and stir to coat them. Cover and cook on low heat for about 10 to 12 minutes. Stir often to keep them from sticking. Uncover and raise the heat to thicken the glaze for another 3 to 5 minutes. Sprinkle with salt and serve. You can find the full recipe above. Yes, you can use regular carrots instead of baby carrots. Just cut them into even sticks about 2 inches long. This size helps them cook evenly, just like baby carrots. Make sure to peel them before cutting. This ensures a smooth texture in your dish. Brown sugar glazed carrots pair well with many dishes. They make a great side for roasted chicken or pork. You can also serve them with grilled steak for a sweet and savory combo. Adding these carrots to a holiday meal is a hit too. Their sweet flavor will complement savory dishes nicely. You now know how to make delicious brown sugar glazed carrots. We covered the key ingredients, equipment, and step-by-step instructions. Remember the tips to avoid common mistakes, and try the variations for a fresh twist. Store your leftovers properly and use the reheating tips for the best results. This dish pairs well with many meals, making it a great choice for any occasion. Use this guide to impress your family and friends with tasty, glazed carrots!

Brown Sugar Glazed Carrots Irresistible Side Dish

Looking for a dish that will wow your family and friends? Brown sugar glazed carrots are easy to make and

- 1 cup all-purpose flour - 1/2 cup unsweetened cocoa powder - 1 teaspoon baking powder - 1/4 teaspoon salt - 1/2 cup granulated sugar - 1/2 cup brown sugar, packed - 1/3 cup vegetable oil - 2 large eggs - 1 teaspoon vanilla extract - 1/2 cup powdered sugar (for dusting) - Optional: 1/4 teaspoon peppermint extract Role of Flour and Cocoa Powder Flour gives the cookies structure. It helps them hold their shape. Cocoa powder adds rich chocolate flavor. It turns our treats into a delightful chocolatey experience. Importance of Sugars in Flavor Granulated sugar sweetens cookies and helps them spread. Brown sugar adds moisture and a hint of caramel. Together, they create the perfect balance of sweetness and depth. Why Use Baking Powder? Baking powder makes cookies rise and become soft. It helps create those lovely cracks on top. This gives our cookies their signature crinkle look and a light texture. These ingredients blend to create the perfect Christmas Crinkle Cookies. You can find the full recipe above, where it guides you step by step to achieve these festive treats. 1. Preheat your oven to 350°F (175°C). Line a baking sheet with parchment paper. 2. In a medium bowl, mix the flour, cocoa powder, baking powder, and salt. Whisk until blended. Set this aside. 3. In a large bowl, combine granulated sugar, brown sugar, and vegetable oil. Mix until smooth. Add eggs one by one, stirring well after each. Finally, blend in the vanilla extract. 1. Chill the dough in the fridge for about 30 minutes. This step helps it firm up for easier rolling. 2. Once chilled, scoop tablespoon-sized portions of dough. Roll them into tight balls. 1. Place each dough ball on the baking sheet about 2 inches apart. 2. Bake for 10-12 minutes. Look for cracks on top. The edges should be set, and the middle soft. 3. Allow the cookies to cool on the sheet for a few minutes. Then, move them to a wire rack to cool completely. These steps guide you to perfect Christmas crinkle cookies. If you want the full recipe, check the earlier section. Enjoy your baking! Avoiding Overmixing Mixing too much can ruin your cookies. When you combine the wet and dry ingredients, mix just until you see no flour. This keeps them soft and chewy. Overmixing adds too much air, which can make them cakey. Adjusting for Altitude and Humidity If you live at a high altitude, you may need to change your recipe. You might need less baking powder. In humid areas, the dough can be too sticky. Adding a bit more flour can help. Always check the cookie dough's texture. Using Room Temperature Ingredients Using room temperature eggs and oil helps the dough mix well. Cold ingredients can make it hard to blend. Take your eggs out of the fridge an hour before you bake. This little step can make your cookies turn out better. Dusting with Powdered Sugar Dusting cookies with powdered sugar gives them a festive look. Do this right after they cool. Use a small sieve for an even coat. It looks like a light snow covering on your cookies. Adding Sprinkles or Drizzles Sprinkles add color and fun. Choose holiday-themed colors for the best effect. You can also drizzle melted chocolate on top for extra sweetness. This adds a special touch to your treats. Creative Presentation Tips Arrange the cookies on a pretty plate to impress your guests. You can stack them high or lay them flat. Place some festive decorations around the cookies for a nice touch. A few pinecones or holly leaves can make your display pop. Incorporating Flavor Variations Want something different? Try adding mint or orange zest. A little peppermint extract gives a fresh twist. Orange zest adds a lovely, bright flavor. Experiment to find what you like best. Suggesting Additional Mix-ins Mix in chocolate chips or nuts for extra texture. You can use white chocolate chips for a sweet contrast. Chopped nuts like walnuts add crunch. These little changes can make your cookies unique. For the complete recipe, check out the Full Recipe section. {{image_2}} You can change up the flavor of your Christmas Crinkle Cookies. One fun option is to add peppermint extract. Just use 1/4 teaspoon for a minty twist. This gives your cookies a fresh, festive taste that everyone loves. Another great idea is to add orange zest. Zest from one orange adds a bright flavor. It pairs well with chocolate and makes the cookies feel more special. If you need gluten-free cookies, swap the all-purpose flour. Use a gluten-free flour blend instead. This works well and keeps the cookies soft. For a vegan option, replace the eggs. Use 1/4 cup of unsweetened applesauce for each egg. You can also use a plant-based oil instead of vegetable oil. This way, everyone can enjoy these treats. You can make your cookies even more festive with some seasonal ingredients. Try adding chopped nuts or dried fruit. These add great texture and taste. For decoration, dust the cookies with powdered sugar. You can also add colorful sprinkles. This makes them look bright and fun on your holiday table. For the full recipe, check out the [Full Recipe]. Store your Christmas crinkle cookies at room temperature. Use an airtight container to keep them fresh. This way, they stay soft and chewy. If you keep them in the fridge, they may dry out. These cookies last about a week at room temperature. For longer freshness, freeze them. Flash-freezing is a great way to save cookies. First, place your cookies on a baking sheet, spaced apart. Freeze them for about an hour until firm. Then, transfer them to a freezer bag. Remove as much air as possible before sealing. When you want to enjoy them, just reheat in the oven at 350°F for about 5–7 minutes. They will taste fresh! Creative packaging makes cookie gifts special. Use festive boxes or clear bags tied with ribbons. You can also layer cookies with parchment paper in tins. This keeps them fresh and adds charm. Make sure to mention the cookie type on the tag. Your friends will love this tasty, thoughtful gift! You can tell when the cookies are done by looking for cracks on top. They should be set around the edges but still soft in the center. A light touch will help; if they spring back, they are ready. This usually takes about 10 to 12 minutes at 350°F (175°C). Yes, you can make the dough ahead of time. After mixing, chill the dough in the fridge for up to 24 hours. This will help the flavors meld together and make it easier to handle. Just let it sit at room temperature for a few minutes before rolling. Store leftover cookies in an airtight container at room temperature. They will stay fresh for about a week. If you want to keep them longer, place them in the fridge. Just remember to let them come back to room temperature before enjoying. You can use different types of sugar. Brown sugar adds moisture and a rich flavor, while granulated sugar gives a nice crisp. You might also try coconut sugar for a unique taste. Just keep the same amounts for best results. To prevent spreading, chill the dough before baking. This keeps the butter from melting too fast. Also, make sure to measure your flour correctly. Too little flour can cause spreading as well. Rolling the dough balls and placing them well spaced on the sheet helps too. We've explored the key ingredients and steps for making festive Christmas crinkle cookies. Understanding these elements helps you create delicious treats for any holiday gathering. Remember to chill the dough and watch for perfect baking signs. Try different flavors and toppings to make these cookies uniquely yours. With proper storage, they’ll stay fresh and delightful. Enjoy sharing your tasty creations with family and friends this season!

Christmas Crinkle Cookies Festive and Fun Treat

Christmas Crinkle Cookies bring joy to every holiday gathering. With their soft, gooey centers and powdery sugar coating, these treats

- 1.5 lbs beef chuck, cut into 1-inch cubes - 4 cups beef broth - 2 large carrots, sliced - 2 medium potatoes, diced - 1 large onion, chopped - 3 cloves garlic, minced - 2 tablespoons tomato paste - 1 teaspoon dried thyme - 1 teaspoon paprika - 2 bay leaves - Salt and pepper to taste - Fresh parsley, chopped (for garnish) - Large pot or Dutch oven - Cooking spoon - Ladle I love using simple ingredients for this easy beef stew. Each one adds a lot of flavor. The beef chuck is perfect; it becomes tender with long cooking. I use beef broth as the base. It gives a rich taste. Fresh veggies make it healthy. Carrots and potatoes add sweetness and texture. The onion and garlic provide a nice aroma. For seasoning, I add a few key ingredients. Tomato paste gives depth. Dried thyme and paprika add warmth. Bay leaves enhance the flavor as it simmers. Don't forget to add salt and pepper to taste. Finally, fresh parsley on top makes the dish pop. You’ll need some basic tools too. A large pot or Dutch oven works best. A sturdy spoon helps mix everything well. A ladle is handy for serving. For the full recipe, check out the detailed steps I’ve included. Enjoy cooking this cozy meal! - Heat olive oil in a large pot over medium-high heat. - Season the beef cubes with salt and pepper. - In batches, brown the beef on all sides for about 5-7 minutes. - Remove the beef and set it aside. - In the same pot, add the chopped onion and garlic. - Sauté for 3-5 minutes until softened and fragrant. - Stir in the tomato paste, dried thyme, and paprika. - Cook for an additional minute to meld the flavors. - Return the browned beef to the pot. - Add sliced carrots, diced potatoes, bay leaves, and beef broth. - Bring the mixture to a boil. - Once boiling, reduce the heat to low and cover. - Allow the stew to simmer for 1.5 - 2 hours. - Stir occasionally until the beef is tender. - Taste and adjust seasoning with salt and pepper as needed. - Remove bay leaves before serving. This process leads to a rich and hearty stew. For the full recipe, check out the details above. To make beef stew great, start with the right cut of beef. I recommend beef chuck. It has fat and connective tissue, which makes it tender when slow-cooked. Look for pieces with good marbling. This fat breaks down during cooking, adding flavor. For tenderness, cooking time is key. I suggest simmering your stew for 1.5 to 2 hours. This slow cooking will help the beef become soft. Stir the stew every now and then to keep it from sticking. Adding herbs and spices makes your stew shine. I like using dried thyme and paprika. They give a warm flavor. You can also try rosemary or bay leaves for extra depth. Simmering time is very important, too. The longer you let your stew simmer, the more the flavors meld together. Aim for at least 1.5 hours. This way, your stew will be rich and tasty. You’ll know your beef is tender when it easily falls apart with a fork. Look for a rich, deep color in the broth, too. If the beef is still tough, give it more time. When the stew is ready, the vegetables should be soft but not mushy. The broth should smell amazing. Trust your nose! Use these signs to know when to serve your beef stew. Check out the Full Recipe for a detailed guide. {{image_2}} You can change the meat in this stew. Try using chicken or pork instead of beef. These meats add their own flavor, making the stew unique. If you want a vegetarian option, use mushrooms or lentils. They both provide a hearty texture and taste. For vegetables, feel free to swap in seasonal favorites. Sweet potatoes can replace regular potatoes. Peas, green beans, or corn can add color and nutrition. You can also use parsnips or turnips for a new twist. These options make the dish fresh and exciting. Different regions have their own beef stew styles. Classic Irish beef stew uses dark beer and root vegetables, creating a rich flavor. It often features a thicker broth and tender beef. This stew is perfect for cold nights. In Southwestern-style beef stew, you add spices like chili powder and cumin. This version may include black beans or corn for a kick. It’s a fun way to spice up your dinner table. Each style tells a story through unique flavors. You can use several cooking methods for beef stew. A slow cooker lets flavors blend over hours. Just add the ingredients in the morning and return to a warm meal. It’s perfect for busy days. For a quicker meal, try a pressure cooker. This method cooks the stew in about 30 minutes. You get tender beef and rich broth without waiting long. Both methods yield a delicious dish that warms the heart. For the full recipe, refer to the earlier section on ingredients and cooking steps. After you enjoy your easy beef stew, store any leftover stew in an airtight container. Make sure to cool it to room temperature first. This helps keep the flavors fresh. Place the container in the fridge. Your stew will stay good there for about 3-4 days. When it's time to reheat, pour the stew into a pot. Heat over low to medium heat, stirring often. This keeps the stew creamy and warm. You can also microwave it in a bowl. Just cover it to avoid splatters and heat in short bursts. Stir between each burst for even heating. If you want to save some stew for later, freezing is a great option. Pour the cooled stew into freezer-safe containers. Leave some space at the top for expansion. You can also use freezer bags. Just squeeze out the air before sealing. Your beef stew will last about 3-4 months in the freezer. To thaw, move the stew from the freezer to the fridge a day before you plan to eat it. For a quicker method, run the sealed bag under cold water. Once thawed, reheat as mentioned above. In the fridge, your beef stew can last up to 4 days. After this, it’s best to toss it. Always check for signs of spoilage. Look for any off smells or changes in color. If it smells sour or looks unusual, don’t eat it. Trust your senses; they are usually right! To make beef stew from scratch, start with beef chuck. Cut it into 1-inch cubes. Brown the beef in olive oil. Then add onions and garlic until soft. Stir in tomato paste and spices. Next, return the beef to the pot. Add carrots, potatoes, and beef broth. Bring it to a boil, then simmer for one and a half to two hours. This lets the flavors blend, making it rich and tasty. For the full recipe, check the section above. Yes, you can use frozen beef for this recipe. Just make sure to thaw it first. Thaw it in the fridge overnight for the best results. This ensures even cooking and great flavor. If you're in a hurry, you can use the microwave, but do it carefully. To thicken beef stew, you have a few options. You can use a cornstarch slurry. Mix one tablespoon of cornstarch with two tablespoons of cold water. Stir it into the stew and simmer until thickened. Another option is to mash some of the potatoes. This adds creaminess and body to the stew. You can customize seasoning easily. Try adding herbs like rosemary or oregano for a fresh taste. For a spicy kick, add red pepper flakes or a splash of hot sauce. You can also experiment with different spices, like cumin or curry powder. Adjust the salt and pepper to your liking for a perfect flavor. Beef stew pairs well with many side dishes. You can serve it with crusty bread for dipping. Mashed potatoes or rice are great options too. A simple green salad adds freshness. Steamed vegetables can also complement the stew nicely. Choose whatever you enjoy most! In this blog post, we covered how to make an easy beef stew. We looked at the key ingredients, like beef chuck, broth, and veggies. I shared step-by-step instructions for preparing and cooking the stew to build rich flavor. We also explored tips for perfect texture and seasoning. Lastly, I discussed variations and storage info. Remember, beef stew is flexible; make it your own. Enjoy your cooking and share it with family and friends!

Easy Beef Stew Great for Cozy Family Dinners

Looking for a cozy meal that warms both heart and home? This Easy Beef Stew is perfect for family dinners.

- Olive oil - Garlic - Crushed tomatoes - Herbs and spices To make a great Quick Italian Tomato Sauce, you need just a few key items. Start with olive oil. It adds rich flavor. Next, grab some garlic. Fresh garlic makes the sauce taste vibrant. The main star is crushed tomatoes, which give the sauce its base. We also need herbs and spices like oregano and basil. These add depth and aroma. - Red pepper flakes - Sugar - Fresh basil for garnish You can make your sauce special with optional ingredients. Red pepper flakes add heat for those who love spice. A bit of sugar balances the acidity of the tomatoes. Finally, fresh basil for garnish gives a bright finish and fresh taste. - Large saucepan - Wooden spoon - Measuring spoons To cook the sauce, you need a few tools. A large saucepan is essential for cooking and simming. A wooden spoon helps stir without scratching your pan. Measuring spoons ensure accurate amounts of spices and ingredients. For the full recipe, refer to the beginning of this article. First, gather your ingredients. You need: - 2 tablespoons olive oil - 4 cloves garlic, minced - 1 can (28 ounces) crushed tomatoes - 1 teaspoon dried oregano - 1 teaspoon dried basil - 1/2 teaspoon red pepper flakes (optional for heat) - Salt and pepper to taste - 1 tablespoon sugar (to balance acidity) - Fresh basil leaves for garnish Next, mince the garlic. Use a sharp knife to chop it finely. This will help release its strong flavor. Measure out your canned tomatoes and seasonings. Having everything ready makes the cooking process smooth and easy. Now, heat the olive oil in a large saucepan over medium heat. Once hot, add the minced garlic. Sauté it for about 1-2 minutes. Watch closely! You want it fragrant but not burnt. After the garlic is ready, pour in the crushed tomatoes. Stir to combine. Add your dried oregano, dried basil, red pepper flakes (if you like heat), salt, and pepper. Mix in a tablespoon of sugar. This balances the acidity of the tomatoes well. Bring the sauce to a simmer. Then, lower the heat and let it cook for 15-20 minutes. Stir it occasionally to prevent sticking. This simmering time helps all the flavors blend beautifully. After cooking, taste your sauce. Adjust the seasonings if needed. You might want more salt or a bit more sugar. Once you have the flavor just right, remove the pot from the heat. Let it cool for a moment. Garnish with fresh basil leaves before serving. This adds color and freshness to your dish. Enjoy your Quick Italian Tomato Sauce! For the complete recipe, check the Full Recipe. - Use fresh tomatoes for a homemade touch: Fresh tomatoes bring bright flavor. Look for ripe ones. They add sweetness and depth. - Don’t skip the sugar for balanced flavor: Sugar cuts the acidity of the tomatoes. It helps the sauce taste rich and smooth. - Overcooking garlic: Garlic can turn bitter if cooked too long. Sauté it just until it's fragrant. This takes about 1-2 minutes. - Not seasoning adequately: Underseasoning can make your sauce bland. Always taste and adjust salt and pepper before serving. - Adding wine or balsamic vinegar: A splash of red wine or balsamic vinegar adds depth. It gives a complex flavor that enhances your sauce. - Experimenting with fresh herbs: Fresh herbs like basil or parsley can brighten the dish. Add them at the end for the best flavor. These tips will help you create a sauce that sings with flavor and charm. For the complete details on making this sauce, check out the Full Recipe. {{image_2}} If you want a kick in your sauce, add more red pepper flakes. Start with one teaspoon and taste as you go. You can always add more. For an extra punch, try adding diced jalapeños. They bring heat and flavor. Just chop them finely and sauté with the garlic. This gives you a spicy and tasty sauce that wakes up your dishes. You can switch the sugar for vegetable broth. This adds a rich flavor without any sweetness. If you prefer a raw taste, simply omit the sugar. The sauce will still shine with the tomatoes and herbs. Don’t be afraid to experiment. Each change can create a new experience for your taste buds. Want to mix things up? Add olives for a Mediterranean twist. Just chop them and stir them in. They add a nice briny flavor that pairs well with tomatoes. If you like Italian-American style, consider adding ground meat. Brown it first and then mix it into the sauce. This creates a hearty meal perfect for pasta or subs. For the full recipe, check out the recipe section above. After you finish cooking the sauce, let it cool down. Cooling helps keep the flavors fresh. Use an airtight container to store it. This keeps out air and moisture. If you don’t have one, a glass jar works too. Be sure to keep the lid tight. To freeze the sauce, pour it into a freezer-safe container. Leave some space at the top. The sauce will expand as it freezes. You can also use ice cube trays for smaller portions. Once frozen, transfer the cubes to a bag. This way, you can use just what you need later. To thaw, put it in the fridge overnight or warm it in a pot. In the fridge, this sauce lasts about five days. If you freeze it, it stays good for three months. For reheating, the stove works best. Just heat it over medium-low heat, stirring often. If it seems thick, add a splash of water or broth. This keeps it smooth and tasty. Enjoy your sauce in various dishes! For the full recipe, check the details above. Making Quick Italian Tomato Sauce is quick and easy. It takes about 25 minutes in total. You’ll spend 5 minutes prepping and 20 minutes cooking. This makes it perfect for a busy weeknight meal. Yes, you can use fresh tomatoes! However, you should consider a few things. First, you need about 2 pounds of fresh tomatoes for this recipe. Second, you will need to peel and chop them. Lastly, fresh tomatoes may need longer to cook down. This can change the flavor and texture of your sauce. Canned tomatoes offer a consistent taste and are ready to go. Quick Italian Tomato Sauce is versatile. Here are some great ways to use it: - Pasta: Toss with spaghetti, penne, or any of your favorite noodles. - Pizza: Spread it on pizza dough before adding toppings. - Lasagna: Layer it between sheets of pasta for a classic dish. - Dipping sauce: Serve it with breadsticks or mozzarella sticks. - Shakshuka: Use it as a base to cook eggs for a tasty breakfast. Feel free to get creative! You can even add veggies or proteins to make it suit your taste. Want to try making this sauce? Check out the Full Recipe for all the details. You now have all the tools to make a quick and tasty Italian tomato sauce. From choosing the right ingredients to mastering cooking techniques, each step matters. Don’t forget to adjust flavors to suit your taste. Try variations to keep things exciting. Store your sauce properly to enjoy later. This sauce will enhance many meals. With practice, you'll easily impress family and friends. Enjoy the process, and happy cooking!

Quick Italian Tomato Sauce Flavorful and Easy Recipe

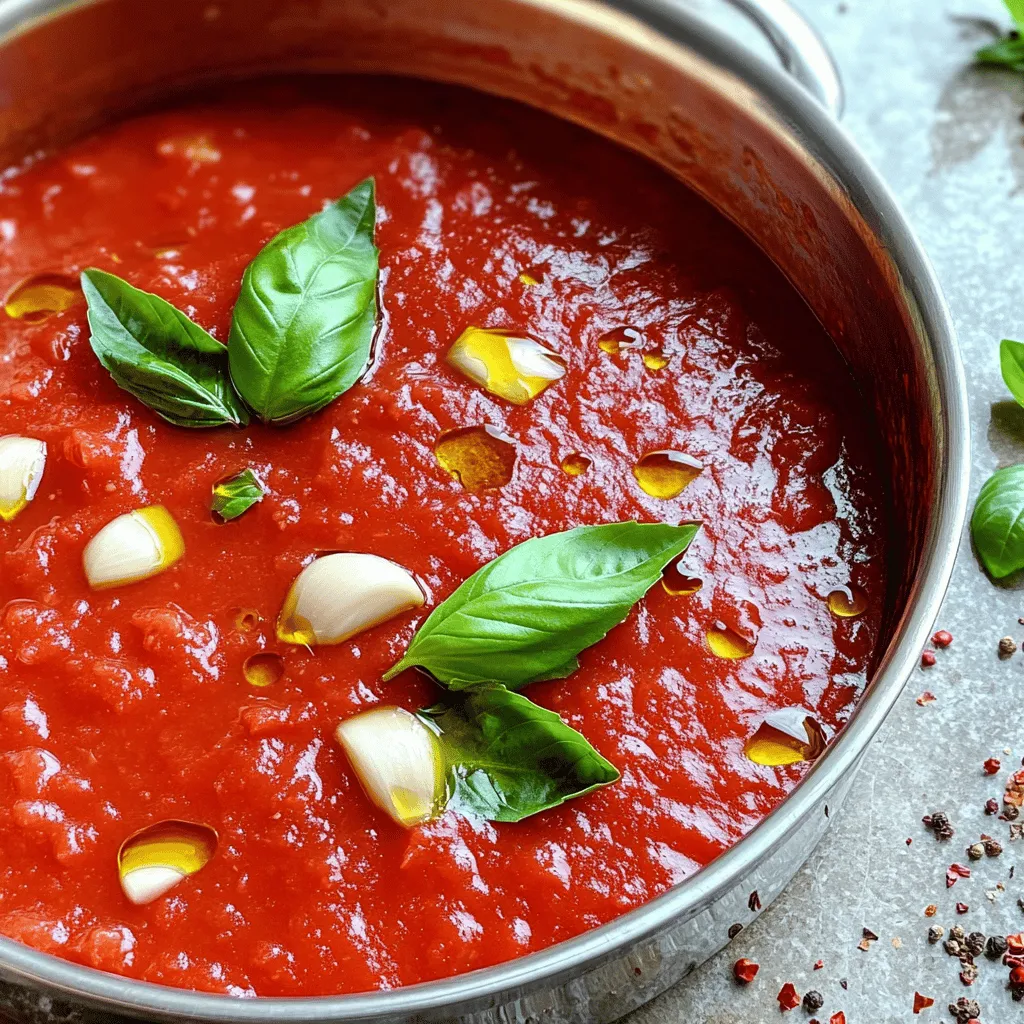
Looking for a quick and tasty tomato sauce that packs a punch? You’re in the right place! This Easy Italian

- Sweet potatoes and their preparation You need 2 large sweet potatoes. Scrub them well and cut them into wedges. This helps them roast evenly and get crispy. - Maple syrup and its qualities Use 3 tablespoons of pure maple syrup. It adds a rich sweetness. Pure maple syrup has natural flavors that enhance your dish. - Olive oil benefits Include 2 tablespoons of olive oil. It helps the sweet potatoes brown nicely. Olive oil also adds healthy fats to your meal. - Spices and herbs used Add 1 teaspoon of cinnamon for warmth. You can also use 1/2 teaspoon of cayenne pepper if you like heat. Season with salt and pepper to taste. Lastly, add 1 tablespoon of fresh rosemary, chopped, for freshness. - Optional ingredients for customization You might want to sprinkle sesame seeds for a nice crunch. Feel free to swap rosemary for other herbs if you prefer. These simple changes can make your dish unique. For the complete recipe, check out the Full Recipe. 1. Preheating the oven: Start by preheating your oven to 425°F (220°C). This temperature helps create crispy edges on the sweet potatoes. 2. Preparing the baking sheet: Line a baking sheet with parchment paper. This makes cleanup easy and keeps the wedges from sticking. To make the glaze, mix the following ingredients in a large bowl: - 3 tablespoons pure maple syrup - 2 tablespoons olive oil - 1 teaspoon cinnamon - 1/2 teaspoon cayenne pepper (optional) - Salt and pepper to taste Stir these ingredients well until they blend into a smooth glaze. This step is key for a balanced flavor. 1. Tips for placement on the baking sheet: Add the sweet potato wedges to the bowl with the glaze. Toss them gently until they are fully coated. Spread the wedges out in a single layer on the baking sheet. Make sure they are not crowded; this helps them roast evenly. 2. Flipping and timing for optimal results: Roast the wedges in the oven for 25-30 minutes. Halfway through, flip them to ensure they cook evenly. The wedges are done when they are tender and caramelized. In the last five minutes, sprinkle chopped rosemary over the wedges. This adds a fresh flavor. Don’t forget to check the [Full Recipe] for more details! To get the best glaze, mix your ingredients well. Combine maple syrup, olive oil, cinnamon, and spices in a bowl. This helps the flavors blend nicely. You want sweet and spice to work together. If you use cayenne pepper, adjust the amount to your taste. A little heat can make it exciting! For crispy sweet potato wedges, space them out on the baking sheet. If they are too close, they will steam and not crisp up. Keep the oven at 425°F. This high heat helps them caramelize and become golden. Flip the wedges halfway through cooking to get an even crisp. Garnish your wedges with sesame seeds after they bake. This adds a nice crunch and visual appeal. You can also sprinkle fresh herbs like rosemary for extra flavor. Serve them warm as a side dish or snack. They pair well with grilled meats or a fresh salad. For more ideas, check the Full Recipe for serving suggestions! {{image_2}} You can add some heat to your maple glazed sweet potato wedges. A pinch of cayenne pepper gives them a nice kick. If you want less heat, skip the cayenne. You can also try smoked paprika for a unique flavor. For sweet alternatives, consider honey or agave syrup. They add a different sweetness but still taste great. If you want a twist, use other root vegetables. Carrots or parsnips work well. They roast similarly and soak up the glaze. You can also change the herbs. Try thyme or parsley for a fresh taste. Each herb brings out different flavors in the dish. Dips can make your sweet potato wedges even better. Try a yogurt dip with herbs or a spicy mayo. They add an extra layer of flavor. For main dishes, pair them with grilled chicken or fish. They complement these proteins nicely and make a colorful plate. Check the Full Recipe for more ideas! To keep your maple glazed sweet potato wedges fresh, place them in an airtight container. Make sure they cool down before sealing. Store them in the fridge for up to three days. This way, the flavor stays strong, and the texture remains nice. When you're ready to enjoy leftovers, preheat your oven to 375°F (190°C). Spread the wedges on a baking sheet. Heat them for about 10-15 minutes. This helps keep them crisp and warm. Avoid using a microwave, as it can make them soggy. If you want to freeze the wedges, do this before roasting. Place the coated wedges in a single layer on a baking sheet. Freeze them for about an hour, then transfer them to a freezer bag. When you’re ready to cook, bake them straight from the freezer. Just add a few extra minutes to the cooking time. This way, you can enjoy this tasty dish later! For the full recipe, check the details above. To make maple glazed sweet potato wedges, start by gathering your ingredients. You will need two large sweet potatoes, maple syrup, olive oil, cinnamon, salt, pepper, and rosemary. 1. Prep the oven: First, preheat your oven to 425°F (220°C). Line a baking sheet with parchment paper for easy cleanup. 2. Make the glaze: In a big bowl, mix maple syrup, olive oil, cinnamon, salt, and pepper. If you want heat, add cayenne pepper. 3. Coat the wedges: Cut sweet potatoes into wedges. Toss them in the glaze until well coated. 4. Spread and roast: Lay the wedges on the baking sheet in a single layer. Roast for 25-30 minutes, flipping halfway. 5. Add flavor: In the last five minutes, sprinkle chopped rosemary on top. 6. Finish: Remove from the oven and garnish with sesame seeds before serving. Yes, you can use other sweeteners! Honey or agave syrup works well as a substitute. Each will give a slightly different flavor, but they add a nice sweetness. Just keep in mind that honey is sweeter than maple syrup, so you might want to use a bit less. Sweet potato wedges pair great with many dishes. Here are a few ideas: - Grilled chicken or fish - Burgers, especially turkey or veggie - A fresh green salad - Quinoa or rice dishes for a hearty meal Absolutely! Maple glazed sweet potato wedges are perfect for meal prep. You can make them in advance and store them in the fridge. They keep well for about 3 to 5 days. Just reheat in the oven for a few minutes to restore their crispiness. In this blog post, I covered how to prepare sweet potato wedges with a tasty maple glaze. We discussed the ingredients, steps, and tips for perfecting your dish. Remember, mixing the glaze well and spacing the wedges properly ensures that they roast to a crisp. Feel free to customize with your favorite spices or herbs. Enjoy these delicious wedges any time. They are easy to make and fun to share. Now, grab your ingredients, and get cooking!

Maple Glazed Sweet Potato Wedges Flavorful Side Dish

Looking for a tasty side dish that’ll wow your family? I’ve got you covered with my Maple Glazed Sweet Potato

Older posts
Newer posts
← Previous Page1 … Page4 Page5 Page6 … Page171 Next →
© 2025 Chelles Recipes • Built with GeneratePress

More Information

  • Home
  • Contact
  • About
  • Dinner
  • Appetizers
  • Dessert

Our Policies

  • Privacy Policy
  • GDPR Policy
  • Terms Of Use
  • Copyright Policy
  • Cookie Policy
  • Disclaimer
©2025, Chelles Recipes About Privacy Policy Back To Top