
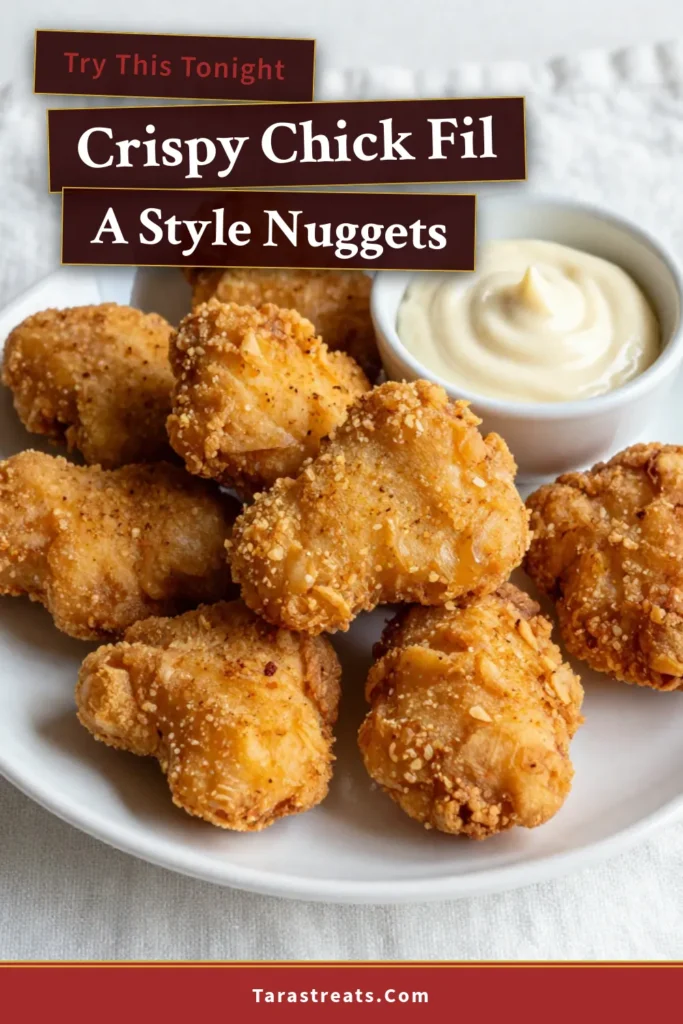
Are you craving those famous Chick-Fil-A nuggets but want to make them at home? You’re in the right place! In this guide, I’ll show you how to whip up crispy, juicy nuggets that taste just as good as the originals. With simple ingredients and easy steps, you’ll impress everyone with your cooking skills. Let’s dive in and create this tasty delight together!
Why I Love This Recipe
- Flavorful Marinade: The combination of dill pickle juice and buttermilk creates an incredibly flavorful base that tenderizes the chicken and infuses it with a delicious tang.
- Perfectly Crispy: The seasoned flour coating gives these nuggets the perfect crunch that contrasts beautifully with the juicy chicken inside.
- Customizable Spice: You can easily adjust the spice level by adding more or less cayenne pepper, making it suitable for all taste preferences.
- Quick and Easy: This recipe is straightforward and quick, allowing you to whip up a delicious meal or snack in no time!
Ingredients
Main Ingredients for Chick-Fil-A Style Nuggets
To make these tasty nuggets, you need simple, easy-to-find items. Here’s what to gather:
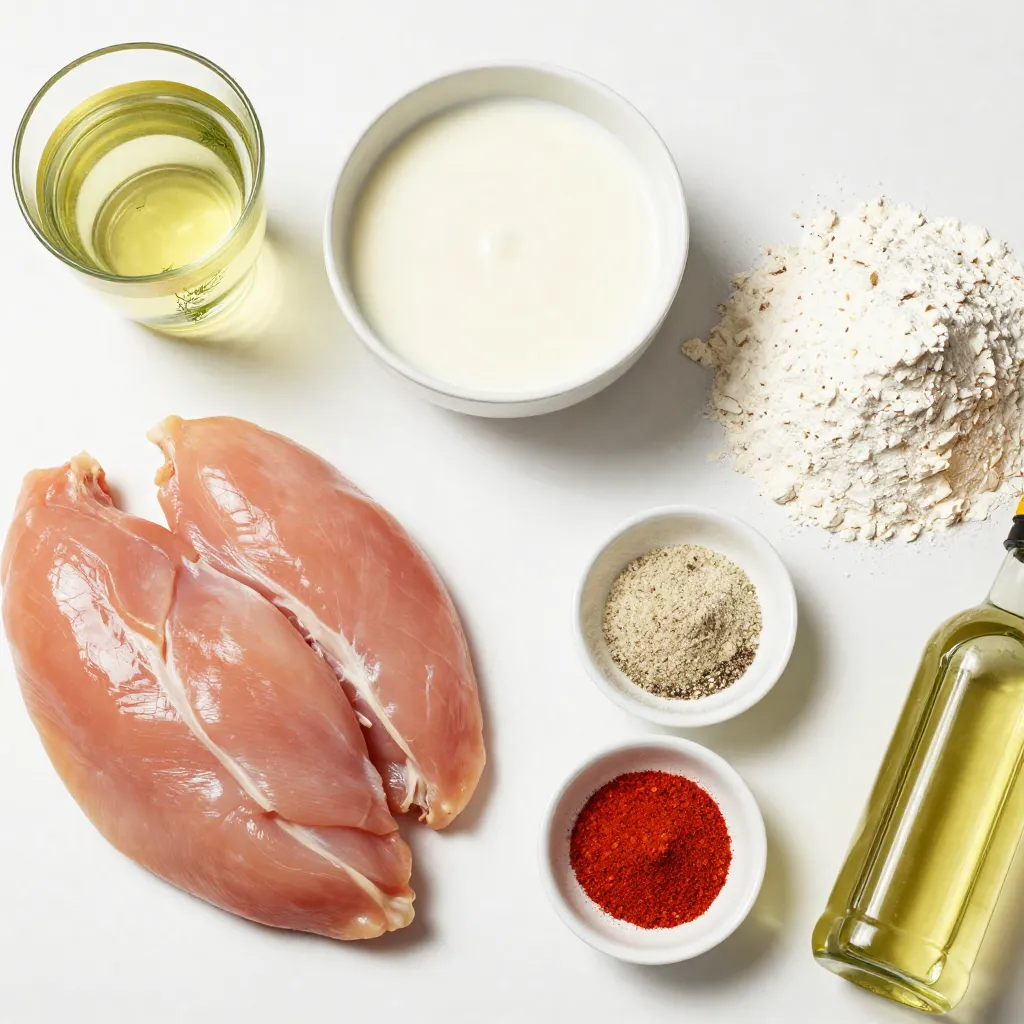
- 1 lb boneless chicken breasts, cut into bite-sized pieces
- 1 cup dill pickle juice
- 1 cup buttermilk
- 1 cup all-purpose flour
These main ingredients give you flavor and texture. The chicken serves as the base. The dill pickle juice adds a nice tang. Buttermilk keeps the nuggets moist and tender. The flour forms a crispy coating.
Seasoning Ingredients
Seasoning is key for flavor. Here’s what you’ll need:
- 1 teaspoon garlic powder
- 1 teaspoon onion powder
- 1 teaspoon paprika
- ½ teaspoon black pepper
- ½ teaspoon cayenne pepper (optional for spice)
These spices add depth and taste. Garlic and onion powder give a savory kick. Paprika adds a mild sweetness and color. Black pepper gives warmth, while cayenne is for those who like heat.
Oil Choice for Frying
Choosing the right oil matters for frying. You can use:
- Canola oil
- Peanut oil
Canola oil is light and has a high smoke point. Peanut oil has a nutty flavor and also works well for frying. Both choices help achieve that perfect golden brown color on your nuggets.
Step-by-Step Instructions
Marinating the Chicken
Start by cutting the chicken breasts into bite-sized pieces. Place the pieces in a large bowl. Pour the dill pickle juice over the chicken. This brine adds flavor and keeps the chicken moist. Cover the bowl and refrigerate for at least 30 minutes, but up to 2 hours works best.
Preparing the Buttermilk Mixture
Once marinated, drain the pickle juice and pat the chicken dry with paper towels. In a separate bowl, pour in 1 cup of buttermilk. Add the chicken pieces to the buttermilk. Make sure all the chicken is coated well. Let it sit for 10 to 15 minutes. This step tenderizes the chicken and adds creaminess.
Mixing the Seasoned Flour
Grab another bowl and whisk together your dry ingredients. Combine 1 cup of all-purpose flour with 1 teaspoon of garlic powder, 1 teaspoon of onion powder, and 1 teaspoon of paprika. Then, add ½ teaspoon of black pepper and ½ teaspoon of cayenne pepper if you like it spicy. This mixture gives the nuggets their signature crunch.
Coating the Chicken
Take the chicken out of the buttermilk. Let the excess buttermilk drip off. Dredge each piece in the seasoned flour mix. Make sure each piece is fully covered. Shake off any extra flour to avoid clumping. This step is key for a crispy texture.
Heating the Oil
In a deep skillet or fryer, pour in enough oil to cover the bottom by about 1 inch. Heat the oil to 350°F (175°C). Use a thermometer to check the temperature. This ensures the nuggets fry evenly and turn golden brown.
Frying the Nuggets
Carefully add a handful of chicken nuggets to the hot oil. Fry in batches to keep them from sticking together. Cook for 3 to 4 minutes on each side. Look for a golden brown color. Check that the internal temperature reaches 165°F (74°C). This step ensures the chicken is safe to eat.
Draining and Serving
Once the nuggets are golden and cooked, transfer them to a plate lined with paper towels. This helps drain any excess oil. Repeat the frying process for the remaining chicken pieces. Serve them hot with your favorite dipping sauce. Enjoy the crunchy delight of your homemade nuggets!
Tips & Tricks
Achieving the Perfect Texture
To get that crispy crunch, the oil needs to be hot. Aim for 350°F. If the oil is too cool, the nuggets will soak up oil and become soggy. If it’s too hot, they might burn on the outside before cooking inside. Marinate the chicken in pickle juice. This adds flavor and keeps it tender. After marinating, coat the chicken well in the buttermilk. Let it sit for 10-15 minutes before frying. This helps the flour stick better.
Recommended Dipping Sauces
These nuggets shine with the right sauces. Honey mustard is a classic choice. It’s sweet and tangy, perfect for the crispy nuggets. Barbecue sauce adds a smoky flavor. You can also try ranch dressing for a creamy dip. Want something spicy? Sriracha mixed with mayo gives a nice kick. Feel free to explore different sauces based on your taste!
Frying Safety Tips
Safety is key when frying. Always use a deep skillet or fryer for best results. Keep a close eye on the oil temperature. Use a thermometer if you have one. Never leave hot oil unattended. When adding chicken, do so carefully to avoid splashes. Use tongs to keep your hands safe. Have a plate ready lined with paper towels to drain excess oil after frying.
Pro Tips
- Marination Time: The longer you marinate the chicken in pickle juice, the more flavorful and tender it will become. Aim for at least 2 hours for the best results.
- Oil Temperature: Ensure the oil is at the right temperature (350°F/175°C) before frying. If it’s too hot, the nuggets will burn; if too cool, they will absorb excess oil and become greasy.
- Batch Frying: Fry the chicken nuggets in small batches to avoid overcrowding the skillet. This helps maintain the oil temperature and ensures even cooking.
- Serving Fresh: For the best texture, serve the nuggets immediately after frying. If you need to keep them warm, place them in a single layer on a baking sheet in a warm oven.
Variations
Adding Spice: Adjusting the Cayenne Pepper
You can make your nuggets spicier by adding more cayenne pepper. Start with ½ teaspoon for a mild kick. If you love heat, try 1 teaspoon or more. The spice adds a nice warmth that pairs well with the chicken. Taste your flour mix before coating the chicken. This lets you find the right level of spice for your taste.
Alternative Cooking Methods (Oven-Baking or Air-Frying)
If you prefer a healthier option, try baking or air-frying the nuggets. For baking, preheat your oven to 400°F (200°C). Place the coated nuggets on a baking sheet. Use parchment paper to prevent sticking. Bake for 15-20 minutes, flipping halfway through. For air-frying, set the air fryer to 400°F (200°C) and cook for 10-12 minutes. Both methods give you crispy nuggets with less oil.
Substituting Ingredients for Healthier Options
You can swap some ingredients for healthier choices. Use whole wheat flour instead of all-purpose flour. This adds fiber to your nuggets. You can also use almond milk instead of buttermilk for a dairy-free option. Marinating in low-sodium pickle juice helps cut back on salt. These small changes keep the taste while making the dish a bit lighter.
Storage Info
How to Store Leftover Nuggets
After enjoying these tasty nuggets, you may have some left. To store them, let the nuggets cool at room temperature. Then, place them in an airtight container. You can keep them in the fridge for up to 3 days. This way, they stay fresh and ready for your next meal.
Reheating Instructions
When you’re ready to enjoy the leftovers, reheating them is easy. Preheat your oven to 350°F (175°C). Place the nuggets on a baking sheet. Heat them for about 10-15 minutes. This keeps them crispy and warm. If you prefer a microwave, use it for 1-2 minutes. However, this may make them a bit soft.
Freezing for Future Meals
Freezing is a great option if you want to save nuggets for later. Start by letting them cool completely. Then, arrange them in a single layer on a baking sheet. Freeze them for 1-2 hours until solid. After that, transfer them to a freezer bag. You can store them for up to 3 months. When you’re ready to eat, just reheat as mentioned before!
FAQs
How long do I need to marinate the chicken?
You should marinate the chicken for at least 30 minutes. For the best taste, try to let it sit for 2 hours. This helps the chicken soak up the dill pickle juice, making it juicy and flavorful.
Can I make these nuggets gluten-free?
Yes, you can! Simply swap the all-purpose flour for a gluten-free flour blend. Many brands offer great blends that work well in frying. This way, everyone can enjoy the tasty nuggets.
What is the best oil for frying?
Canola oil or peanut oil works best for frying these nuggets. Both oils have a high smoke point. This means they can heat up without burning, giving you crispy and golden nuggets.
How can I make a large batch for a party?
To make a big batch, just double or triple the recipe. Marinate multiple pounds of chicken at once. Fry them in batches to keep them crispy. This way, you can serve many guests easily.
Are these nuggets kid-friendly?
Absolutely! These nuggets are perfect for kids. They are crunchy, tasty, and easy to eat. Serve them with dipping sauces like honey mustard or barbecue sauce for extra fun.
You learned how to make Chick-Fil-A style nuggets. We covered ingredients, steps, and tips for perfect results. Any cook can marinate, coat, and fry these nuggets with ease. Add your favorite sauces or spice them up for more flavor. Store leftovers for quick meals later.
This recipe is great for families and gatherings. With these details, you can create nuggets everyone will love. Enjoy your cooking adventur

Chick-Fil-A Nugget Delights
Ingredients
- 1 lb boneless chicken breasts, cut into bite-sized pieces
- 1 cup dill pickle juice
- 1 cup buttermilk
- 1 cup all-purpose flour
- 1 teaspoon garlic powder
- 1 teaspoon onion powder
- 1 teaspoon paprika
- 0.5 teaspoon black pepper
- 0.5 teaspoon cayenne pepper (optional for spice)
- as needed Oil for frying (canola or peanut oil)
Instructions
- In a large bowl, combine the chicken pieces and pickle juice. Cover and let it marinate in the refrigerator for at least 30 minutes to 2 hours.
- After marination, drain the pickle juice and pat the chicken dry. In a separate bowl, mix the chicken with buttermilk, ensuring each piece is well-coated. Let it sit for 10-15 minutes.
- In another bowl, whisk together the flour, garlic powder, onion powder, paprika, black pepper, and cayenne pepper (if using).
- Remove the chicken from the buttermilk, letting excess dip off. Dredge each piece in the seasoned flour until fully covered. Shake off any excess flour.
- In a deep skillet or fryer, heat about 1 inch of oil over medium-high heat until it reaches 350°F (175°C).
- Carefully add a handful of chicken nuggets to the hot oil, frying in batches to avoid overcrowding. Fry for 3-4 minutes on each side, or until they are golden brown and cooked through (internal temperature should reach 165°F or 74°C).
- Once cooked, transfer the nuggets to a plate lined with paper towels to drain excess oil. Repeat the frying process for the remaining chicken.
- Serve the nuggets hot with your favorite dipping sauce, such as honey mustard or barbecue sauce.
