
Get ready to delight your taste buds with my easy recipe for Mini Crème Brûlée Cheesecakes! This sweet twist on a classic dessert combines creamy cheesecake with a crunchy caramelized topping, giving you a bite-sized treat that’s both fancy and fun. Perfect for parties or a special night in, these mini cheesecakes are sure to impress. Let’s dive into the simple steps to create these delicious desserts!
Ingredients
List of Required Ingredients
- 1 cup graham cracker crumbs
- 1/4 cup unsalted butter, melted
- 2 cups cream cheese, softened
- 1/2 cup granulated sugar
- 1/2 cup sour cream
- 2 large eggs
- 1 teaspoon vanilla extract
- 1 teaspoon lemon zest
- 1/3 cup granulated sugar (for brûlée topping)
When I make mini crème brûlée cheesecakes, I love to gather my ingredients first. The crust starts with graham cracker crumbs mixed with melted butter. This mix gives the cheesecakes a rich base.
Next, I grab my cream cheese. It should be soft for easy mixing. Add granulated sugar, sour cream, eggs, vanilla, and lemon zest to the bowl. Each ingredient plays a key role in flavor. Cream cheese gives it that classic tang, while lemon zest adds a fresh twist.
For the topping, I use granulated sugar. This sugar caramelizes into a crunchy layer. It’s the final touch that makes these cheesecakes special.
Suggested Tools and Equipment
- Muffin tin
- Cupcake liners
- Kitchen torch or broiler
- Mixing bowls and utensils
For tools, I recommend a muffin tin and cupcake liners. These make baking and serving easy. A kitchen torch is best for brûlée topping, but a broiler works too. Just keep an eye on it! Mixing bowls and utensils are a must for blending ingredients smoothly.
Ready to start?
Step-by-Step Instructions
Preparation Steps
- Preheat your oven to 325°F (160°C).
- Line a muffin tin with cupcake liners.
Cheesecake Assembly
- In a medium bowl, combine 1 cup of graham cracker crumbs with 1/4 cup of melted unsalted butter. Mix well until the crumbs are coated.
- Press about 1 tablespoon of this mixture into each cupcake liner. This will form your crust.
Baking the Cheesecakes
- In a large bowl, blend 2 cups of softened cream cheese with 1/2 cup of granulated sugar. Mix until smooth.
- Add 1/2 cup of sour cream, 2 large eggs, 1 teaspoon of vanilla extract, and 1 teaspoon of lemon zest. Beat until fully combined and creamy.
- Pour the cheesecake batter over the crusts, filling each liner about 3/4 full.
- Bake for 15–18 minutes. The edges should set, but the centers should still jiggle a bit.
- After baking, turn off the oven and let the cheesecakes cool inside for about 1 hour. Keep the door slightly open.
- Transfer the cooled cheesecakes to the fridge. Chill for at least 4 hours, or overnight for the best results.
- Before you serve, sprinkle about 1 teaspoon of granulated sugar on top of each cheesecake. Use a kitchen torch to caramelize it until golden. If you don’t have a torch, place them under the broiler for a minute or two, watching closely to avoid burning.
- Let the brûlée topping cool and harden for a few minutes before serving.
Tips & Tricks
Achieving the Perfect Texture
To make the best mini crème brûlée cheesecakes, start with softened cream cheese. Softening it makes mixing easier. You want a smooth and lump-free batter. Leave the cream cheese out at room temperature for about 30 minutes before using.
Chilling is also key. After baking, let the cheesecakes cool in the oven for about an hour. This helps them set properly. Then, refrigerate them for at least four hours. Chilling overnight often gives the best flavor.
How to Caramelize Sugar Properly
Caramelizing sugar gives your cheesecakes a lovely crunch. You can use a kitchen torch for this. It allows you to control the heat well. If you don’t have one, a broiler works too. Just pay close attention. Sugar can burn quickly under high heat.
When using a torch, sprinkle sugar evenly on top. Aim for a thin layer. Then, move the flame in small circles. This helps the sugar melt and bubble nicely. If you see it turning dark too fast, pull back the flame.
Serving Suggestions
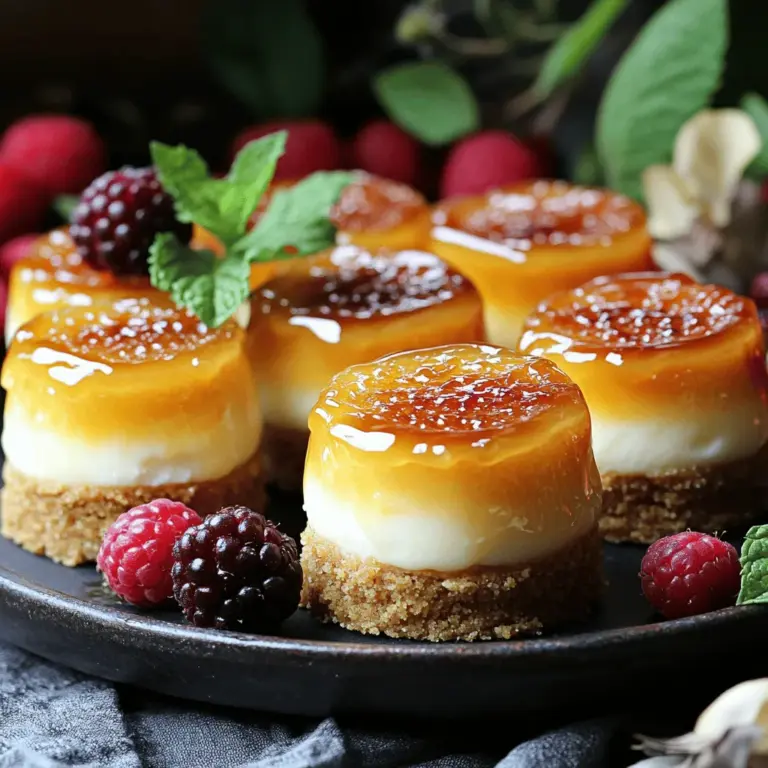
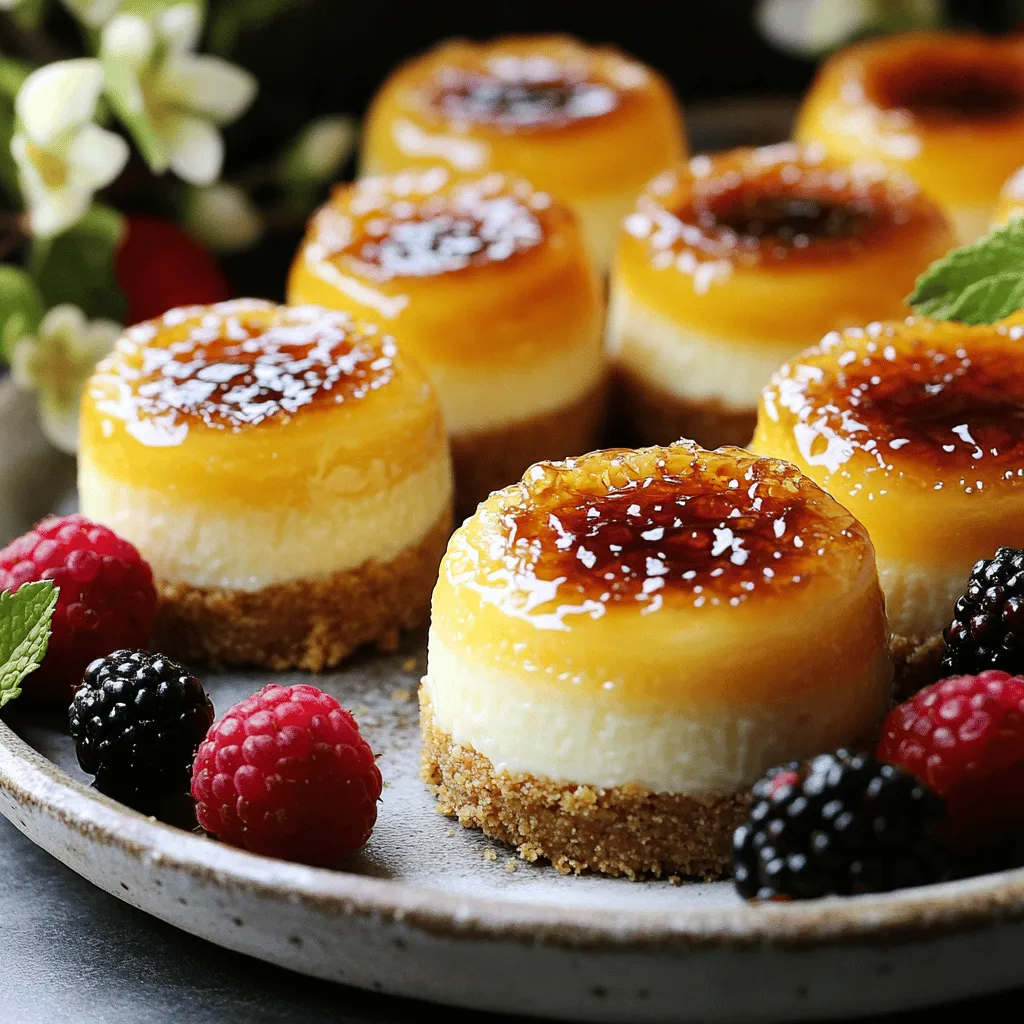
Presentation matters when serving these mini cheesecakes. A nice platter goes a long way. Place the cheesecakes neatly and add garnishes. Fresh berries or a mint leaf add color and charm. You can also dust some powdered sugar for extra flair.
For a fun touch, serve with a small pitcher of chocolate or fruit sauce. This gives guests the option to pour some on top. It adds flavor and looks great on the plate.
Variations
Flavor Variations
You can change the flavor of your mini crème brûlée cheesecakes. Adding different citrus zest can brighten the taste. Try orange, lime, or grapefruit zest for a fresh twist. You can also use flavored extracts, like almond or coconut. A few drops can add depth to the cheesecake.
Dietary Variations
If you need gluten-free options, use almond flour or gluten-free cookies for the crust. It still provides a great texture. For those who want dairy-free, you can use vegan cream cheese. Coconut cream or almond milk can replace sour cream. These swaps help everyone enjoy this treat.
Mini Cheesecake Designs
You can serve these cheesecakes as individual treats in muffin liners. This makes each one special. Alternatively, bake in a larger pan and cut into squares. The choice is yours! For toppings, go beyond the classic brûlée. Fresh fruit, chocolate shavings, or a drizzle of caramel can enhance the look and taste. Explore different designs to impress your guests.
Storage Info
Proper Storage Techniques
To keep your mini crème brûlée cheesecakes fresh, store them in the fridge. Place them in an airtight container. This helps prevent any odors from seeping in. You can also wrap each cheesecake in plastic wrap for extra protection. If you want to freeze them, first let them cool completely. Then, wrap each one in plastic wrap and place them in a freezer-safe bag. This keeps them safe for a longer time.
Shelf Life
In the fridge, your mini cheesecakes will last about 5 days. Keep an eye on them as they age. If you notice any off smells or visible mold, it’s time to toss them. In the freezer, they can last up to 2 months. Just remember to thaw them in the fridge before serving.
Reheating Tips
When you’re ready to enjoy your cheesecakes again, reheat them gently. The best way is to place them in the oven at 250°F (120°C) for about 10 minutes. This helps maintain their creamy texture. After reheating, sprinkle sugar on top and use your kitchen torch or broiler to caramelize the sugar. Serve them fresh with a nice garnish for a delightful treat.
FAQs
What can I substitute for cream cheese?
If you need a cream cheese substitute, try these options:
- Greek yogurt: It has a similar texture and tangy flavor.
- Mascarpone: This creamy cheese works well in many recipes.
- Silken tofu: Blend it until smooth for a dairy-free option.
These options can help if you have lactose intolerance or prefer a different taste.
Can I make Mini Crème Brûlée Cheesecakes in advance?
Yes, you can prepare these cheesecakes ahead of time. Here’s how:
- Make the filling: Follow the recipe and bake as directed.
- Chill: Once cooled, cover and store them in the fridge for up to two days.
- Brûlée topping: Add the sugar and caramelize just before serving. This keeps the topping crunchy.
This way, you can impress guests without stress!
What if I don’t have a kitchen torch?
If you lack a kitchen torch, don’t worry! Here are two easy methods:
- Broiler method: Place the cheesecakes under the broiler for 1-2 minutes. Keep an eye on them to avoid burning.
- Stovetop method: Heat a non-stick pan over medium heat. Place a heatproof dish on the pan and sprinkle sugar on top. Let it melt until golden.
Both methods will give you that delightful brûlée effect!
You’ve learned how to make mini crème brûlée cheesecakes from scratch. We covered the needed ingredients, tools, and a clear step-by-step guide. Tips on texture and serving ideas will help you impress your guests. Don’t forget about flavor variations and proper storage methods. Now you are ready to create these delicious treats with confidence. Enjoy your baking journey and delight in the smiles your cheesecakes bring!

