Go Back
- 2 ½ cups all-purpose flour - 1 teaspoon baking soda - ½ teaspoon baking powder - ½ teaspoon salt - 1 cup unsalted butter, softened - 1 cup granulated sugar - 1 cup powdered sugar - 2 large eggs - 2 teaspoons pure vanilla extract - ½ teaspoon almond extract (optional) When making homemade vanilla wafers, you need simple ingredients. Each one plays a key role. The flour gives structure. Baking soda and powder help them rise. Salt enhances flavor. Butter is vital for a rich, creamy texture. Granulated sugar and powdered sugar sweeten the wafers. The eggs bind the mix. Vanilla extract adds classic flavor. Almond extract gives a twist, but it’s optional. - Mixing bowls - Electric mixer - Cookie scoop or tablespoon - Baking sheets - Parchment paper You also need some tools to make this recipe easy. Mixing bowls help blend the dough. An electric mixer saves time and effort. A cookie scoop or tablespoon allows for even portions. Baking sheets help the wafers bake evenly, and parchment paper prevents sticking. These ingredients and tools set you up for success. Make sure you have everything ready. Then, you can enjoy making these tasty homemade vanilla wafers! For the full recipe, check back to the beginning. 1. First, preheat your oven to 350°F (175°C). This helps the wafers bake evenly. 2. Line your baking sheets with parchment paper. This will prevent the wafers from sticking. 3. In a bowl, whisk together the flour, baking soda, baking powder, and salt. Mix well, and set this aside. 1. In a large bowl, cream the softened butter, granulated sugar, and powdered sugar. Use an electric mixer for about 3-4 minutes. Aim for a light and fluffy texture. 2. Next, add the eggs, one at a time. Mix well after each addition. 3. Then, stir in the vanilla extract and almond extract if you like. This adds a nice layer of flavor. 1. Use a small cookie scoop or tablespoon to drop mounds of dough onto your prepared baking sheets. Space them about 2 inches apart. 2. Flatten each mound slightly with the back of a fork. This gives them a nice shape. 3. Bake the wafers in your preheated oven for 10-12 minutes. Look for lightly golden edges. 4. After baking, let the wafers cool on the baking sheets for 5 minutes. Then, transfer them to wire racks to cool completely. For more detailed steps, you can check the Full Recipe. Enjoy making these delightful homemade vanilla wafers! To get the best texture for your vanilla wafers, avoid over-mixing the dough. Over-mixing can make your cookies tough. Mix just until the dry and wet ingredients blend together. This keeps your wafers light and crisp. When it comes to flattening the dough, use the back of a fork. Press down gently on each mound of dough. This helps them bake evenly. You can also use your fingers if you prefer. Just make sure they are not too flat. Pair your vanilla wafers with a hot drink. They go well with coffee or tea. The warm flavors enhance the sweetness. You can also use them in desserts. Try stacking them with whipped cream and berries. This makes a fun and tasty treat! For a simple yet elegant presentation, serve them in a decorative jar. You can also place them on a cake stand. Add a sprig of mint for a pop of color. This makes for a lovely display. Baking time and temperature are key. Keep an eye on your wafers. If you bake them too long, they may turn hard. Aim for edges that are lightly golden for the best results. Also, be careful with ingredient substitutions. Not all flours or sugars work the same. Using a different type of flour may change the texture. Stick to the recipe for the best outcome. If you must substitute, do it wisely! For the full recipe, check out the complete guide. Enjoy baking! {{image_2}} You can easily change the taste of your homemade vanilla wafers. One popular option is adding chocolate chips. Just fold in about 1 cup of chocolate chips into your dough. This gives a sweet twist that kids love. Another fun idea is to use different extracts. While vanilla is classic, you can try almond or coconut extract. Each extract brings a new flavor. You can mix and match to find your favorite. If you need gluten-free options, substitute the all-purpose flour with a gluten-free blend. Make sure the blend has xanthan gum. This helps the wafers hold together well. For vegan substitutions, replace the butter with vegan butter. Use flax eggs instead of regular eggs. To make one flax egg, mix 1 tablespoon of ground flaxseed with 3 tablespoons of water. Let it sit for 5 minutes before using. You can also give your wafers a seasonal twist. For holidays, add festive spices like cinnamon or nutmeg. A little sprinkle of colored sugar on top makes them fun for celebrations. Incorporate seasonal flavors like pumpkin spice in fall or peppermint in winter. These variations will keep your vanilla wafers exciting all year round. Store your homemade vanilla wafers in an airtight container. A glass jar or a plastic container works well. Keep them at room temperature, away from direct sunlight. They stay fresh for about one week. To freeze your wafers, place them in a single layer on a baking sheet. Put the sheet in the freezer for about an hour. Once they are frozen, transfer them to a zip-top bag. Remove as much air as you can before sealing. They can last up to three months in the freezer. To thaw, take them out of the bag and let them sit at room temperature for about 30 minutes. You can also warm them in the oven at a low temperature for a few minutes. If your wafers go stale, don't worry! You can revive them. Preheat your oven to 300°F (150°C). Place the wafers on a baking sheet. Bake for about 5 minutes. This will help crisp them up again. Enjoy your wafers fresh and tasty once more! Homemade vanilla wafers can last about one week when stored correctly. Keep them in an airtight container to keep them fresh. You can place them in a cool, dry spot. If you want to keep them longer, you can freeze them. In the freezer, they can last up to three months. Just remember to let them thaw at room temperature before serving. Yes, you can use other types of flour. Whole wheat flour or almond flour can work well. However, these options may change the taste and texture. Whole wheat flour makes the wafers a bit denser. Almond flour can add a nutty flavor. Experiment to find what you like best! You can make egg-free wafers! Try using unsweetened applesauce or mashed bananas as a substitute. Use about ¼ cup of either for each egg. You can also use flaxseed meal mixed with water. Mix 1 tablespoon of flaxseed meal with 3 tablespoons of water and let it sit for a few minutes. This will help bind the ingredients. Homemade vanilla wafers taste fresher and richer. You can control the ingredients, avoiding preservatives and artificial flavors. Store-bought wafers are often crunchy, while homemade ones can be softer and chewier. Plus, you can adjust the sweetness and flavor to your liking. Yes, you can make the wafers any size you want! If you want bigger wafers, scoop more dough for each piece. Just remember to adjust the baking time. Larger wafers may need a few extra minutes in the oven. Keep an eye on them to avoid overbaking. In this blog post, I shared how to make delicious homemade vanilla wafers. You learned about the ingredients, equipment, and step-by-step instructions to create the perfect dough. I also covered tips to enhance flavor, avoid common mistakes, and ways to store your wafers. Remember to experiment with variations that suit your taste. Homemade wafers taste better than store-bought, and they are easy to make! Enjoy your baking journey and have fun sharing these tasty treats.

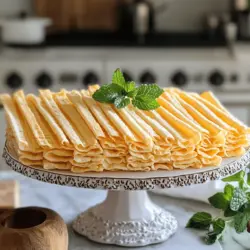
Homemade Vanilla Wafers

Indulge your sweet tooth with this easy and delightful homemade vanilla wafers recipe! With simple ingredients and quick steps, you'll create light, crunchy wafers perfect for snacking or dessert. These homemade treats are far superior to store-bought ones, and you can even customize flavors to suit your taste. Click through to explore the full recipe and tips to impress your family and friends with these delicious homemade vanilla wafers!

Ingredients
  

2 ½ cups all-purpose flour

1 teaspoon baking soda

½ teaspoon baking powder

½ teaspoon salt

1 cup unsalted butter, softened

1 cup granulated sugar

1 cup powdered sugar

2 large eggs

2 teaspoons pure vanilla extract

½ teaspoon almond extract (optional)

Instructions
 

Preheat your oven to 350°F (175°C). Line baking sheets with parchment paper.

    In a bowl, whisk together the flour, baking soda, baking powder, and salt until combined. Set aside.

      In a large mixing bowl, cream the softened butter, granulated sugar, and powdered sugar together using an electric mixer until light and fluffy (about 3-4 minutes).

        Add the eggs, one at a time, mixing well after each addition. Then mix in the vanilla extract and almond extract if using.

          Gradually add the dry ingredient mixture to the wet ingredients, mixing just until incorporated. Avoid over-mixing.

            Using a small cookie scoop or a tablespoon, drop mounds of dough about 2 inches apart on the prepared baking sheets. Flatten each mound slightly with the back of a fork.

              Bake in the preheated oven for 10-12 minutes, or until the edges are lightly golden.

                Allow the wafers to cool on the baking sheets for 5 minutes before transferring them to wire racks to cool completely.

                  Prep Time: 15 minutes | Total Time: 27 minutes | Servings: 24 wafers

                    - Presentation Tips: Serve the vanilla wafers in a decorative jar or on a cake stand, and garnish with a sprig of mint for a pop of color. Enjoy with coffee or tea for a delightful treat!