Get ready to spread some holiday cheer with my Salted Peanut Butter Christmas Trees! These festive treats are easy to make and perfect for your holiday gatherings. With just a few simple ingredients, you’ll craft delightful trees that taste amazing. Whether you want tips for decorations or ideas for healthier swaps, this guide has you covered. Let’s dive into making your season merry and bright with these delicious little trees!
Why I Love This Recipe
- Delicious Flavor: The combination of creamy peanut butter and sweet honey creates a delightful balance that everyone loves.
- Fun to Make: Shaping these festive trees is a fun activity for both kids and adults, making it a perfect holiday project.
- Healthy Ingredients: With natural peanut butter, oats, and optional honey, these treats offer a healthier alternative to traditional holiday sweets.
- Customizable Decorations: You can personalize these trees with various toppings like chocolate, sprinkles, or even different food coloring!
Ingredients
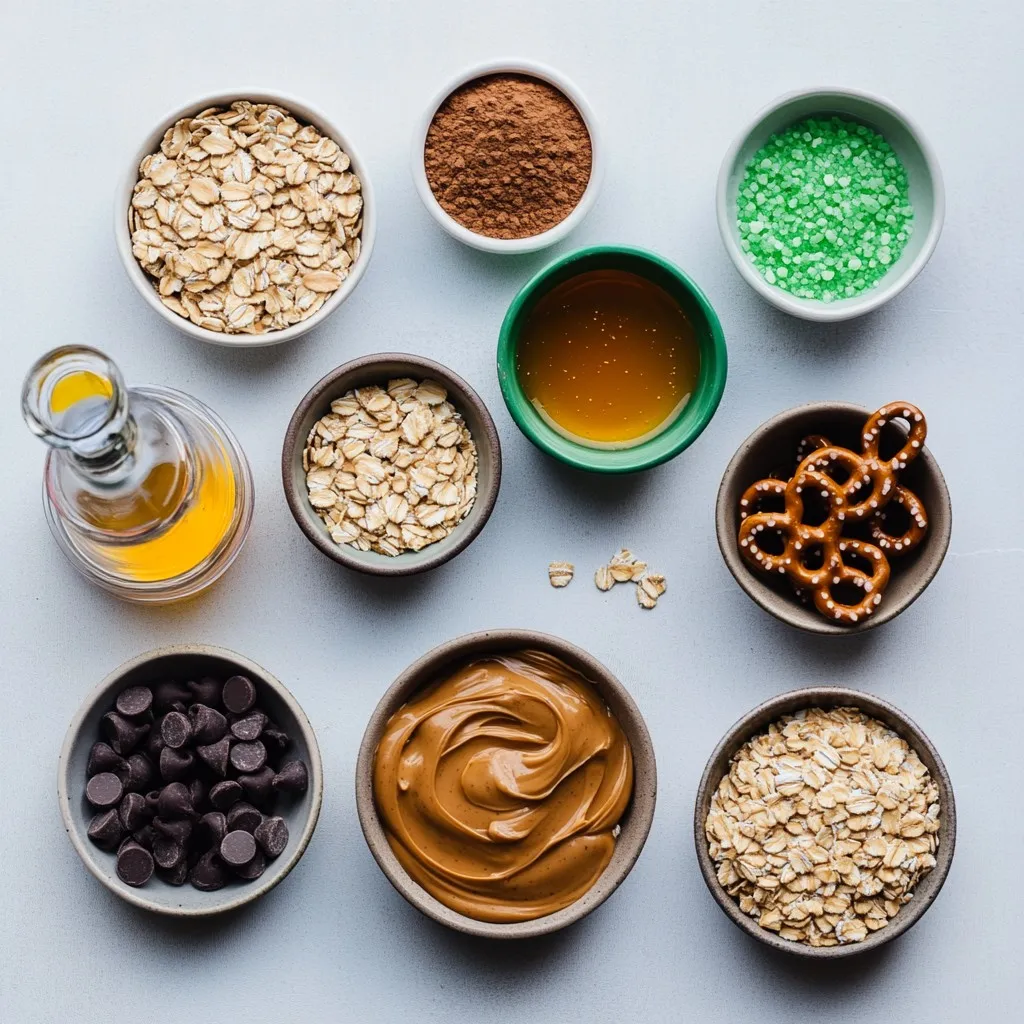
List of Ingredients
– 1 cup natural peanut butter
– 1/2 cup honey or maple syrup
– 3 cups rolled oats
– 1/2 teaspoon vanilla extract
– 1/4 teaspoon salt
– 1/4 cup mini chocolate chips (optional)
– 1/4 cup crushed pretzels (for decoration)
– Green food coloring (optional)
– Edible glitter or star-shaped sprinkles (for decoration)
These simple ingredients create a fun holiday treat. The peanut butter gives a rich flavor. Honey or maple syrup adds sweetness. Rolled oats provide a chewy texture. Vanilla and salt enhance the taste. Optional mini chocolate chips add a nice surprise. Crushed pretzels make for great decoration. Food coloring brings a festive touch. Edible glitter or sprinkles make everything sparkle!
Substitutions for Ingredients
If you want to change things up, here are some ideas:
– Peanut Butter: Use almond or cashew butter for a nut-free version.
– Honey/Maple Syrup: Swap with agave syrup if needed.
– Rolled Oats: Try quick oats for a smoother texture.
– Chocolate Chips: Use white chocolate or dark chocolate.
These swaps can keep your trees fun and tasty. Don’t worry; they will still taste great!
Optional Add-ins for Flavor and Presentation
You can add extras to make your trees even better:
– Chopped nuts: Add crushed almonds or pecans for crunch.
– Coconut flakes: Sprinkle on top for a snowy look.
– Dried fruits: Use cranberries or raisins for a fruity taste.
These add-ins can boost flavor and make your trees unique. Get creative and have fun with your decorations!
Step-by-Step Instructions
Preparing the Peanut Butter Mixture
Start by taking a medium bowl. In it, combine 1 cup of natural peanut butter and 1/2 cup of honey or maple syrup. Mix these two until the blend is smooth. Add 1/2 teaspoon of vanilla extract and 1/4 teaspoon of salt. Stir well to combine. Now, gradually fold in 3 cups of rolled oats. Make sure the oats are well coated. If you want a festive twist, add a few drops of green food coloring. This step makes the mixture pop with holiday cheer.
Forming the Christmas Trees
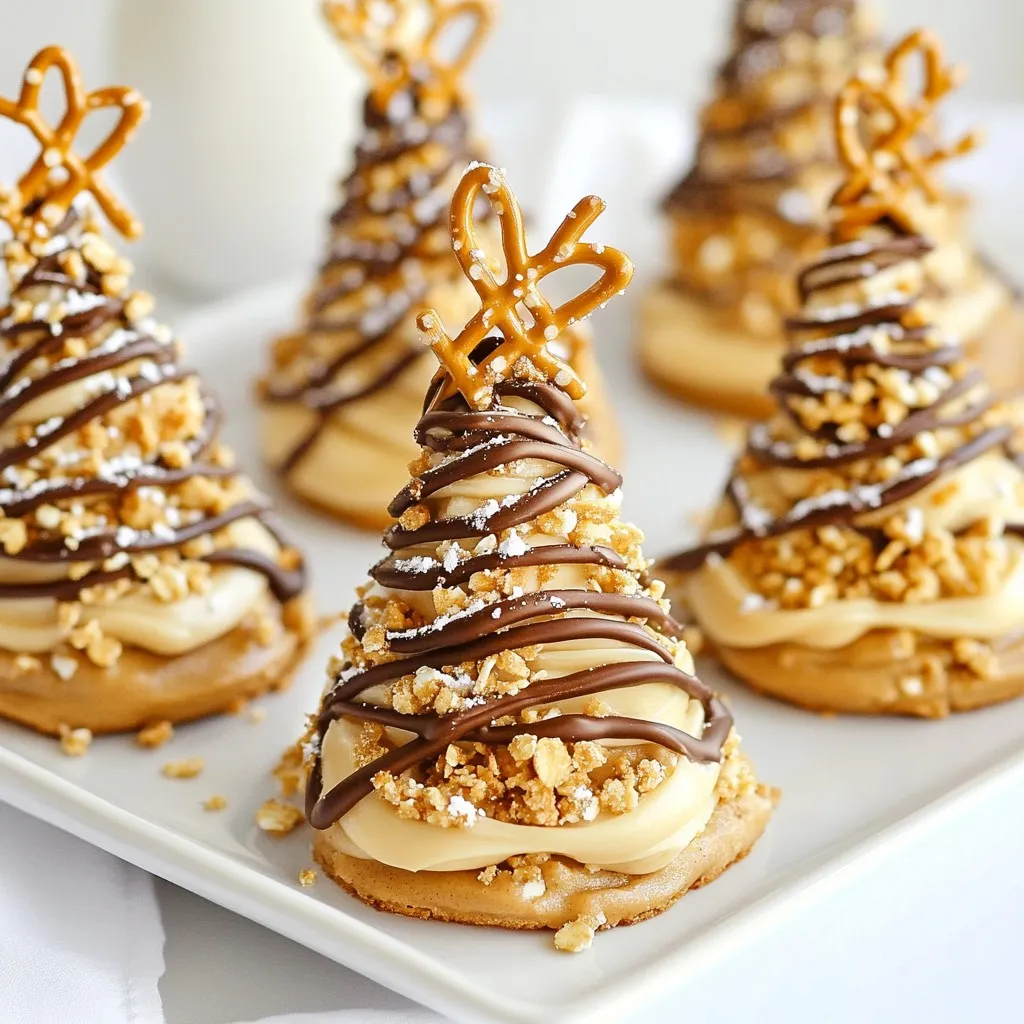
Once your mixture is ready, refrigerate it for about 30 minutes. This step helps it harden slightly. After chilling, take small handfuls of the mixture. Shape them into triangular forms with a flat base. Aim for a height of 2-3 inches. This size works best for little hands. Place them on a parchment-lined baking sheet. You should see a whole forest of trees coming to life!
Decorating Tips and Techniques
Now comes the fun part—decorating! Melt some chocolate in the microwave or a double boiler. Drizzle it over the trees or dip the bottoms in the chocolate. This adds a rich flavor. Next, sprinkle crushed pretzels and edible glitter or star-shaped sprinkles on top. These decorations give a festive touch. After decorating, return the trees to the fridge for another 30 minutes. This helps everything set nicely. Enjoy your creative and tasty holiday treats!
Tips & Tricks
Best Practices for Shaping Trees
When shaping your trees, make sure your hands are clean. It helps to dampen your hands slightly. This keeps the mixture from sticking too much. Take small handfuls of the chilled mixture. Form them into triangles with a flat base. Aim for about 2-3 inches tall. If they fall apart, just press them together again.
How to Achieve the Perfect Texture
To get the right texture, start with natural peanut butter. It has the best flavor and binds well. Mix in honey or maple syrup to sweeten. This keeps the trees moist and tasty. Use rolled oats for a hearty feel. They help hold everything together. If the mixture feels too dry, add a tiny bit of water. If it’s too wet, add more oats.
Troubleshooting Common Issues
If your trees don’t hold their shape, try chilling the mixture longer. A firmer mixture is easier to shape. If they fall apart after shaping, they might need more oats. If they don’t taste sweet enough, drizzle in more honey or syrup. Lastly, if they lack color, add more green food coloring. This makes them festive and fun!
Pro Tips
- Chilling is Key: Allow the mixture to chill for at least 30 minutes before shaping. This helps the trees hold their form better.
- Color It Up: If you want a festive look, add a few drops of green food coloring to the mixture before shaping the trees.
- Get Creative with Toppings: Feel free to use different toppings like coconut flakes or colored sugars to make your trees even more festive.
- Perfect Presentation: Use a piping bag to drizzle melted chocolate for a more decorative finish on your trees.
Variations
Different Flavor Additions
You can play with flavors in your salted peanut butter Christmas trees. Consider adding some spices for warmth. Ground cinnamon or nutmeg can give a cozy taste. You can also mix in some cocoa powder for a chocolatey twist. If you want a fruity touch, try adding dried cranberries or raisins. They add color and sweetness.
Alternative Decoration Ideas
Decorating these trees can be fun! Instead of chocolate drizzle, you can use white chocolate for a snowy effect. Try coconut flakes for a winter wonderland look. You can also use mini marshmallows as ornaments. For a playful touch, use candy canes or gumdrops to add color and texture. Let your creativity shine!
Healthier Ingredient Swaps
Want to make these trees healthier? You can swap honey or maple syrup with agave syrup for less sugar. Use almond butter if you want a nut-free option. For a gluten-free version, ensure your oats are certified gluten-free. You can even add some ground flaxseed for extra fiber. These swaps keep the treats tasty and nutritious.
Storage Info
How to Store Leftover Trees
To keep your salted peanut butter Christmas trees fresh, store them in an airtight container. Place parchment paper between layers to avoid sticking. Keep them in the fridge for best results. This helps maintain their taste and texture.
Freezing Options for Long-term Storage
You can freeze these festive treats for longer storage. Wrap each tree in plastic wrap, then place them in a freezer-safe bag. Make sure to remove as much air as possible. They can stay good in the freezer for up to three months.
Shelf Life of Salted Peanut Butter Trees
These trees will last about one week in the fridge. If you freeze them, they can last much longer. Just remember to thaw them in the fridge before serving. This keeps them tasty and safe to eat.
FAQs
Can I make these trees ahead of time?
Yes, you can make these trees in advance. They store well in the fridge for up to a week. Just keep them in an airtight container to keep them fresh. You can also freeze them. They stay good for about two months in the freezer. Just thaw them in the fridge when you’re ready to enjoy.
What can I use instead of peanut butter?
If you need a replacement for peanut butter, try almond butter or sunflower seed butter. Both offer a creamy texture and a great taste. Sunflower seed butter is nut-free, making it safe for schools. Also, tahini can work well if you want a different flavor profile.
How do I make these trees vegan-friendly?
To make these trees vegan, use maple syrup instead of honey. All other ingredients are already vegan-friendly. Ensure you check that any chocolate you add is dairy-free. You can also skip the chocolate for a simple treat.
We covered all the essential steps to make tasty Christmas trees from peanut butter. You learned about the needed ingredients, fun flavor ideas, and how to style your trees. Remember to store leftovers properly for fresh snacks later. Try different flavors and healthy swaps for your recipe. Making these trees can spark joy during the holidays. Your creativity will impress friends and family. Enjoy making these treats, and keep experimenting. Happy cookin