If you crave a quick and easy treat, look no further! These No-Bake Peanut Butter Bars are simple to make and satisfy your sweet tooth. With just a few ingredients like creamy peanut butter, honey, and rolled oats, you can whip them up in no time. I’ll guide you step-by-step through the process, offering tips and variations to suit your taste. Ready to dive into this delicious recipe? Let’s get started!
Why I Love This Recipe
- Quick and Easy: This recipe takes only 10 minutes to prepare, making it a perfect last-minute treat.
- Nutritious Ingredients: With peanut butter, oats, and optional protein powder, these bars are a healthy snack option.
- Customizable: You can easily swap in your favorite nuts or sweeteners to make it your own.
- No Baking Required: Enjoy the convenience of a no-bake recipe that sets in the refrigerator!
Ingredients
Main Ingredients
– 1 cup creamy peanut butter
– 1/2 cup honey or maple syrup
– 1 1/2 cups rolled oats
The main ingredients are simple and easy to find. Creamy peanut butter is the star of this recipe. It gives the bars their rich, nutty flavor. Honey or maple syrup adds sweetness and helps bind the mixture. Rolled oats provide a chewy texture and make the bars filling. These ingredients work well together to create a tasty treat.
Optional Add-Ins
– 1/2 cup vanilla protein powder
– 1/4 cup dark chocolate chips
– 1/4 cup chopped nuts (e.g., almonds or walnuts)
If you want to boost the nutrition, you can add vanilla protein powder. It blends well and adds extra protein. Dark chocolate chips give a sweet surprise in every bite. Chopped nuts like almonds or walnuts add crunch and flavor. You can mix and match these add-ins based on what you like.
Seasoning
– A pinch of sea salt
A pinch of sea salt brightens up the flavors in the bars. It balances the sweetness and enhances the taste of the peanut butter. Just a little goes a long way in making these treats even better.

Step-by-Step Instructions
Mixing the Base
Start by grabbing a medium bowl. Add 1 cup of creamy peanut butter and 1/2 cup of honey or maple syrup. Mix them well until they are smooth. Next, add in 1 1/2 cups of rolled oats. If you want an extra boost, toss in 1/2 cup of vanilla protein powder. Don’t forget a pinch of sea salt to enhance the flavor. Stir everything until it’s all mixed up nicely.
Adding Extras
Now it’s time to make these bars even better. Fold in 1/4 cup of dark chocolate chips and 1/4 cup of chopped nuts. You can choose almonds or walnuts based on your liking. Mix gently to keep the chocolate and nuts evenly spread throughout the mixture.
Preparing for Chilling
Grab an 8×8 inch square baking dish. Line it with parchment paper, leaving some hanging over the sides for easy lifting. Pour the peanut butter mixture into the lined dish. Press it down firmly and evenly using the back of a spatula or your hands. Smooth the top to make it look nice and neat.
Chilling Time
Put the dish in the refrigerator and let it chill for at least 2 hours. This step is crucial. It helps the bars set and makes them easier to cut.
Cutting Bars
After the bars have chilled, carefully lift them out using the parchment paper. Place them on a cutting board. Use a sharp knife to cut into your desired sizes. Enjoy these tasty treats as a snack or dessert!
Tips & Tricks
Ensuring Perfect Texture
To get the right mix, blend the peanut butter and honey well. Use a sturdy spoon to avoid clumps. When adding the oats, make sure they mix in evenly. This keeps the bars from being too dry. Chilling is key! Refrigerate for at least two hours. This helps the bars set up nicely and hold their shape.
Presentation Suggestions
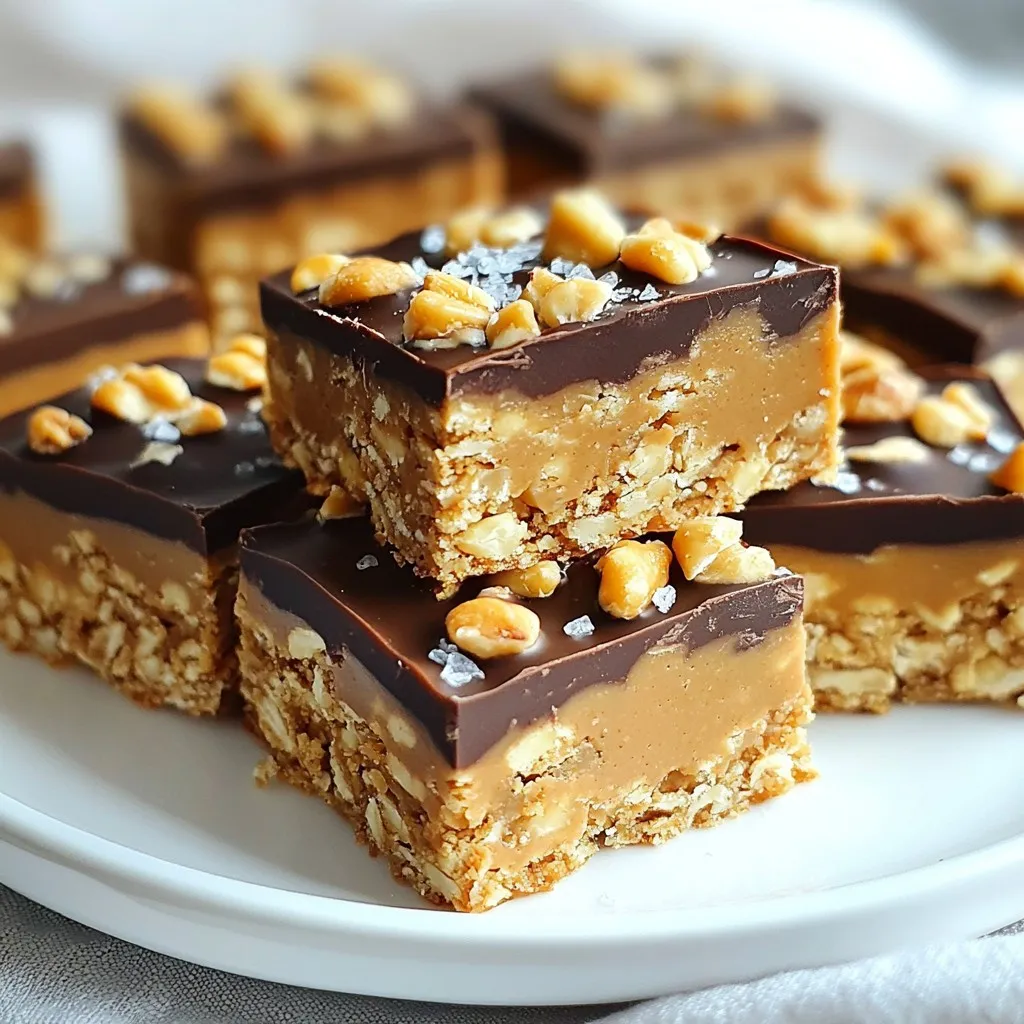
For a fancy touch, drizzle melted dark chocolate on top. Just melt the chocolate in the microwave for 30 seconds. Use a spoon to create a zigzag pattern. Serve the bars on a nice plate, stacked neatly. They look great for snacks or dessert!
Healthier Alternatives
You can swap honey for agave syrup. This gives a lower glycemic index option. For a gluten-free version, use rolled oats that are certified gluten-free. This way, everyone can enjoy these tasty treats!
Pro Tips
- Storage Tip: Keep the bars in an airtight container in the refrigerator to maintain their freshness for up to one week.
- Texture Tip: For chewier bars, use quick oats instead of rolled oats; they absorb moisture differently.
- Customization Tip: Feel free to mix in your favorite add-ins like dried fruit or seeds for added flavor and nutrition.
- Serving Tip: For a fun twist, serve with a side of yogurt or a drizzle of honey for dipping!
Variations
Flavor Modifications
You can easily change the flavor of your no-bake peanut butter bars. Adding a teaspoon of vanilla gives a sweet touch. If you like warmth, try a sprinkle of cinnamon. Both will enhance the taste.
You can also swap peanut butter for other nut butters. Almond butter or cashew butter works well too. Each nut butter brings a unique flavor and texture. Feel free to experiment!
Dietary Adjustments
For those watching their sugar, use sugar-free sweeteners. Choose options like stevia or erythritol. These keep the bars sweet without added sugar.
If you want a vegan version, replace honey with maple syrup. This keeps the recipe plant-based while still being tasty. You can also ensure all other ingredients are vegan-friendly.
Textural Changes
To add more texture, consider mixing in dried fruits. Chopped dates or cranberries add a sweet chew. You can also add seeds like chia or flaxseed for extra crunch and nutrition.
These small changes can make your no-bake peanut butter bars even more delicious. Enjoy creating your unique versions!
Storage Info
Best Storage Practices
Store your no-bake peanut butter bars in an airtight container. This keeps them fresh longer. You can use a glass or plastic container with a tight lid. Place parchment paper between layers if stacking. This helps prevent sticking.
Refrigerate the bars for best results. They stay firm and tasty when cold. Make sure to put them in the fridge within two hours of making.
Freezing Tips
You can freeze these bars for long-term storage. First, cut them into pieces. Wrap each piece in plastic wrap or foil. Then, place the wrapped bars in a freezer bag. Remove as much air as possible to prevent freezer burn.
To thaw, simply take out a bar and leave it at room temperature. You can also thaw bars in the fridge for a few hours. This keeps them cool and ready to eat.
Shelf Life
In the refrigerator, these bars last about two weeks. If stored well in an airtight container, they stay fresh longer.
Watch for signs of spoilage. If you see mold or an off smell, it’s best to toss them. Always trust your senses. If something seems off, do not eat it.
FAQs
How long do no-bake peanut butter bars last?
No-bake peanut butter bars can last up to one week in the fridge. Store them in an airtight container. If you want them to last longer, you can freeze them for up to three months. Just make sure you wrap them well to prevent freezer burn.
Can I use natural peanut butter instead of creamy?
Yes, you can use natural peanut butter! Natural peanut butter may have a different texture. It might be a bit more oily, so stir it well before using. This will give the bars a nice, rich taste.
What can I substitute for honey or maple syrup?
You can use agave nectar or brown rice syrup as substitutes. Both work well and add sweetness. If you want to avoid liquid sweeteners, try using powdered sugar. Just remember to adjust the amount to keep the bars from being too dry.
Are these bars kid-friendly?
Absolutely! These bars are perfect for kids. They are sweet, chewy, and easy to make. Plus, you can get your kids involved in mixing and pressing the bars. They will love the taste and the fun of making them.
Can I make these nut-free?
Yes, you can make these bars nut-free! Substitute peanut butter with sunflower seed butter or soy nut butter. These alternatives will keep the bars tasty and safe for those with nut allergies.
You now know how to create delicious no-bake peanut butter bars. You can mix creamy peanut butter, honey, and oats, then add tasty extras like chocolate chips. Chilling the mixture is key to perfect texture.
These bars can fit any diet and taste preference. Store them well, and they’ll last longer. Enjoy experimenting with flavors and ingredients. You’ll soon have a healthy snack that everyone will lov