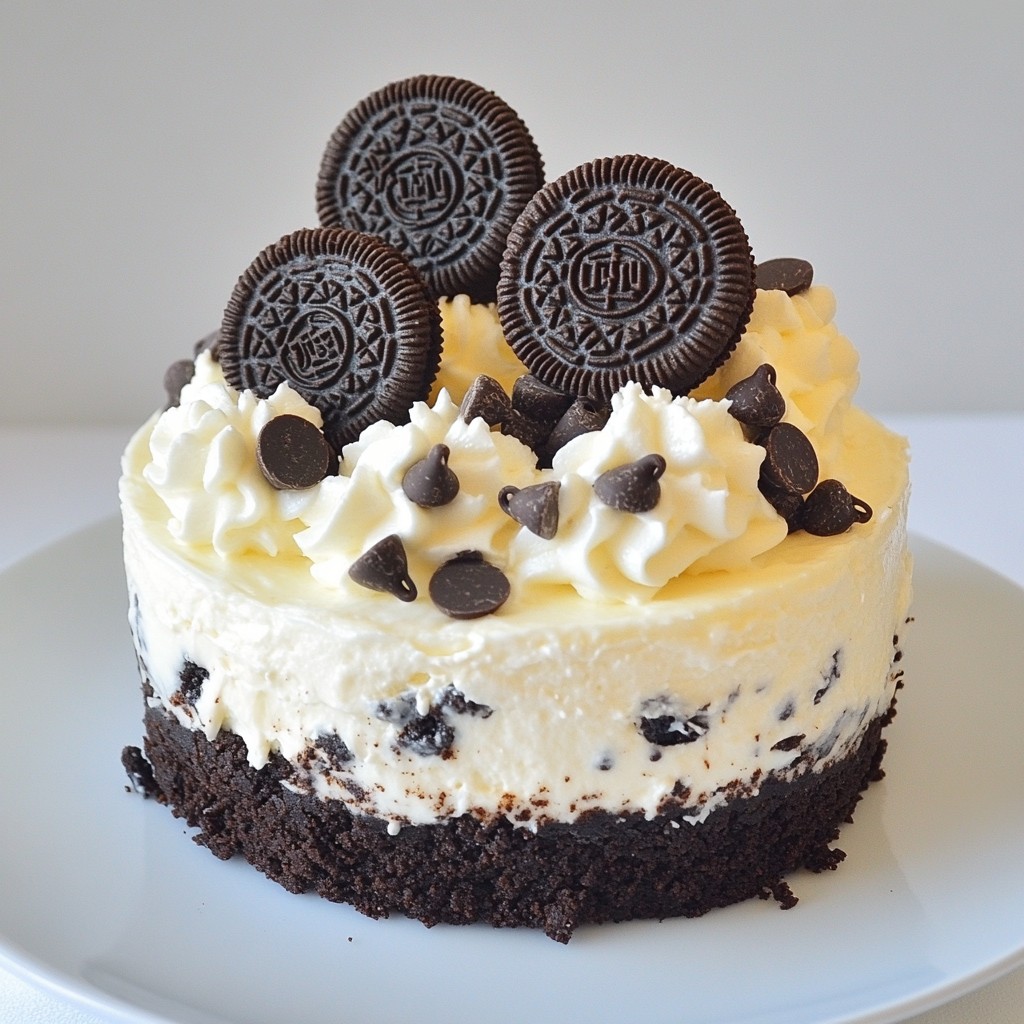
Love Oreos? You'll adore this No Bake Oreo Cheesecake! This easy, creamy treat needs no oven, and it’s perfect for any occasion. With crushed Oreos in the crust and a rich filling, every bite is simply delicious. Plus, you can whip this up in no time. Let’s dive into the simple ingredients and straightforward steps that will make you the star of any dessert table!
Why I Love This Recipe
- Easy to Make: This no-bake cheesecake requires minimal effort, making it perfect for any occasion without the hassle of baking.
- Decadent Flavor: The combination of creamy cheesecake and crunchy Oreo cookies creates a rich and satisfying dessert that everyone loves.
- Perfect for Any Occasion: Whether it’s a birthday, holiday, or just a treat for yourself, this cheesecake is always a hit!
- Customizable: You can easily add your favorite toppings or mix-ins, making it a versatile dessert that can be adapted to your tastes.
Ingredients
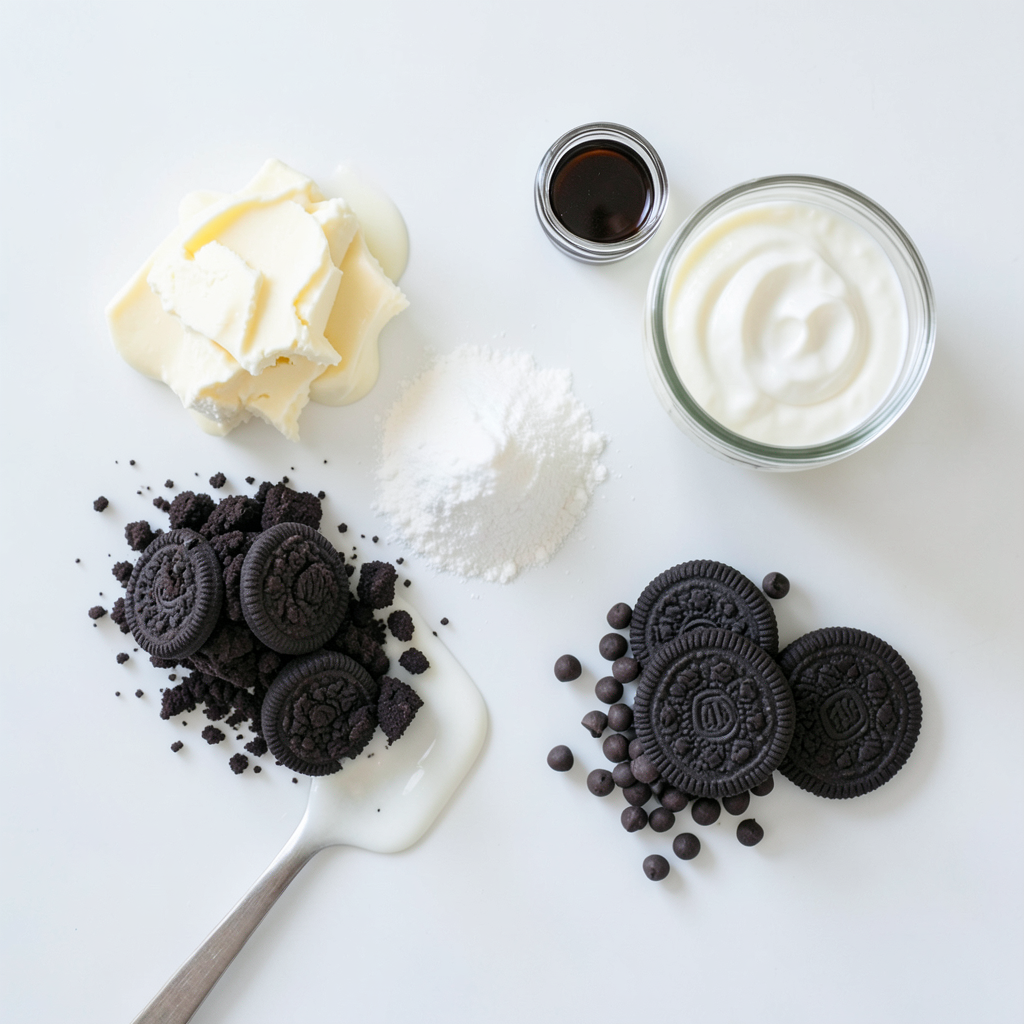
Main Ingredients for No Bake Oreo Cheesecake
- 24 Oreo cookies, crushed
- 4 tablespoons unsalted butter, melted
- 16 oz cream cheese, softened
Additional Ingredients
- 3/4 cup powdered sugar
- 1 teaspoon vanilla extract
- 1 cup heavy whipping cream
- 1/2 cup mini chocolate chips (optional)
- Additional Oreo cookies for decoration
To make this No Bake Oreo Cheesecake, you need some simple items. First, gather the main ingredients. You will crush 24 Oreo cookies. This forms the base. Then, melt 4 tablespoons of unsalted butter. Mix this with the crushed cookies. This helps the crust hold together.
Next, you need 16 oz of cream cheese. Make sure it is softened. This makes mixing easier and gives a smooth texture.
Now, for the additional ingredients. Start with 3/4 cup of powdered sugar. This will sweeten your cheesecake. Add 1 teaspoon of vanilla extract for flavor.
You also need 1 cup of heavy whipping cream. Whipping this cream gives your cheesecake a light and airy feel. If you want extra crunch, add 1/2 cup of mini chocolate chips. These are optional but yummy!
Finally, keep some extra Oreo cookies. You can use these for decoration. They add a nice touch and look great on top.
This list of ingredients is key to making your cheesecake a hit. Each item plays a role in creating the perfect balance of flavors and texture.
Step-by-Step Instructions
Preparing the Crust
Start by crushing 24 Oreo cookies in a bowl. You want them to be fine crumbs. Then, melt 4 tablespoons of unsalted butter. Mix the butter with the crushed Oreos until they look like wet sand. Now, take a 9-inch springform pan. Press the Oreo mixture firmly into the bottom of the pan. Use the back of a measuring cup to pack it down. This helps the crust hold its shape. Place the pan in the refrigerator while you make the filling.
Making the Cheesecake Filling
Next, get a large bowl and add 16 ounces of softened cream cheese. Beat it with an electric mixer until it is smooth and creamy. Gradually add 3/4 cup of powdered sugar and 1 teaspoon of vanilla extract. Mix until everything is well combined and smooth.
Incorporating Whipped Cream
In a separate bowl, pour in 1 cup of heavy whipping cream. Whip it until you see stiff peaks form. This means the cream is fluffy and holds its shape. Gently fold the whipped cream into the cream cheese mixture. Do this carefully so you keep the air in the whipped cream.
Combining and Chilling
Now, pour the cheesecake filling over the crust in your springform pan. Spread it evenly with a spatula. Cover the pan with plastic wrap and place it in the refrigerator. Let it chill for at least 4 hours, or even overnight for the best taste and texture. This helps the cheesecake set properly.
Tips & Tricks
Achieving the Perfect Texture
To make your cheesecake smooth, always soften the cream cheese first. Take it out of the fridge at least 30 minutes before you start. This makes it easy to mix and helps avoid lumps.
Whipping the cream properly is also key. Use a chilled bowl and beaters to get the best results. Whip the heavy cream until stiff peaks form. This adds lightness to your cheesecake.
Decorating Your Cheesecake
Presentation matters. Use whole Oreo cookies on top for a fun look. You can also crush some Oreos and sprinkle them over the cheesecake. This adds extra texture and makes it eye-catching.
For optional toppings, consider adding chocolate sauce or fresh fruit. Strawberries and raspberries pair well with the creamy filling. You can even use whipped cream for a fluffy touch.
Serving Suggestions
Slice your cheesecake with a hot knife for clean cuts. Dip the knife in hot water, then wipe it dry before cutting. This makes each piece look neat and pretty.
Pair your cheesecake with coffee or tea for a delightful treat. Fresh fruits like berries can add a nice balance. Enjoying it with a glass of milk is also a classic choice.
Pro Tips
- Use Cold Ingredients: Ensure your cream cheese and heavy cream are cold for better whipping and mixing results.
- Chill Time Matters: For the best texture, allow the cheesecake to set overnight in the refrigerator.
- Texture Variations: Experiment with different mix-ins like crushed nuts or flavored extracts for a unique twist.
- Presentation Tip: Use a hot knife to slice the cheesecake for cleaner cuts and a more appealing presentation.
Variations
Different Flavor Profiles
You can change up your no bake Oreo cheesecake in fun ways. Mix in other flavors like mint, peanut butter, or even coffee. Just add a few tablespoons of these flavors into the cream cheese mixture.
For the crust, you don’t have to stick with Oreos. Try using graham crackers, chocolate wafers, or even vanilla cookies. Each option gives a unique taste and texture to your cheesecake.
Dietary Adaptations
If you need a gluten-free crust, use gluten-free cookies. Many brands offer tasty alternatives that work well. Just crush them as you would regular Oreos and mix with butter.
For a dairy-free version, look for dairy-free cream cheese. Many brands now make great options that taste amazing. You can also use coconut cream for a rich, creamy texture.
Mini Cheesecakes
Making mini cheesecakes is easy and fun. Use a muffin tin lined with cupcake liners. Just prepare the crust and filling as usual. Then, scoop the filling into each cup.
You’ll want to chill them for about 2 to 3 hours instead of 4. This shorter time helps them set well. Once they are firm, pop them out of the liners and enjoy!
Storage Info
Short-term Storage
To keep your no bake Oreo cheesecake fresh, store it in the fridge. Place it in an airtight container. You can also cover the springform pan tightly with plastic wrap. This keeps it moist and prevents it from absorbing other odors.
Long-term Storage
If you want to save some cheesecake for later, you can freeze it. First, slice the cheesecake into pieces. Wrap each piece in plastic wrap, then place them in a freezer bag. Make sure to remove all air. To thaw, leave it in the fridge overnight. Enjoy it cold for the best taste.
Shelf Life
In the fridge, your cheesecake will stay fresh for about 4 to 5 days. Check for signs that it's gone bad. If you see mold or if it smells sour, it’s best to throw it away. Keeping an eye on it helps ensure you enjoy every bite.
FAQs
How long does the no bake Oreo cheesecake need to set?
The no bake Oreo cheesecake needs at least 4 hours to set in the fridge. For the best results, I recommend letting it chill overnight. This time allows the filling to firm up nicely and the flavors to blend well. If you rush it, the cheesecake may be too soft and hard to slice.
Can I use other types of cookies for the crust?
Yes, you can use other cookies for the crust. Some tasty options are chocolate sandwich cookies, graham crackers, or even vanilla wafers. Just crush them into fine crumbs and mix with melted butter. Each cookie brings its own flavor, so feel free to get creative!
What should I do if my cheesecake filling is too runny?
If your cheesecake filling is runny, don’t worry; you can fix it! First, try chilling it longer. If it’s still too soft, add more whipped cream. Make sure the heavy cream is whipped to stiff peaks. You can also add a bit of powdered sugar for extra sweetness and thickness.
You now have all the tools to make a perfect no bake Oreo cheesecake. From the crunchy Oreo crust to the creamy filling, each step matters. Remember to chill it well for the best texture. Whether you're serving it at a party or enjoying it alone, this cheesecake will please everyone.
With a few fun variations, you can adapt it to fit any taste. Don't forget the storage tips for keeping it fresh. Happy baking!