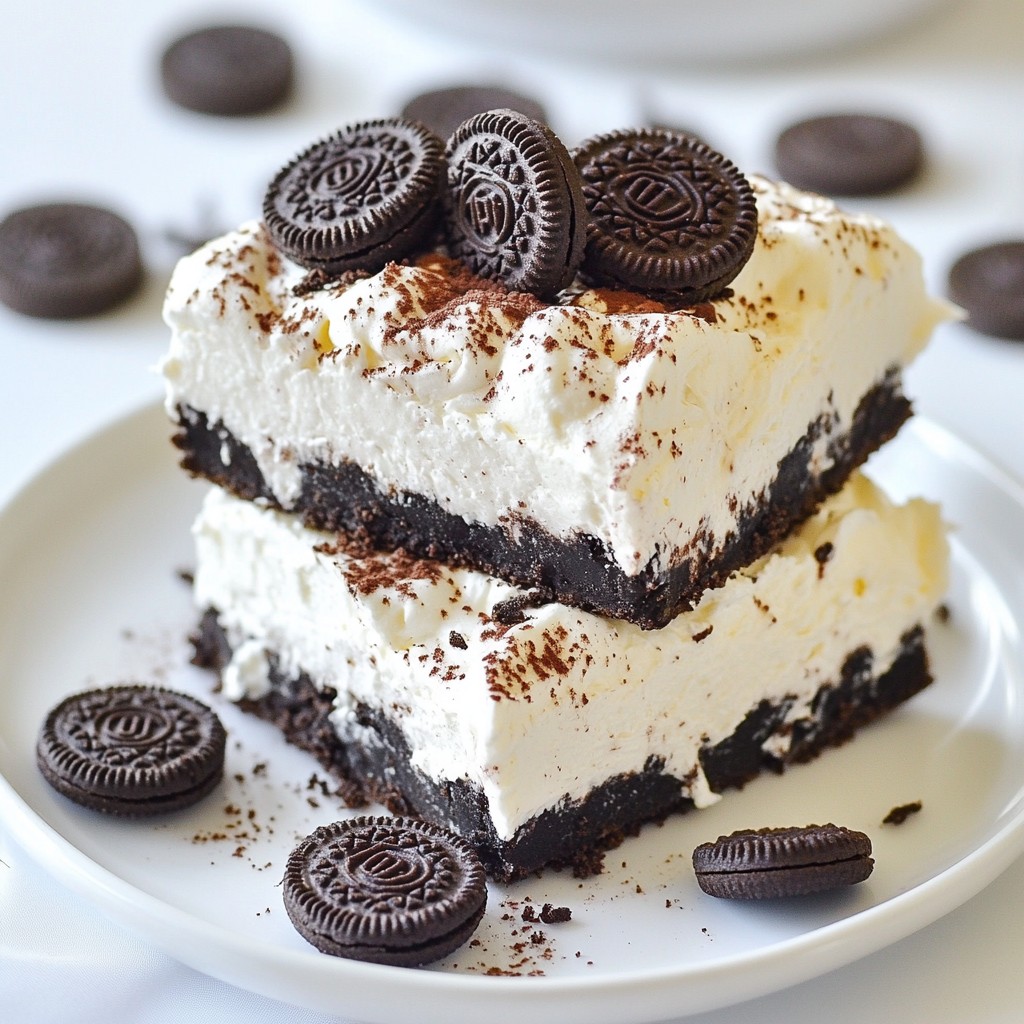
Looking for a quick and delicious dessert? Try these No Bake Oreo Cheesecake Bars! They are easy to make and perfect for any occasion. You don't need to bake anything, and the rich flavor of Oreos mixed with creamy cheesecake will wow your friends and family. Get ready to dive into a treat that’s simple yet delightful. Trust me, you won't want to miss this recipe!
Why I Love This Recipe
- Decadent Flavor: The combination of creamy cheesecake and crunchy Oreo cookies creates a delightful contrast that is irresistible.
- No Baking Required: This easy no-bake recipe means you can enjoy delicious cheesecake without the hassle of turning on the oven.
- Perfect for Any Occasion: Whether it's a birthday party, holiday gathering, or just a sweet treat at home, these bars are always a hit!
- Customizable Toppings: Feel free to get creative with toppings! Add fruit, chocolate drizzle, or extra crushed Oreos for a personal touch.
Ingredients
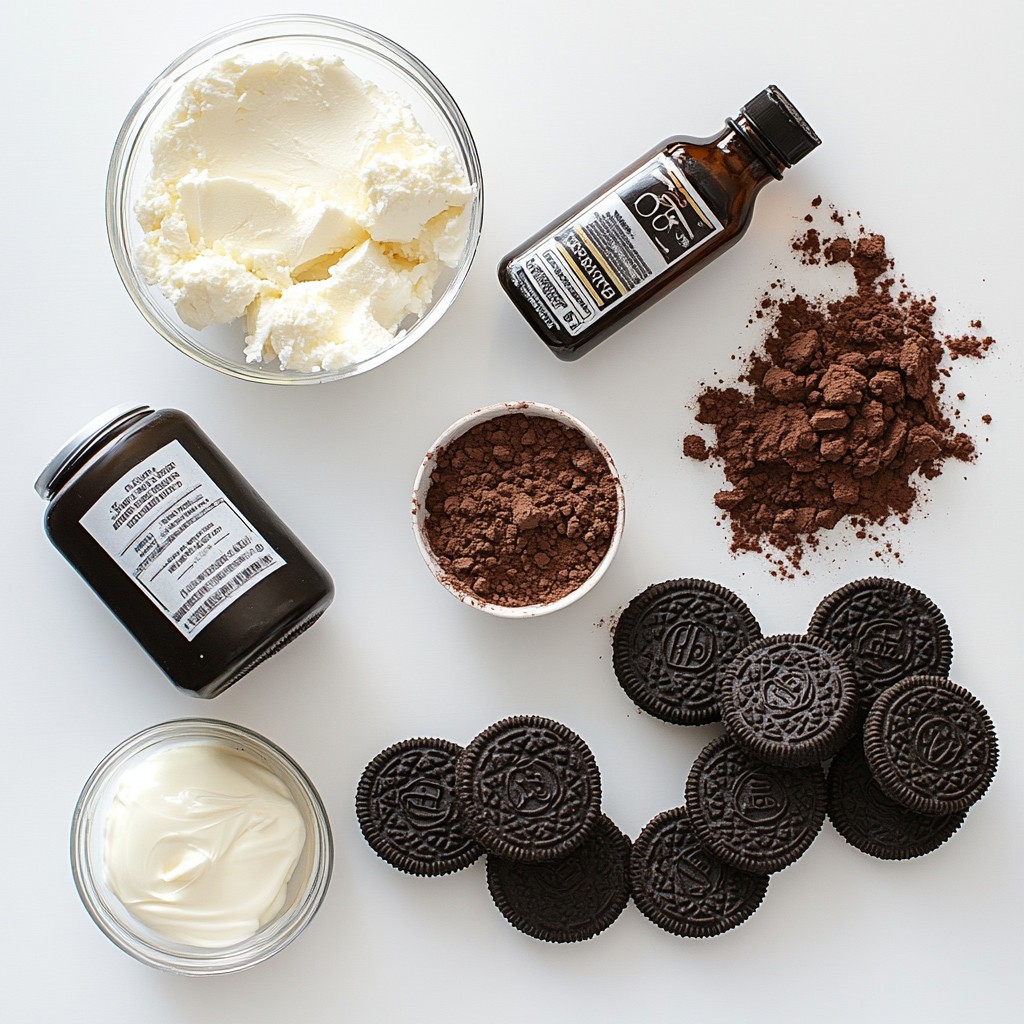
List of Ingredients
To make No Bake Oreo Cheesecake Bars, gather these simple ingredients:
- 24 Oreo cookies, crushed (plus extra for topping)
- 4 tablespoons unsalted butter, melted
- 16 oz cream cheese, softened
- 2/3 cup powdered sugar
- 1 teaspoon vanilla extract
- 1 cup heavy whipping cream
- 1 tablespoon cocoa powder (optional, for garnish)
Tips for Choosing Ingredients
For the best flavor, use fresh ingredients. Choose full-fat cream cheese for a rich taste. Look for heavy whipping cream with a high fat content for great texture. You can also use regular Oreos, but double-stuffed gives an extra creamy feel. If you want a special touch, pick seasonal flavors or fun cookies for the crust.
Substitutions for Allergies or Preferences
You can easily swap ingredients based on your needs. For a gluten-free version, use gluten-free cookies. If you have lactose issues, try dairy-free cream cheese and coconut cream instead of heavy cream. For a lower sugar option, use a sugar substitute in place of powdered sugar. These swaps keep the treat delicious while catering to your diet.
Step-by-Step Instructions
Preparation of the Oreo Crust
To start, grab a mixing bowl. Add 24 crushed Oreo cookies and 4 tablespoons of melted butter. Use a fork to mix until it looks like wet sand. This mix will form the base. Next, press the Oreo mixture into a 9x9-inch baking pan. Make sure it is compact and even. Place the pan in the fridge while you prepare the filling. This step helps the crust set well.
Making the Cheesecake Filling
Now, take a large mixing bowl. Beat 16 ounces of softened cream cheese with an electric mixer. Mix until creamy and smooth. Slowly add 2/3 cup of powdered sugar and 1 teaspoon of vanilla extract. Keep mixing until there are no lumps left. In another bowl, whip 1 cup of heavy cream until stiff peaks form. Gently fold this whipped cream into your cream cheese mix. Be careful not to deflate it. This keeps the filling light and airy.
Assembly and Chilling Process
Once your filling is ready, pour it over the chilled Oreo crust. Use a spatula to spread it evenly. Crumble extra Oreo cookies on top for garnish. Press them slightly into the filling so they stick. Cover the pan with plastic wrap and put it back in the fridge. Let it chill for at least 4 hours, or until set. After chilling, cut the cheesecake into bars and serve. Enjoy your delicious creation!
Tips & Tricks
Common Mistakes to Avoid
One common mistake is not crushing the Oreo cookies well. Aim for fine crumbs. This helps your crust hold together. If you use large chunks, it may crumble when you cut it. Also, do not skip chilling the crust. This step sets the base and adds structure.
How to Achieve the Perfect Consistency
For a smooth cheesecake, make sure your cream cheese is softened. Cold cream cheese can lead to lumps. Beat it well until it’s creamy. Then, when you fold in the whipped cream, do it gently. This keeps the mixture light and fluffy, giving you a great texture.
Serving Suggestions for Extra Flavor
To add a fun twist, serve with a drizzle of chocolate sauce. This makes the bars even richer. You can also add fresh berries on the side for a fruity touch. A dollop of whipped cream gives a nice creaminess and makes them look fancy.
Pro Tips
- Chill Your Ingredients: Ensure your cream cheese is softened at room temperature for easy mixing. Chilling the heavy cream beforehand can help achieve stiffer peaks when whipped.
- Use a Springform Pan: If you want to make this recipe look even more impressive, consider using a springform pan. It allows for easy release of the cheesecake bars.
- Customize Your Toppings: Feel free to add your favorite toppings! Chopped nuts, chocolate shavings, or a drizzle of caramel can elevate the flavor and presentation.
- Allow Extra Chilling Time: For the best texture, let your cheesecake bars chill overnight. This ensures they are fully set and flavors meld beautifully.
Variations
Flavor Variations (Mint, Peanut Butter, etc.)
You can easily change the flavor of your No Bake Oreo Cheesecake Bars. For a mint twist, add 1 teaspoon of peppermint extract to the cream cheese mix. This gives a refreshing taste that pairs well with the Oreo crust. If you love peanut butter, mix in 1/2 cup of creamy peanut butter into the filling. This makes each bite rich and nutty. You can also add crushed cookies or candy bars to the filling for extra crunch.
Dietary Variations (Vegan, Gluten-Free)
You can make these bars vegan by swapping traditional ingredients. Use vegan cream cheese and replace heavy cream with coconut cream. For a gluten-free version, choose gluten-free Oreo cookies. These options ensure everyone can enjoy your treat without worry.
Garnishing Ideas for a Unique Touch
Garnishing can make your bars stand out. Try adding fresh berries on top for color. You can also drizzle chocolate or caramel sauce over the bars for added sweetness. For a fun twist, sprinkle crushed nuts or candy on top for crunch. These simple touches can make your bars not just tasty, but also visually appealing!
Storage Info
Best Practices for Refrigerating
To keep your No Bake Oreo Cheesecake Bars fresh, store them in the fridge. Cover the pan with plastic wrap or foil. This helps prevent them from drying out. Make sure they chill for at least four hours. This time allows the bars to set properly.
Freezing Instructions
You can freeze these cheesecake bars for later enjoyment. Cut them into bars first. Wrap each bar in plastic wrap, then place them in an airtight container. Label the container with the date. They can last up to three months in the freezer. When you want to eat them, thaw them in the fridge overnight.
Shelf Life and Quality Tips
These bars taste best within the first week. Keep an eye on their texture. If they start to feel dry or crumbly, they may be past their prime. Always check for off smells or discoloration before eating. Enjoying them fresh ensures the best flavor and texture.
FAQs
How long do No Bake Oreo Cheesecake Bars last?
No Bake Oreo Cheesecake Bars last about five days in the fridge. Keep them covered to keep them fresh. The longer they sit, the softer they may get. For best taste and texture, enjoy them within three days.
Can I use different cookies for the crust?
Yes, you can use different cookies for the crust. Try chocolate sandwich cookies or graham crackers. Each option gives a unique flavor. Just crush them well and mix with melted butter. Make sure they are similar in texture to Oreos for the best results.
What do I do if my cheesecake filling is too soft?
If your cheesecake filling is too soft, chill it longer. You can also fold in more whipped cream for extra stability. If that doesn’t work, try adding a bit of powdered sugar. This can help firm it up. Always mix gently to keep the light texture.
This blog post covered how to make delicious No Bake Oreo Cheesecake Bars. We discussed key ingredients and tips for choosing the best ones, including helpful substitutions. You learned simple step-by-step instructions for preparation and assembly. We listed common mistakes to avoid and ways to achieve that perfect texture.
In the end, you can enjoy many tasty variations and gain practical tips for storing your creation. Remember, making these bars can be fun and rewarding. Take your time and enjoy each step for the best results!