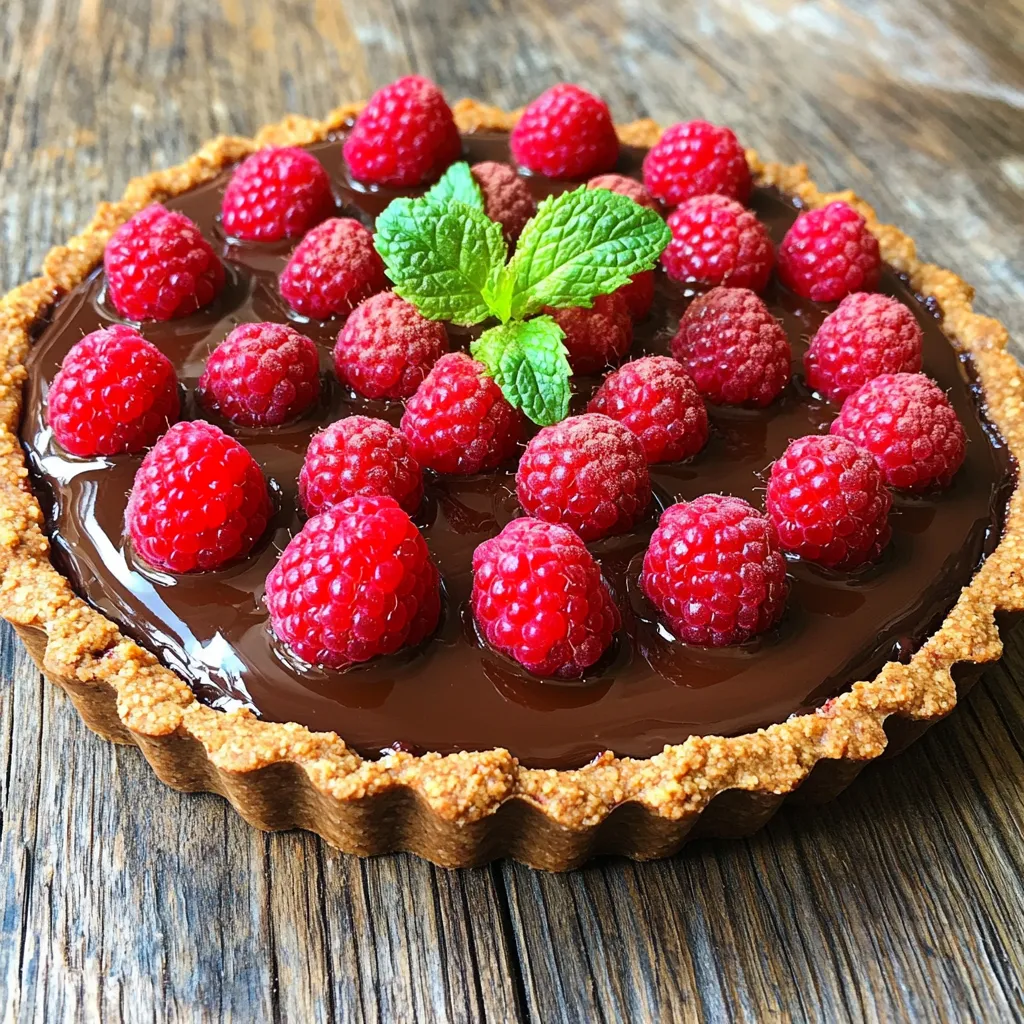
If you’re craving a dessert that’s quick, easy, and mouthwatering, look no further. My No Bake Chocolate Raspberry Tart is here to impress! With a rich chocolate filling and fresh raspberries, this tart is perfect for any occasion. You won’t believe how simple it is to make. Let’s dive into the ingredients and steps that will have your taste buds singing!
Ingredients
To create the No Bake Chocolate Raspberry Tart, you will need the following ingredients:
– 1 ½ cups graham cracker crumbs
– ½ cup unsalted butter, melted
– ¼ cup sugar
– 8 oz cream cheese, softened
– 1 cup powdered sugar
– 1 cup heavy whipping cream
– 8 oz bittersweet chocolate, chopped
– 1 cup fresh raspberries
– 2 tablespoons cocoa powder (for garnish)
– Mint leaves (for garnish)
Each ingredient plays a key role in building flavor and texture. The graham cracker crumbs form a crunchy base. The butter helps bind the crumbs, while sugar adds sweetness. Cream cheese and powdered sugar create a rich filling. Heavy cream gives a light texture, and bittersweet chocolate provides the deep chocolate flavor. Fresh raspberries add a burst of tartness, balancing the sweetness. Cocoa powder and mint leaves enhance the tart’s look and taste.
Gather these items before you start. This makes the process smooth and fun. You can find most ingredients at your local store. If you have dietary needs, you can adjust some ingredients. This tart is versatile, and I’ll share more on that later. Enjoy making this delightful treat!
Step-by-Step Instructions
Preparation of the Crust
– First, grab a mixing bowl. Add 1 ½ cups of graham cracker crumbs, ½ cup of melted unsalted butter, and ¼ cup of sugar.
– Mix these ingredients until they look like wet sand. This is key for a good crust.
– Now, take a 9-inch tart pan. Press the crumb mix into the bottom and sides. Use your fingers or the back of a measuring cup to pack it tightly.
– Place the crust in the fridge. This helps it firm up while you make the filling.
Making the Chocolate Filling
– Next, melt 8 oz of chopped bittersweet chocolate. Use a microwave-safe bowl. Heat it in 30-second bursts, stirring in between. Stop when it’s smooth. Let it cool a bit.
– In another bowl, beat 8 oz of softened cream cheese until smooth. Slowly add 1 cup of powdered sugar, mixing well.
– In a different bowl, whip 1 cup of heavy cream. Beat until soft peaks form. Then, gently fold the whipped cream into the cream cheese mix.
– Finally, add the melted chocolate. Mix until everything is smooth and combined.
Assembling the Tart
– Now, pour the chocolate cream into your chilled crust. Smooth the top with a spatula.
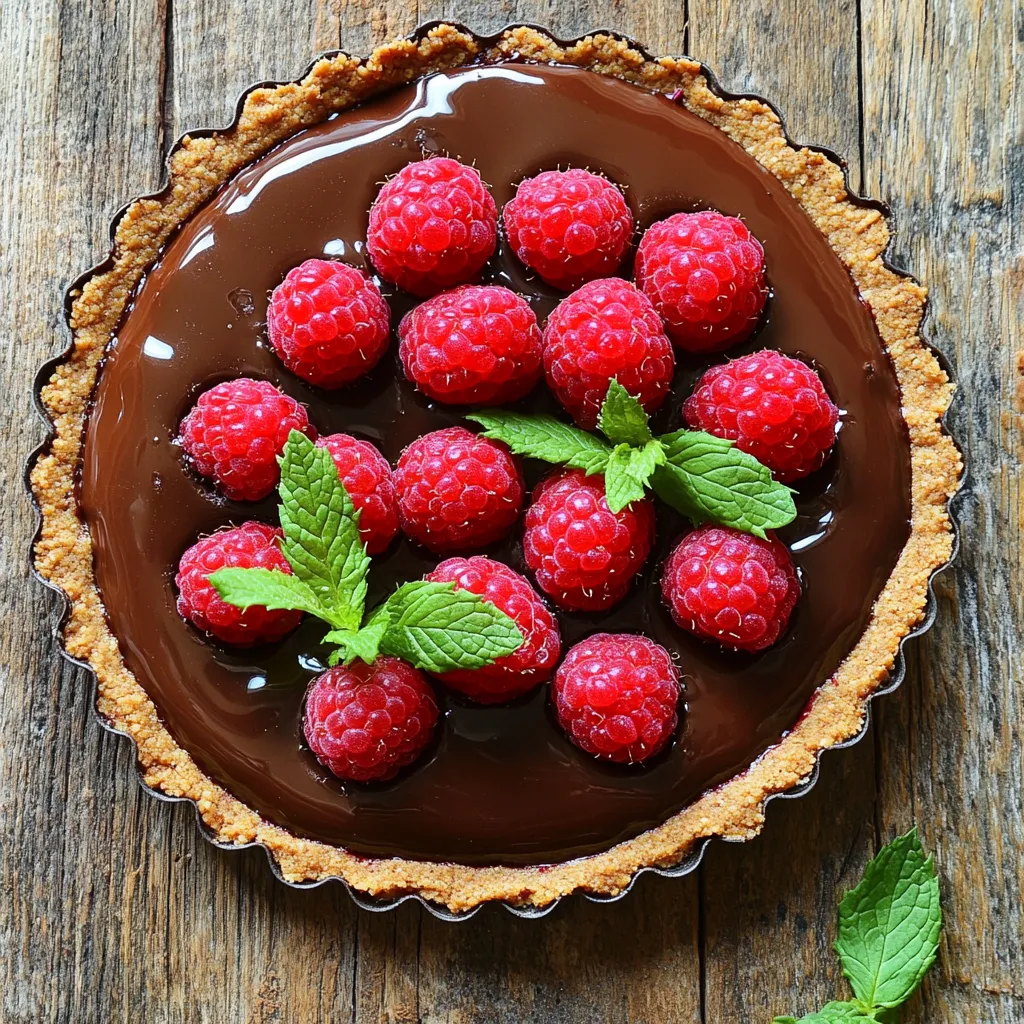
– Take 1 cup of fresh raspberries. Arrange them on top of the chocolate filling. Press them in gently.
– Cover the tart with plastic wrap. Place it back in the fridge for at least 4 hours. For best results, chill overnight to let it set fully.
– Once it’s set, dust the top with 2 tablespoons of cocoa powder and add mint leaves for a touch of color.
– Slice the tart and serve it chilled. Enjoy this sweet and rich treat!
Tips & Tricks
Ensuring the Perfect Crust
To make a great crust, focus on the right texture. Use graham cracker crumbs, melted butter, and sugar. Mix them well until the crumbs feel like wet sand. This helps the crust hold together. After mixing, press the mixture firmly into a 9-inch tart pan. Use your fingers or a measuring cup. Chill the crust in the fridge for at least 30 minutes. This chilling time helps it become firm and easy to slice.
Chocolate Melting Techniques
Melting chocolate can be tricky. Avoid clumps by chopping it into small pieces first. Use a microwave-safe bowl for melting. Heat the chocolate in 30-second bursts. Stir it after each interval to ensure even melting. This method helps keep the chocolate smooth. Let it cool a bit before mixing with other ingredients.
Presentation Ideas
Garnish your tart for a stunning look. Dust the top with cocoa powder for a rich touch. Add fresh mint leaves for color and freshness. You can also try other toppings. Consider using whipped cream, nuts, or more berries for a fun twist. Feel free to get creative with your presentation!
Variations
Dietary Alternatives
To make this tart fit different diets, you can change a few things. For a gluten-free crust, swap graham cracker crumbs for ground almonds or gluten-free cookie crumbs. Be sure to check that your butter is gluten-free as well. If you need a dairy-free filling, use vegan cream cheese and coconut cream instead of regular cream. These swaps keep the tart creamy and rich without dairy.
Flavor Enhancements
Want to change the flavor? You can add extracts like vanilla or almond to the filling. Just one teaspoon will boost the taste. You can also mix in different berries. Try strawberries, blueberries, or blackberries for a twist on the classic raspberry. This will add fun colors and tastes to your tart.
Serving Suggestions
When serving, pair the tart with ice cream or whipped cream. Vanilla ice cream adds a nice touch, balancing the tartness of the raspberries. For a fancy look, drizzle some melted chocolate on top before serving. This not only looks great but adds an extra chocolatey flavor that everyone will love.
Storage Info
Best Practices for Refrigeration
To keep your no bake chocolate raspberry tart fresh, cover it well. Use plastic wrap or a tight lid. Store it in the fridge. This way, it stays cool and tasty. The tart lasts up to five days in the fridge. After that, the crust may get soggy.
Freezing Instructions
If you want to keep it longer, you can freeze the tart. First, slice it into pieces. Wrap each piece in plastic wrap. Then, place them in a freezer-safe bag. This helps to keep them safe from freezer burn. The tart can stay frozen for up to three months.
When you’re ready to enjoy it, take a piece out. Let it thaw in the fridge for a few hours. For a quicker thaw, leave it at room temperature for about 30 minutes. This way, you can enjoy a slice of your tart without losing its great taste!
FAQs
How long does the tart need to set?
The tart needs to chill for at least 4 hours. I often suggest leaving it overnight. This longer time helps the filling firm up well. It also blends the flavors nicely. The chocolate and raspberries become a perfect duo after resting.
Can I use frozen raspberries?
Yes, you can use frozen raspberries. Just be aware that they might be a bit softer. If using frozen, let them thaw first. Drain any excess liquid before placing them on the tart. This way, your tart stays firm and doesn’t get soggy. Fresh raspberries add a nice crunch, but frozen can work in a pinch.
What can I substitute for graham cracker crumbs?
You can use crushed cookies or whole grain crackers. Almond flour mixed with melted butter also makes a great base. For a nut-free option, try crushed rice cereal. Each option gives a unique taste to your tart. Choose what fits your taste and diet needs best.
This tart combines sweet and rich flavors for a perfect treat. You learned how to make the crust, the chocolate filling, and assemble it all. Use my tips for a great outcome, like melting chocolate without clumps. Don’t hesitate to make variations to suit your taste. Store it right, and it will stay fresh. Enjoy making this scrumptious tart, and share it with family and friends. Your dessert game just got a boost!