Looking to wow your guests this Thanksgiving? You’ve come to the right place! This article will guide you through simple, make-ahead dessert recipes that are easy and delicious. I’ll share step-by-step instructions, tips for success, and variations for every taste. With these treats ready before the feast, you’ll have more time to enjoy your loved ones. Let’s dive into mouth-watering desserts that will steal the show!
Why I Love This Recipe
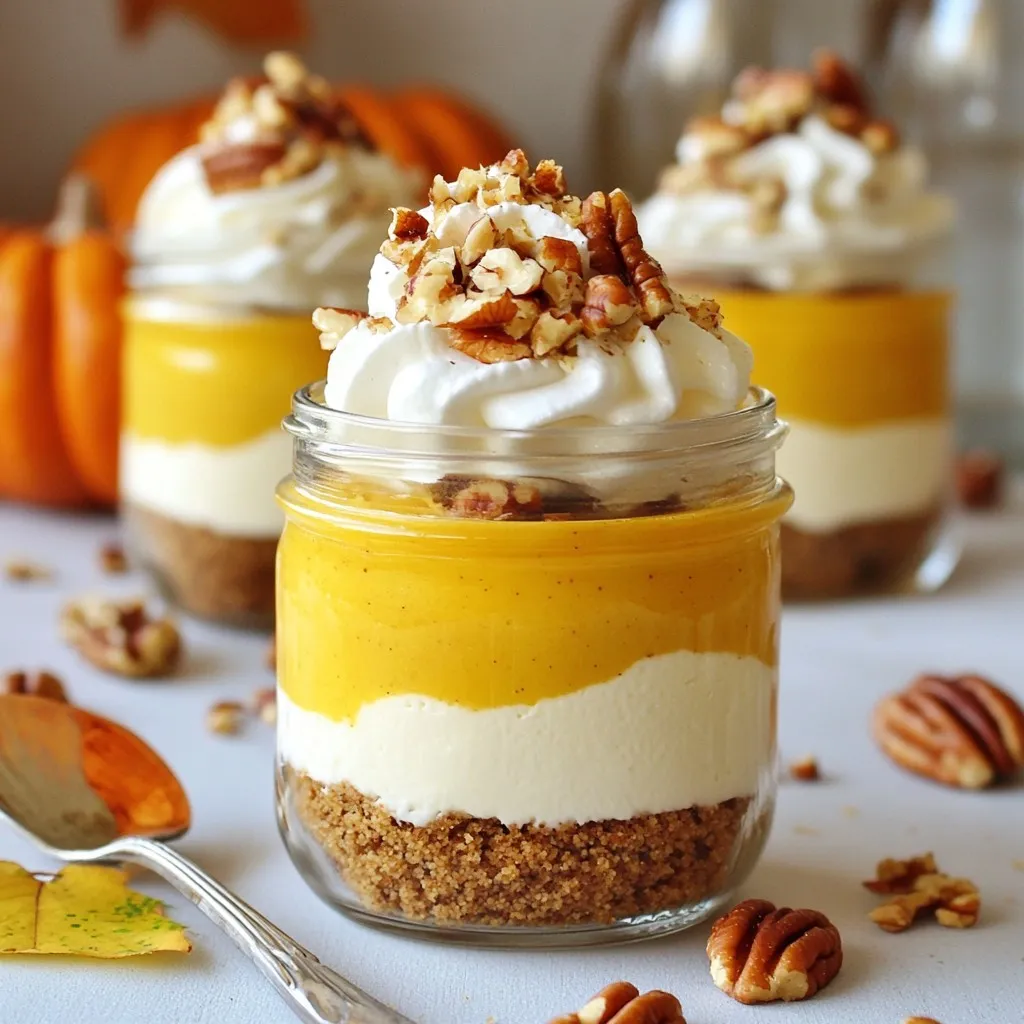
- Delicious Flavor Combination: This cheesecake offers a perfect balance of pumpkin spice and creamy texture, making it a seasonal favorite.
- Easy to Serve: Using jars not only looks charming but also makes it convenient to serve individual portions without the mess of slicing a traditional cheesecake.
- Make Ahead Option: These jars can be prepared in advance, allowing you to enjoy your Thanksgiving dinner without the last-minute dessert rush.
- Customizable Toppings: With options for whipped topping and crushed pecans, you can easily personalize each jar to suit your guests’ tastes.
Ingredients
Let’s gather all the ingredients for your Thanksgiving Pumpkin Cheesecake Jars. Here’s what you need:
– 1 ½ cups graham cracker crumbs
– ½ cup unsalted butter, melted
– 2 (8 oz) packages cream cheese, softened
– 1 cup canned pumpkin puree
– ¾ cup granulated sugar
– 1 tsp vanilla extract
– ½ tsp ground cinnamon
– ¼ tsp ground nutmeg
– ¼ tsp ground ginger
– 3 large eggs
– 1 cup whipped topping (for garnish)
– 1/4 cup crushed pecans (for garnish)
For the best flavor and texture, I suggest using Nabisco Graham Crackers for the crust. Their crunch holds up well. Use Philadelphia Cream Cheese for a rich and creamy filling. Libby’s Canned Pumpkin is my go-to for a smooth puree, but feel free to use fresh if you prefer.
Stick with McCormick Spices for your cinnamon, nutmeg, and ginger. They offer great flavors that enhance your dessert.
Gather these ingredients and let’s dive into making this tasty treat!

Step-by-Step Instructions
Preparing the Crust
To start, you need to mix the graham cracker crumbs and melted butter. In a bowl, combine 1 ½ cups of crumbs with ½ cup of melted butter. Stir until the crumbs soak up the butter. Next, divide this mixture into four dessert jars. Press the crumb mix tightly into the bottom of each jar to create a solid base.
Making the Cheesecake Filling
Now, let’s make the filling. In a large mixing bowl, beat two packages of softened cream cheese until it’s smooth. Add 1 cup of canned pumpkin puree, ¾ cup of granulated sugar, 1 tsp of vanilla extract, ½ tsp of ground cinnamon, ¼ tsp of ground nutmeg, and ¼ tsp of ground ginger. Keep mixing until everything is well blended and smooth.
Incorporating the Eggs
Next, it’s time to add the eggs. You will want to add 3 large eggs one at a time. After each egg, mix the mixture well. This helps to keep the filling smooth and creamy. Make sure the eggs are fully mixed in before you add the next one.
Baking the Cheesecakes
Preheat your oven to 325°F (160°C). Place the jars in a baking dish. Add hot water to the dish until it reaches halfway up the sides of the jars. This water bath helps the cheesecakes bake evenly. Bake for 25 to 30 minutes. The centers should be set but still slightly jiggly.
Cooling and Chilling
After baking, carefully take the jars out of the oven. Let them cool at room temperature for about 30 minutes. Once cooled, put the jars in the fridge. Let them chill for at least 4 hours or overnight. Chilling helps the flavors meld together.
Final Preparation
Before serving, garnish each cheesecake jar with 1 cup of whipped topping. Then, sprinkle ¼ cup of crushed pecans on top for a nice crunch. This adds flavor and makes your dessert look beautiful. Enjoy serving these sweet treats!
Tips & Tricks
Serving Suggestions
Pair your pumpkin cheesecake jars with a warm drink like spiced cider or coffee. They also pair well with vanilla ice cream for extra creaminess.
To present the jars nicely for guests, place them on a wooden board. Add small spoons next to each jar for easy serving. You can also tie a little ribbon around the jar for a festive touch.
Making Ahead and Storage
To make this dessert ahead of time, you can prepare the jars up to a week in advance. After baking and cooling, cover them with lids or wrap them with plastic wrap.
For leftovers, store the jars in the fridge. They can last for up to four days when sealed well. If you want to keep them longer, consider freezing them.
Troubleshooting Common Issues
To avoid cracks in your cheesecakes, do not overbeat the batter. Mix until just combined and do not open the oven door while baking.
If your cheesecakes come out too soft, bake them a bit longer. If they are too hard, check your oven temperature and reduce the baking time next time.
Pro Tips
- Chill Time: Allowing the cheesecake jars to chill overnight enhances the flavor and texture, making them creamier and more delicious.
- Crust Consistency: Ensure the graham cracker crumbs are well mixed with melted butter to avoid a dry crust. It should hold together when pressed.
- Water Bath Importance: Using a water bath prevents the cheesecakes from cracking and helps them cook evenly, resulting in a smoother texture.
- Garnish Creativity: Feel free to experiment with different toppings such as caramel sauce, whipped cream, or chocolate shavings for added flavor.
Variations
Flavor Variations
You can switch things up with different flavors. Try adding chocolate to the cheesecake mix. This adds a rich taste that pairs well with pumpkin. You can also use spices like cardamom or clove for a unique twist. Seasonal fruits like cranberries or apples make nice toppings too. They add color and flavor to your jars.
Dietary Considerations
For a gluten-free option, use gluten-free graham crackers. They work just as well in the crust. If you want a vegan dessert, swap cream cheese for a plant-based version. You can use coconut cream or tofu blended until smooth. Also, adjust the sugar. Use a natural sweetener like maple syrup for a healthier touch.
Serving Sizes
If you have more guests, you can easily double or triple the recipe. Just keep the same baking time, but check for doneness more often. For smaller gatherings, you can make just two jars. Adjust the ingredient amounts, and you’re set. These desserts are easy to scale up or down as needed.
Storage Info
Best Practices for Long-Term Storage
To freeze your pumpkin cheesecakes, follow these steps:
– Let the jars cool completely.
– Cover each jar tightly with plastic wrap.
– Place the wrapped jars in a freezer bag or container.
– Label with the date so you remember when you made them.
Using glass jars helps keep the taste fresh. If you use plastic, make sure they are freezer-safe.
Shelf Life
In the fridge, these cheesecakes last about five days. Keep them covered to avoid drying out. Watch for signs of spoilage:
– Unpleasant smell
– Change in color
– Mold growth
If you see any of these, it’s best to toss them.
Reheating Instructions
If you need to thaw and reheat, here’s how:
– Take the jars out of the freezer and put them in the fridge overnight to thaw.
– To reheat, place the jar in a warm water bath for about 10 minutes.
– Avoid using a microwave, as it can change the texture.
These steps help keep the taste and texture of your cheesecakes intact. Enjoy your delicious desserts!
FAQs
Can I use fresh pumpkin instead of canned?
Yes, you can use fresh pumpkin. Start by selecting a sugar pumpkin. Cut it in half, remove the seeds, and roast it until soft. After roasting, scoop out the flesh and blend it until smooth. This fresh puree offers a rich flavor.
Can I make these cheesecakes without cream cheese?
You can use alternatives like mascarpone or ricotta cheese. These options will change the texture slightly. Mascarpone gives a creamy taste, while ricotta adds a grainy feel. Experiment to see what you like best!
How do I know when my cheesecakes are done?
Look for a slight jiggle in the center. The edges should be set while the middle remains a bit soft. A toothpick inserted into the center should come out mostly clean. This means they are ready!
Can I double the recipe?
Yes, you can double the recipe! Just make sure you have enough jars. Adjust the baking time as needed. Keep an eye on them, as larger batches may require a few extra minutes.
What should I do if I don’t have jars?
You can use ramekins or muffin tins. Just make sure to adjust the baking time. You can also use a pie dish for a larger cheesecake. Just remember to cut it into pieces to serve!
To wrap up, this blog post guided you through crafting delicious cheesecakes in jars. We covered the essential ingredients, step-by-step techniques for mixing and baking, and tips for perfecting your dessert. I shared ideas for variations, storage best practices, and how to troubleshoot common issues. Now, gather your ingredients and get baking! Enjoy sharing these delightful cheesecakes with friends and family. Your effort will surely impress and satisfy everyone. Happy bakin