Homemade Banana Pudding Sweet and Creamy Delight

WANT TO SAVE THIS RECIPE?

Are you ready to treat yourself to a dessert that’s creamy and sweet? Homemade banana pudding is a classic favorite that will delight your taste buds. With layers of ripe bananas, Nilla wafers, and rich vanilla pudding, this recipe is simple yet divine. In this guide, I’ll share easy steps, tips, and fun variations to make your pudding stand out. Let’s dive into making your new favorite dessert!

Ingredients

Making homemade banana pudding starts with fresh, quality ingredients. Here’s what you need:

– 3 large ripe bananas, sliced

– 1 cup granulated sugar

– 1/3 cup cornstarch

– 1/4 teaspoon salt

– 4 cups whole milk

– 4 large egg yolks

– 2 tablespoons unsalted butter

– 2 teaspoons vanilla extract

– 1 package (11 oz) Nilla wafers

– Whipped cream for topping

Each ingredient plays a key role. The ripe bananas add natural sweetness and flavor. Granulated sugar helps balance the pudding’s creaminess. Cornstarch thickens the mix, giving it that perfect, smooth texture.

Whole milk provides richness, while egg yolks enhance the creaminess. Butter adds a lovely silkiness, and vanilla extract brings a warm flavor. Nilla wafers give a delightful crunch and contrast to the soft pudding. Finally, whipped cream on top adds a fluffy finish.

For the full recipe, follow along to create this sweet and creamy delight.

Step-by-Step Instructions

Preparation Steps

Start by making the base of your pudding. In a medium saucepan, whisk together the sugar, cornstarch, and salt until mixed well. This step is key to a smooth texture. Next, gradually add the milk to the dry mix, whisking as you go. This helps remove lumps. Heat the saucepan over medium heat. Stir constantly until the mix thickens and bubbles, around 7 to 10 minutes. You want it to be thick but not burnt.

Egg Yolk Mixture

Now, let’s work on the eggs. In a separate bowl, whisk the egg yolks until smooth. Once your milk mixture is hot, slowly pour about 1 cup of it into the egg yolks. Whisk constantly to temper them. This step keeps the eggs from cooking too fast. After that, pour the egg yolk mix back into the saucepan. Keep cooking for another 2 to 3 minutes, stirring all the time. This will make your pudding even creamier.

Layering the Pudding

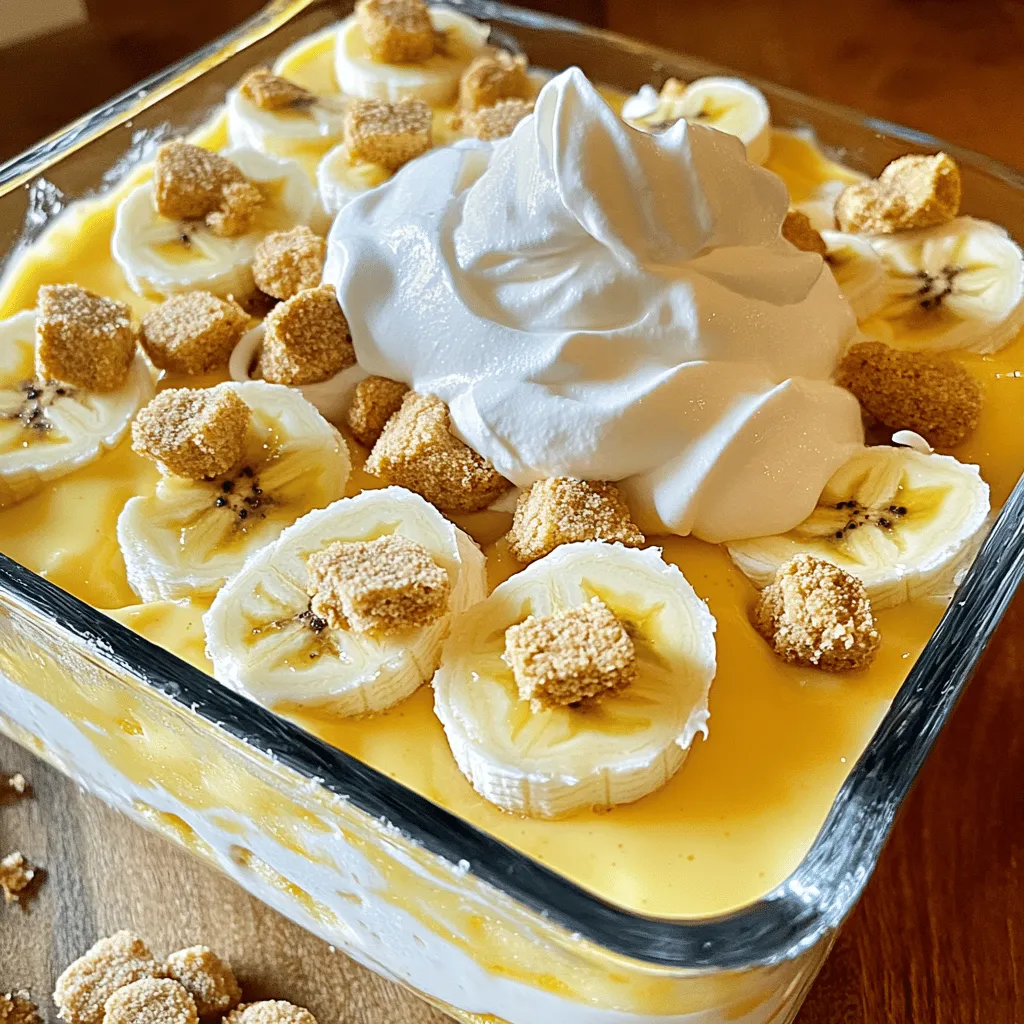
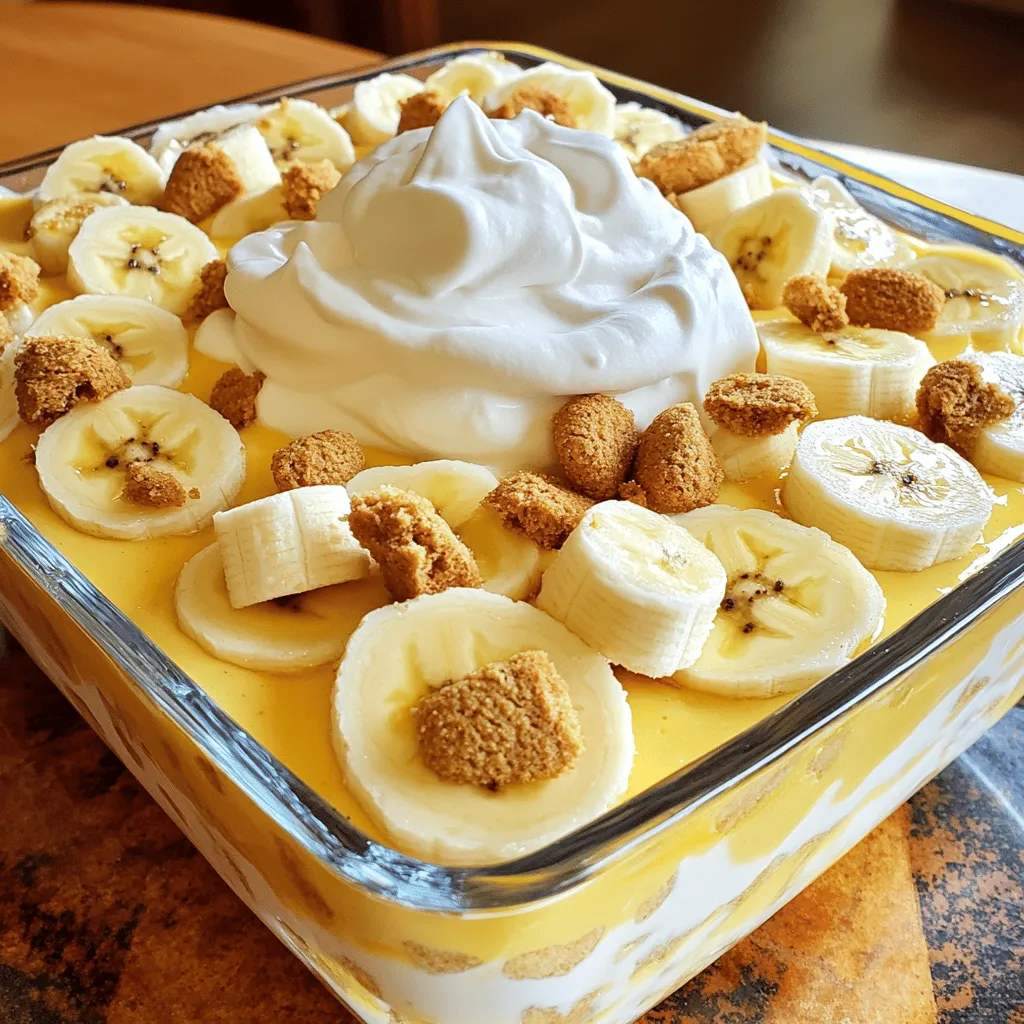
It’s time to layer the deliciousness! In a large serving dish, start with half of the Nilla wafers. Then, add half of your banana slices on top. Pour half of the pudding over these layers. Repeat this process with the remaining wafers, bananas, and pudding. Finally, cover the dish. Use plastic wrap or a lid to press it right onto the pudding. This keeps a skin from forming. Chill in the fridge for at least 4 hours or overnight for the best flavor.

For the full recipe, refer to the earlier section. Enjoy your sweet treat!

Tips & Tricks

Achieving the Right Consistency

Stirring constantly is key to a smooth pudding. If you stop, lumps can form. Use a whisk for the best results. I recommend cooking the mixture over medium heat. This heat level helps the pudding thicken without burning. If you want a thicker pudding, let it cook a bit longer. Just watch it closely to avoid scorching.

Choosing the Right Bananas

Choosing the right bananas is crucial. Ripe bananas work best for flavor. They should be yellow with some brown spots. Overripe bananas may be too mushy and sweet. The size of the bananas can also change the taste. Larger bananas have a stronger flavor, while smaller ones are milder. So pick what you like best!

Preventing a Skin from Forming

To stop a skin from forming, cover the pudding while it chills. Press plastic wrap directly onto the top of the pudding. This method keeps air out and moisture in. You can also use a lid if your dish has one. Just make sure it fits snugly. Both methods work well to keep your pudding smooth and creamy. Remember, a little care goes a long way!

Variations

Flavor Additions

You can easily change up your banana pudding to suit your taste. Try adding chocolate chips or cocoa powder. This twist gives a rich, chocolatey flavor that pairs well with bananas. Just mix in about half a cup of chocolate chips when you layer the pudding.

Another fun option is adding peanut butter. Peanut butter gives a nutty taste and thick texture. Stir in a half cup of creamy peanut butter into the pudding mixture. You’ll love how it complements the bananas.

Gluten-Free Options

If you need a gluten-free version, you can use gluten-free wafers. Many brands make gluten-free vanilla cookies that taste great in this dessert. Check your local store for options that match the flavor of Nilla wafers.

You may also need to modify thickening agents. Instead of cornstarch, you could try arrowroot powder. It works well for gluten-free puddings and helps achieve that creamy texture.

Dairy Alternatives

For a dairy-free version, consider using almond milk or coconut milk. Both options add a unique flavor while keeping the pudding creamy. Use the same amount of milk as the recipe calls for.

If you want to skip eggs, try egg replacers. Flaxseed meal or chia seeds work well. Mix one tablespoon of flaxseed meal with three tablespoons of water to replace one egg. This will help bind the pudding while keeping it dairy-free.

For more details, visit the Full Recipe to see how easy it is to make these variations!

Storage Info

Storing Leftovers

To store leftover pudding, place it in an airtight container. Cover the pudding directly with plastic wrap. This helps keep the top from drying out. Store it in the fridge for up to three days. To maintain texture and flavor, avoid stirring it too much after chilling.

Freezing Banana Pudding

Freezing banana pudding can change its texture. If you want to freeze it, layer the pudding as usual, but skip the bananas and whipped cream. Freeze in an airtight container. When you want to eat it, thaw it in the fridge overnight. Expect the pudding to be a bit grainy when thawed, but it will still taste great!

Shelf Life Information

Homemade banana pudding lasts about three to four days in the fridge. Look for signs of spoilage, such as an off smell or mold. If the pudding separates or changes color, it’s best to toss it. Always trust your senses; if it seems off, don’t eat it!

FAQs

How do I make Homemade Banana Pudding without eggs?

To make banana pudding without eggs, you can use cornstarch as a thickener. Combine milk, sugar, and cornstarch in a pot. Cook over medium heat, stirring until it thickens. You can also add a bit of cream cheese for richness. This will give you a creamy texture without eggs.

Can I use instant pudding mix?

Yes, you can use instant pudding mix. It is quicker to prepare, but it lacks the depth of flavor found in homemade pudding. Instant pudding is also less creamy and may not set as well. Homemade banana pudding uses fresh ingredients and can taste richer and more satisfying.

How long can homemade banana pudding sit out?

Homemade banana pudding should not sit out for more than two hours. If it’s warm in your kitchen, the time drops to one hour. Always keep it covered, and refrigerate any leftovers. This keeps it safe and ensures it stays creamy and delicious.

In this article, we explored how to make a delicious banana pudding. We covered the ingredients, step-by-step instructions, and helpful tips. You learned about variations to try and how to store your pudding correctly. Remember, using ripe bananas makes a big difference in flavor. Making this treat is fun and rewarding. Enjoy your homemade banana pudding, and share it with friends!

Making homemade banana pudding starts with fresh, quality ingredients. Here’s what you need: - 3 large ripe bananas, sliced - 1 cup granulated sugar - 1/3 cup cornstarch - 1/4 teaspoon salt - 4 cups whole milk - 4 large egg yolks - 2 tablespoons unsalted butter - 2 teaspoons vanilla extract - 1 package (11 oz) Nilla wafers - Whipped cream for topping Each ingredient plays a key role. The ripe bananas add natural sweetness and flavor. Granulated sugar helps balance the pudding's creaminess. Cornstarch thickens the mix, giving it that perfect, smooth texture. Whole milk provides richness, while egg yolks enhance the creaminess. Butter adds a lovely silkiness, and vanilla extract brings a warm flavor. Nilla wafers give a delightful crunch and contrast to the soft pudding. Finally, whipped cream on top adds a fluffy finish. For the full recipe, follow along to create this sweet and creamy delight. Start by making the base of your pudding. In a medium saucepan, whisk together the sugar, cornstarch, and salt until mixed well. This step is key to a smooth texture. Next, gradually add the milk to the dry mix, whisking as you go. This helps remove lumps. Heat the saucepan over medium heat. Stir constantly until the mix thickens and bubbles, around 7 to 10 minutes. You want it to be thick but not burnt. Now, let's work on the eggs. In a separate bowl, whisk the egg yolks until smooth. Once your milk mixture is hot, slowly pour about 1 cup of it into the egg yolks. Whisk constantly to temper them. This step keeps the eggs from cooking too fast. After that, pour the egg yolk mix back into the saucepan. Keep cooking for another 2 to 3 minutes, stirring all the time. This will make your pudding even creamier. It's time to layer the deliciousness! In a large serving dish, start with half of the Nilla wafers. Then, add half of your banana slices on top. Pour half of the pudding over these layers. Repeat this process with the remaining wafers, bananas, and pudding. Finally, cover the dish. Use plastic wrap or a lid to press it right onto the pudding. This keeps a skin from forming. Chill in the fridge for at least 4 hours or overnight for the best flavor. For the full recipe, refer to the earlier section. Enjoy your sweet treat! Stirring constantly is key to a smooth pudding. If you stop, lumps can form. Use a whisk for the best results. I recommend cooking the mixture over medium heat. This heat level helps the pudding thicken without burning. If you want a thicker pudding, let it cook a bit longer. Just watch it closely to avoid scorching. Choosing the right bananas is crucial. Ripe bananas work best for flavor. They should be yellow with some brown spots. Overripe bananas may be too mushy and sweet. The size of the bananas can also change the taste. Larger bananas have a stronger flavor, while smaller ones are milder. So pick what you like best! To stop a skin from forming, cover the pudding while it chills. Press plastic wrap directly onto the top of the pudding. This method keeps air out and moisture in. You can also use a lid if your dish has one. Just make sure it fits snugly. Both methods work well to keep your pudding smooth and creamy. Remember, a little care goes a long way! {{image_2}} You can easily change up your banana pudding to suit your taste. Try adding chocolate chips or cocoa powder. This twist gives a rich, chocolatey flavor that pairs well with bananas. Just mix in about half a cup of chocolate chips when you layer the pudding. Another fun option is adding peanut butter. Peanut butter gives a nutty taste and thick texture. Stir in a half cup of creamy peanut butter into the pudding mixture. You’ll love how it complements the bananas. If you need a gluten-free version, you can use gluten-free wafers. Many brands make gluten-free vanilla cookies that taste great in this dessert. Check your local store for options that match the flavor of Nilla wafers. You may also need to modify thickening agents. Instead of cornstarch, you could try arrowroot powder. It works well for gluten-free puddings and helps achieve that creamy texture. For a dairy-free version, consider using almond milk or coconut milk. Both options add a unique flavor while keeping the pudding creamy. Use the same amount of milk as the recipe calls for. If you want to skip eggs, try egg replacers. Flaxseed meal or chia seeds work well. Mix one tablespoon of flaxseed meal with three tablespoons of water to replace one egg. This will help bind the pudding while keeping it dairy-free. For more details, visit the Full Recipe to see how easy it is to make these variations! To store leftover pudding, place it in an airtight container. Cover the pudding directly with plastic wrap. This helps keep the top from drying out. Store it in the fridge for up to three days. To maintain texture and flavor, avoid stirring it too much after chilling. Freezing banana pudding can change its texture. If you want to freeze it, layer the pudding as usual, but skip the bananas and whipped cream. Freeze in an airtight container. When you want to eat it, thaw it in the fridge overnight. Expect the pudding to be a bit grainy when thawed, but it will still taste great! Homemade banana pudding lasts about three to four days in the fridge. Look for signs of spoilage, such as an off smell or mold. If the pudding separates or changes color, it’s best to toss it. Always trust your senses; if it seems off, don’t eat it! To make banana pudding without eggs, you can use cornstarch as a thickener. Combine milk, sugar, and cornstarch in a pot. Cook over medium heat, stirring until it thickens. You can also add a bit of cream cheese for richness. This will give you a creamy texture without eggs. Yes, you can use instant pudding mix. It is quicker to prepare, but it lacks the depth of flavor found in homemade pudding. Instant pudding is also less creamy and may not set as well. Homemade banana pudding uses fresh ingredients and can taste richer and more satisfying. Homemade banana pudding should not sit out for more than two hours. If it's warm in your kitchen, the time drops to one hour. Always keep it covered, and refrigerate any leftovers. This keeps it safe and ensures it stays creamy and delicious. In this article, we explored how to make a delicious banana pudding. We covered the ingredients, step-by-step instructions, and helpful tips. You learned about variations to try and how to store your pudding correctly. Remember, using ripe bananas makes a big difference in flavor. Making this treat is fun and rewarding. Enjoy your homemade banana pudding, and share it with friends!

Homemade Banana Pudding

Indulge in this creamy dreamy banana pudding that will satisfy your sweet tooth! With layers of ripe bananas, crunchy Nilla wafers, and a rich custard made from scratch, it’s the ultimate dessert for any occasion. Just follow our simple step-by-step instructions to create a delicious treat that everyone will love. Click to explore the full recipe and impress your friends and family with this classic dessert!

Ingredients
  

3 large ripe bananas, sliced

1 cup granulated sugar

1/3 cup cornstarch

1/4 teaspoon salt

4 cups whole milk

4 large egg yolks

2 tablespoons unsalted butter

2 teaspoons vanilla extract

1 package (11 oz) Nilla wafers

Whipped cream for topping

Instructions
 

In a medium saucepan, whisk together the sugar, cornstarch, and salt until well combined.

    Gradually add the whole milk to the dry mixture, whisking to combine and remove any lumps.

      Place the saucepan over medium heat, stirring constantly, until the mixture thickens and begins to bubble (about 7-10 minutes).

        In a separate bowl, whisk the egg yolks. Once the milk mixture is hot, slowly pour about 1 cup of it into the egg yolks, whisking constantly to temper.

          Pour the egg yolk mixture back into the saucepan with the remaining milk mixture. Continue to cook, stirring constantly, for another 2-3 minutes until it thickens further.

            Remove the saucepan from heat, stir in the butter and vanilla extract until fully melted and combined.

              In a large serving dish, layer half of the Nilla wafers, followed by half of the banana slices, and then pour half of the pudding over the layers.

                Repeat the layers with the remaining ingredients: Nilla wafers, banana slices, and the rest of the pudding.

                  Cover the dish with plastic wrap or a lid, pressing it directly onto the surface of the pudding to prevent a skin from forming. Chill in the refrigerator for at least 4 hours or overnight for the best flavor.

                    Before serving, top generously with whipped cream and garnish with extra banana slices and Nilla wafers if desired.

                      Prep Time: 25 mins | Total Time: 4 hours 30 mins | Servings: 8

                        WANT TO SAVE THIS RECIPE?

                        Leave a Comment

                        Recipe Rating