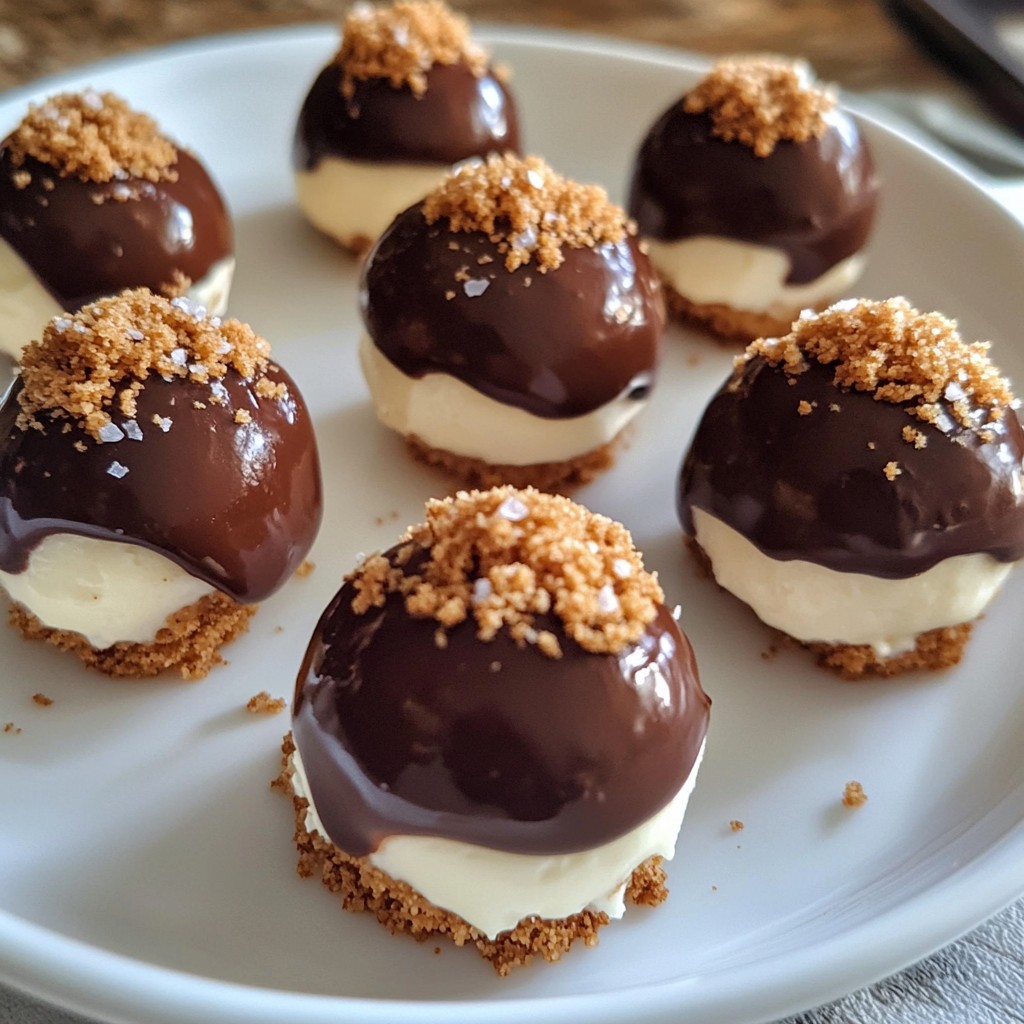
Get ready to indulge in a sweet, creamy treat with my Chocolate Dipped Cheesecake Bites! These delightful bites are easy to make and perfect for any occasion. Imagine soft cheesecake wrapped in rich chocolate, all rolled in crunchy graham crackers. Whether you're planning a party or just want a special dessert, this recipe will impress. Let’s dive into the simple ingredients and steps to create this delightful dessert!
Why I Love This Recipe
- Deliciously Indulgent: These chocolate dipped cheesecake bites are the perfect combination of creamy cheesecake and rich chocolate, making them an irresistible treat.
- Easy to Make: With simple ingredients and straightforward steps, anyone can whip up these delightful bites in no time.
- Perfect for Any Occasion: Whether it's a party, a holiday gathering, or just a sweet craving, these bites are versatile enough to fit any event.
- Customizable: You can easily switch up the chocolate type or add different toppings, allowing for endless variations to suit your taste.
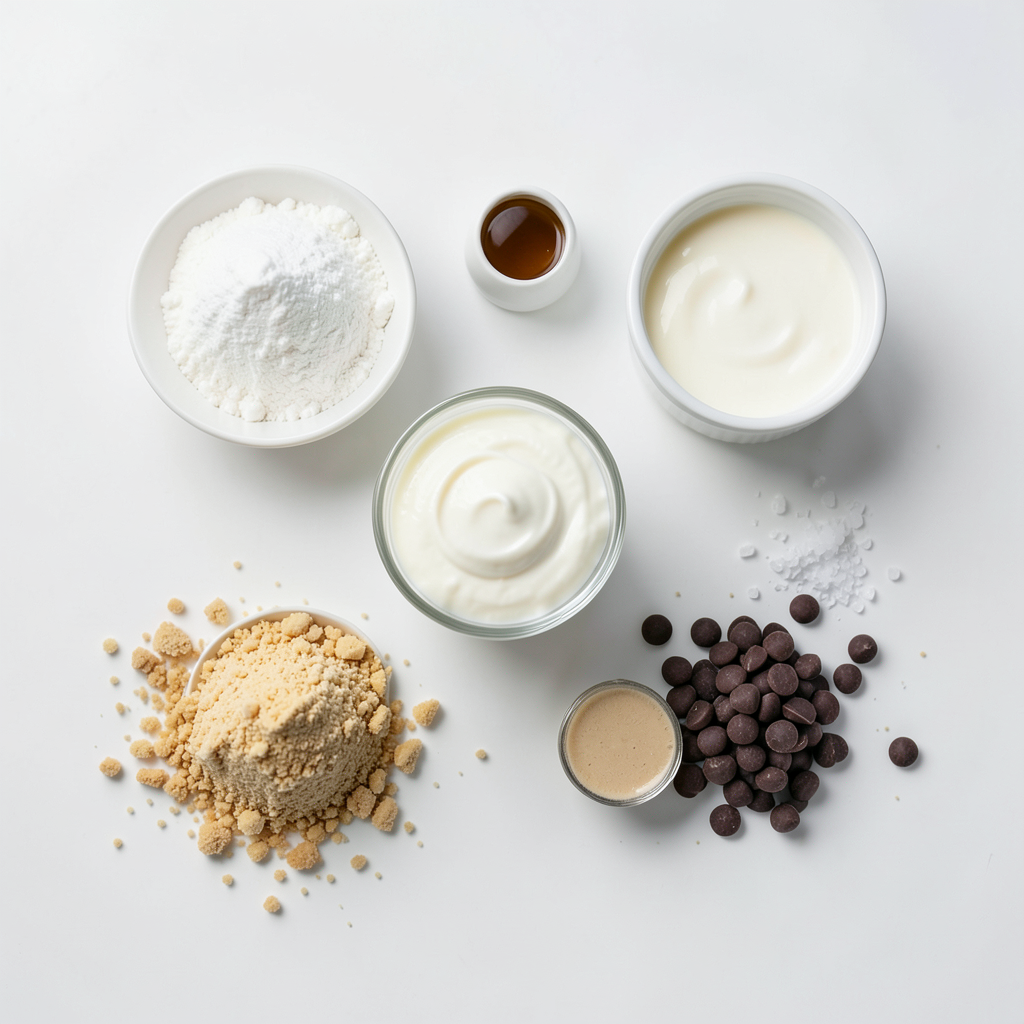
Ingredients
List of Ingredients
- 8 oz cream cheese, softened
- 1/2 cup powdered sugar
- 1 tsp vanilla extract
- 1/4 cup heavy cream
- 1 cup chocolate chips (semisweet or dark)
- 1 tbsp coconut oil (optional, for smoother dipping)
- Graham cracker crumbs (for rolling)
- Sea salt (for garnish, optional)
Ingredient Notes
Fresh vs. expired cream cheese Always use fresh cream cheese for the best taste. Old cream cheese changes texture and flavor. Check the date before using.
Importance of room temperature ingredients Room temperature ingredients mix better. They create a smooth filling for your bites. Take the cream cheese and heavy cream out well ahead of time.
Types of chocolate to use Semisweet chocolate is a classic choice. Dark chocolate gives a richer taste. You can also use white chocolate if you like it sweeter.
Step-by-Step Instructions
Detailed Cooking Process
Mixing the cheesecake filling Start with a mixing bowl. Add 8 oz of softened cream cheese, 1/2 cup of powdered sugar, and 1 tsp of vanilla extract. Beat these together with an electric mixer. Make sure the mixture is creamy and smooth. This step is key for a good texture.
Shaping and freezing the cheesecake bites Next, add 1/4 cup of heavy cream to the bowl. Beat the mixture until it becomes light and fluffy. This usually takes about 3-4 minutes. Now, shape the cheesecake mixture into small balls. Aim for about 1 inch in diameter. Place these on a baking sheet lined with parchment paper. Freeze the bites for at least 1 hour, until they are firm.
Melting the chocolate While the bites freeze, melt 1 cup of chocolate chips in a microwave-safe bowl. You can use either semisweet or dark chocolate. Add 1 tbsp of coconut oil for a smoother finish if you want. Heat in 20-second intervals, stirring in between. Stop when the chocolate is smooth and melted.
Dipping and Coating
Proper technique for dipping Once the cheesecake bites are firm, it's time to dip them! Take each bite and dip it into the melted chocolate. Let any excess chocolate drip off before moving to the next step. This keeps the coating even and neat.
Rolling in graham cracker crumbs After dipping, roll each cheesecake bite in graham cracker crumbs. Make sure they are coated lightly but well. This adds flavor and gives a nice crunch.
Adding sea salt garnish For a special touch, sprinkle a pinch of sea salt on top of each bite. Do this before the chocolate sets. The salt adds a lovely contrast to the sweet chocolate and cheesecake.
Refrigerate the bites until the chocolate hardens. This should take about 15-20 minutes. Enjoy these delightful treats!
Tips & Tricks
Achieving the Perfect Texture
To make the best cheesecake bites, start with the cream cheese. It needs to be soft. I let mine sit out for about 30 minutes. This helps it mix better. Use an electric mixer to beat the cream cheese, powdered sugar, and vanilla extract together. Mix until it is creamy and smooth.
Next, add the heavy cream. Keep mixing until fluffy. This should take about 3 to 4 minutes. The fluffier the mixture, the better your bites will taste. If you notice any lumps, keep beating. Smooth is key for great bites.
Presentation Ideas
When it's time to serve, presentation matters. I like to arrange the cheesecake bites on a bright, decorative platter. This makes them stand out. For a fun touch, drizzle some extra melted chocolate over the bites.
You can also use fresh berries for color. Place them around the bites. This adds freshness and makes the platter pop. Another idea is to sprinkle a pinch of sea salt on top. This gives a nice contrast to the sweet chocolate. Enjoy your beautiful and tasty treats!
Pro Tips
- Chill Out: Ensure the cream cheese is well softened to blend smoothly, but keep the mixture chilled before shaping into bites for easier handling.
- Chocolate Magic: Adding coconut oil not only helps the chocolate melt more smoothly but also gives a beautiful shine to your finished bites.
- Graham Cracker Crush: For an extra crunch, consider toasting the graham cracker crumbs lightly before rolling the bites for enhanced flavor.
- Salt Bae: A sprinkle of sea salt elevates the flavor profile, balancing the sweetness of the chocolate and cheesecake.
Variations
Flavor Adjustments
You can give your cheesecake bites a twist by adding different flavors. A few drops of almond extract bring a rich taste. If you love mint, try peppermint extract for a fresh kick. You can even mix in some lemon zest for a bright flavor. Adding cocoa powder gives more chocolatey goodness without changing the main texture.
Chocolate Alternatives
While semisweet chocolate is a classic choice, you can switch it up. Use dark chocolate for a richer flavor. If you want something sweeter, white chocolate works great too. For those who prefer dairy-free, many brands offer dairy-free chocolate chips. These options let everyone enjoy this tasty treat, no matter their diet.
Storage Info
How to Store Cheesecake Bites
To keep your cheesecake bites fresh, place them in an airtight container. Use parchment paper between layers to avoid sticking. Store them in the refrigerator for up to five days. If you want them to last longer, freeze them. They will stay good in the freezer for about three months. Just be sure to wrap them well in plastic wrap before putting them in a freezer bag.
Reheating Tips
If you freeze the cheesecake bites, you can thaw them safely. Move them from the freezer to the fridge for a few hours. This keeps their texture nice. Avoid using a microwave for thawing, as this can make them too soft.
When you’re ready to serve them, take them out of the fridge. Let them sit for a few minutes to reach room temperature. This enhances the flavor and keeps them creamy. Enjoy your delightful treats!
FAQs
Common User Questions
How do I prevent chocolate from hardening too quickly? To keep chocolate from hardening too fast, work in a warm area. You can also add a bit of coconut oil to the melted chocolate. This makes it smoother and helps it stay liquid longer. Melt your chocolate in small batches if needed.
Can I use store-bought cheesecake filling? Yes, you can use store-bought cheesecake filling. Just make sure it is thick enough to hold its shape. This can save you time and effort.
What can I substitute for graham cracker crumbs? If you want a change, try using crushed cookies. Vanilla wafers, Oreos, or even nut-based crumbs work well. These can add a unique flavor twist.
Recipe Adaptations
How to make this recipe gluten-free To make these cheesecake bites gluten-free, use gluten-free graham crackers. Many brands offer great options. Also, check your chocolate for gluten-free labels to be safe.
Vegan options for cheesecake bites For vegan cheesecake bites, swap cream cheese for a vegan cream cheese. Use powdered sugar and coconut cream instead of heavy cream. Choose dairy-free chocolate chips for dipping. This way, everyone can enjoy these treats!
Making cheesecake bites is fun and easy. You learned about key ingredients like cream cheese, chocolate, and tips for the best texture. I shared step-by-step instructions to help you create these treats. You can explore various flavors and adapt the recipe to your needs.
In the end, storing, reheating, and presenting your cheesecake bites will enhance your experience. Enjoy your delicious creations and feel free to experiment.