Skip to content
DisclaimerTerms Of UseGDPR PolicyCookie Policy

Chelles Recipes

  • Home
  • Drinks
  • Appetizers
  • Dinner
  • Dessert
  • About
  • Contact
  • Privacy Policy
DisclaimerTerms Of UseGDPR PolicyCookie Policy

Rosie

- 8 ounces spaghetti or fettuccine - 1 pound large shrimp, peeled and deveined - 4 tablespoons unsalted butter - 4 cloves garlic, minced - 1 teaspoon red pepper flakes (optional) - 2 cups chicken or vegetable broth - 1 cup cherry tomatoes, halved - 1 cup fresh spinach - 1 tablespoon lemon juice - Salt and pepper to taste - Fresh parsley, chopped (for garnish) - Grated Parmesan cheese (for serving) Gathering the right ingredients is key for this dish. First, you need the pasta, which can be either spaghetti or fettuccine. The choice is yours! Next, grab a pound of large shrimp. Make sure they are peeled and deveined for easy cooking. For the base flavor, we’ll use unsalted butter and fresh garlic. The butter adds richness, while the garlic gives a wonderful aroma. If you like a bit of heat, add red pepper flakes. They are optional but can spice things up. You’ll also need chicken or vegetable broth to cook the pasta. The broth infuses flavor into the noodles, making them taste great. Cherry tomatoes add sweetness and color. Fresh spinach makes the dish healthier and adds a nice pop of green. Finally, for seasoning, we have lemon juice, salt, and pepper. Fresh parsley is perfect for garnish, and grated Parmesan cheese is a must for serving. Each ingredient plays a role in making this one-pot meal shine. 1. First, melt 2 tablespoons of butter in a large pot over medium-high heat. 2. Next, add the minced garlic and red pepper flakes. Sauté them for about one minute. The aroma will be amazing! 3. Now, add 1 pound of large shrimp to the pot. Season them with salt and pepper. 4. Cook the shrimp for about 2 to 3 minutes. They should turn pink. Remove them from the pot and set aside. 1. In the same pot, pour in 2 cups of chicken or vegetable broth. Bring it to a simmer. 2. Add 8 ounces of spaghetti or fettuccine to the pot. Cook according to the package instructions, usually 8 to 10 minutes. Stir occasionally. 3. About 3 minutes before the pasta is done, toss in 1 cup of halved cherry tomatoes and 1 cup of fresh spinach. Cook until the spinach wilts and tomatoes soften. 1. Once the pasta is cooked, return the shrimp to the pot. 2. Add the remaining 2 tablespoons of butter and 1 tablespoon of lemon juice. 3. Toss everything gently until the butter melts and the shrimp warm through. 4. Taste the dish and adjust seasoning with more salt, pepper, or lemon juice if you like. This one-pot meal is quick and full of flavor! Enjoy making this dish. To avoid overcooking shrimp, watch the color. Cook them until they turn pink. This usually takes about 2-3 minutes. If the shrimp curl tightly, they are overcooked. Always remove them from heat once done to keep them tender. For pasta, I like spaghetti or fettuccine. Both types soak up the sauce well. They also blend nicely with the shrimp. You can use whole wheat or gluten-free pasta for healthy swaps. Just adjust the cooking time as needed. For side dishes, I recommend a fresh green salad. A simple Caesar salad pairs well too. Steamed veggies, like broccoli or asparagus, add color and nutrients. When it comes to wine, a chilled white wine works best. Try a Sauvignon Blanc or Pinot Grigio. If you prefer red, a light Pinot Noir is a nice choice. For plating, use deep bowls to serve the pasta. This helps keep the sauce contained. Top each bowl with fresh parsley and grated Parmesan. It adds a pop of color and flavor. To create an appealing visual display, arrange shrimp on top of the pasta. Scatter cherry tomatoes for a bright touch. Drizzle with a bit of olive oil for shine. This makes your dish look gourmet and inviting. {{image_2}} You can make this dish your own with simple swaps. Instead of shrimp, try chicken or tofu. Both options add protein and flavor. For a gluten-free meal, use gluten-free pasta. Many brands offer great taste and texture. Want to boost the flavor? Add fresh herbs like basil or parsley. A sprinkle of oregano or thyme can bring a nice touch too. You can also toss in veggies like bell peppers or zucchini. They add color and nutrition to your meal. If you're looking for vegan options, replace shrimp with chickpeas or mushrooms. Use vegan butter instead of regular butter. You can also reduce calories by cutting down on butter or using less pasta. These changes keep the dish light and tasty. To store leftovers, place the pasta in an airtight container. This keeps the dish fresh and prevents drying. Refrigerate it right away. Leftovers stay good for up to three days. Make sure to reheat it on low heat. Add a splash of broth or water to keep it moist. Stir gently to mix everything well. To freeze, use a freezer-safe container. Portion it into smaller servings to make it easy to thaw. Leave space at the top, as the pasta expands when frozen. For thawing, move the container to the fridge overnight. You can also use the microwave for quick thawing. Reheat on low heat, adding a bit of broth or water to keep it creamy. You can prep this dish ahead of time for busy nights. Cook the shrimp and pasta but leave out the spinach and tomatoes. These ingredients are best fresh. Portion the meal into containers for easy grab-and-go meals. You can add fresh spinach and tomatoes right before serving. This way, the flavors stay bright and tasty. You can use spaghetti or fettuccine. Both types work well. They cook evenly and soak up the sauce nicely. If you want a twist, try whole wheat or gluten-free pasta. Just check the cooking time on the package. Absolutely! If you prefer less heat, leave out the red pepper flakes. You can also use less if you want a mild flavor. This dish is flexible and allows for personal taste. Add veggies like bell peppers, zucchini, or broccoli. They boost color and nutrients. You can also toss in some avocado for healthy fats. This adds creaminess to the dish without extra calories. Pair your pasta with a light salad or garlic bread. A fresh Caesar salad complements the shrimp well. For drinks, a crisp white wine or sparkling water works great. To prep this dish ahead, cook the pasta and shrimp separately. Store them in airtight containers. When ready to eat, combine them with the sauce on the stove. This keeps everything fresh and tasty. This dish, One-Pot Garlic Butter Shrimp Pasta, is simple and tasty. We covered the main and additional ingredients, plus seasonings. You learned how to prepare shrimp and pasta together. I shared tips on cooking, serving, and presentation. Variations offer fun twists, and storage ideas keep leftovers fresh. In the end, you can enjoy this quick meal any night. Happy cooking!

One-Pot Garlic Butter Shrimp Pasta Simple and Quick

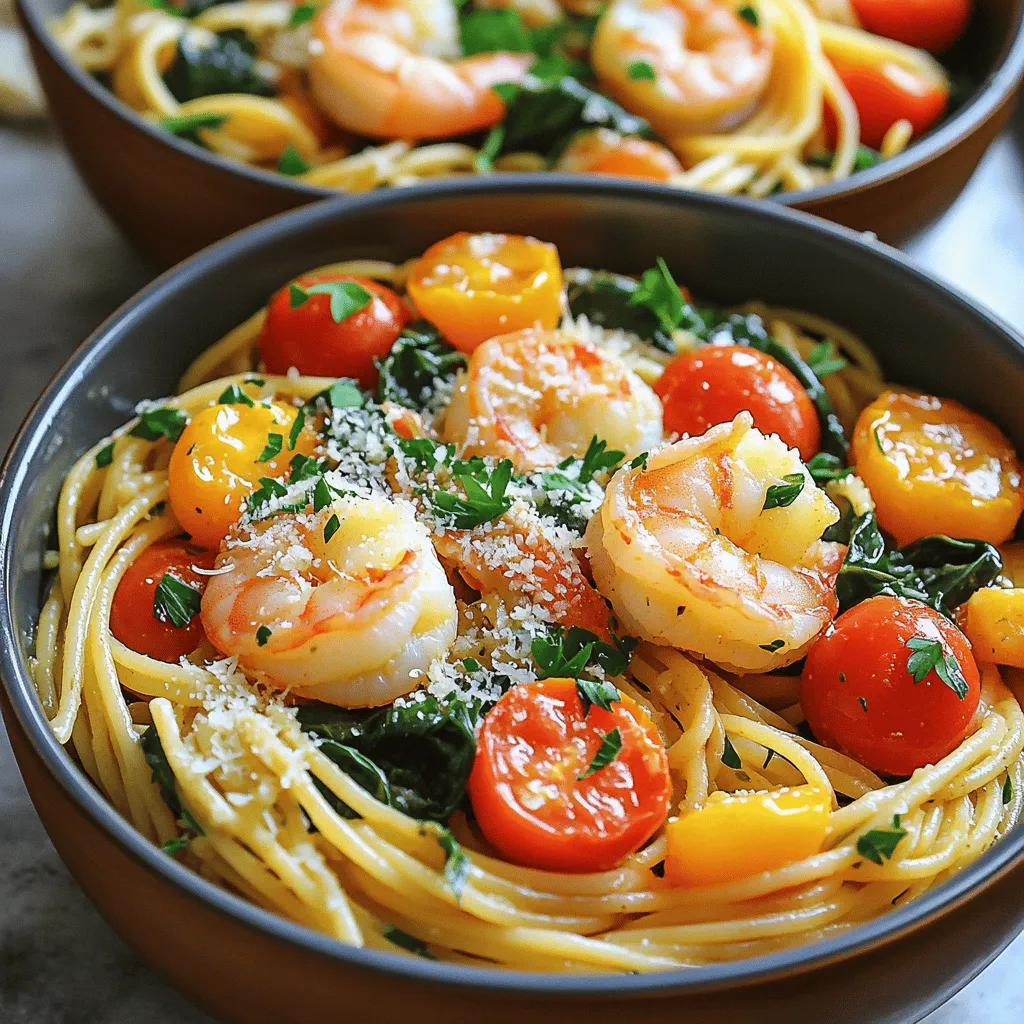
Are you craving a quick and tasty meal? You’ll love this One-Pot Garlic Butter Shrimp Pasta! It’s simple to make

- 1 medium pumpkin (about 2-3 pounds), peeled and diced - 1 medium onion, chopped - 2 cloves garlic, minced - 1 carrot, peeled and diced - 1 tablespoon fresh ginger, minced - 1 teaspoon ground cumin - 1 teaspoon ground coriander - 4 cups vegetable broth - 1 cup coconut milk - 2 tablespoons olive oil - Salt and pepper to taste - Fresh cilantro or parsley for garnish For those with dietary needs, you can swap coconut milk with almond milk. Use low-sodium broth for a lighter option. If you want a vegan version, skip the coconut milk. You can also use any squash if pumpkin is out of season. Each serving of this silky pumpkin soup has about 220 calories. It contains 9 grams of fat, 3 grams of protein, and 30 grams of carbs. This soup is rich in vitamin A, which is great for your eyes. It also has vitamin C, which helps your immune system. Plus, the fiber from pumpkin and carrots aids digestion. Overall, it's a tasty and healthy choice! Start by peeling the pumpkin. Use a sharp knife and slice it carefully. Cut the pumpkin into small cubes. Aim for pieces about one inch. This size helps them cook evenly. Next, chop the onion into small bits. Mince the garlic and ginger finely. This will add strong flavors. Peel and dice the carrot into small cubes, similar in size to the pumpkin. Tips for chopping: - Use a stable cutting board. - Keep your fingers tucked in while chopping. - A sharp knife will make the task easier and safer. Heat a big pot over medium heat. Add the olive oil and let it warm up. Once hot, toss in the chopped onion. Stir and sauté for about five minutes. You want the onion to turn translucent. Now, add the minced garlic, ginger, and carrot. Sauté for another three to four minutes. You want to smell the fragrant spices. Next, add the diced pumpkin, cumin, and coriander. Stir and cook for about five minutes. This toasts the spices and brings out their flavors. Pour in the vegetable broth. Bring the mix to a boil. Once boiling, reduce the heat. Let it simmer for 20 to 25 minutes. The pumpkin should be soft enough to pierce with a fork. For a silky texture, use an immersion blender. Carefully blend the soup until smooth. If you don’t have one, use a regular blender. Pour the soup in batches into the blender. Blend until creamy, then return it to the pot. Blending tips: - Let the soup cool slightly before blending. - Blend in small amounts to avoid spills. - A high-speed blender works best for a smooth finish. To make your pumpkin soup rich and smooth, experiment with different types of cream or milk. You can use heavy cream for a decadent taste. If you prefer a lighter option, try almond milk or oat milk. Coconut milk gives a nice tropical twist, which pairs well with pumpkin. Adjust spices to fit your taste. If you love heat, add more ginger or a dash of cayenne. For a milder flavor, reduce the cumin and coriander. One common mistake is not cooking the pumpkin enough. If it's too firm, your soup won't blend well. Always check if the pumpkin is tender before blending. Another pitfall is burning the garlic. Keep an eye on it while sautéing, as it can turn bitter quickly. Also, be careful not to add too much salt too early. Taste your soup before seasoning to avoid over-salting. Garnishes can elevate your soup. Fresh cilantro or parsley adds color and freshness. A drizzle of olive oil can add richness. For a fun touch, try adding roasted pumpkin seeds on top. Pair your silky pumpkin soup with crusty bread for a complete meal. A simple green salad with light dressing also complements the soup well. Enjoy your warm bowl of comfort! {{image_2}} You can change the taste of silky pumpkin soup by adding spices and herbs. Try adding nutmeg for warmth or a pinch of red pepper flakes for heat. Fresh herbs like thyme or sage can also give a nice touch. If you want a thicker soup, add more diced carrots or even some cooked lentils for protein. These additions make the soup heartier and boost nutrition. In fall, you can use roasted pumpkin or butternut squash for a sweeter flavor. Roasting the pumpkin brings out its natural sugars. In winter, consider adding root vegetables like parsnips or sweet potatoes. These ingredients not only change the taste but also add a colorful twist to your soup. To make the soup vegan, simply swap coconut milk for heavy cream. Use vegetable broth to keep it plant-based. For a gluten-free version, ensure your broth is gluten-free. If you need low-carb options, skip the carrots and focus on pumpkin and broth. You can also use almond milk as a lighter alternative to coconut milk, making it suitable for those who are lactose intolerant. To keep your silky pumpkin soup fresh, use airtight containers. Make sure the soup cools down to room temperature before sealing. This helps prevent moisture buildup. You can store it in the fridge for up to five days. If you want to save it longer, consider freezing it. Use freezer-safe containers or bags. Be sure to leave some space at the top, as soup expands when frozen. Label the containers with the date to keep track. When reheating, choose a gentle method. You can warm the soup on the stove over low heat. Stir it often to avoid sticking. If using a microwave, heat in short bursts, stirring in between. This helps keep the soup creamy and smooth. If the soup seems thick, add a splash of vegetable broth or coconut milk. This revives the texture and flavor. For a richer taste, you can stir in a bit of cream before serving. To make your pumpkin soup richer, try adding a few key ingredients. Use more coconut milk or heavy cream for a creamier texture. You can also add butter for a richer taste. Another option is to include a few roasted garlic cloves. They add depth and a nice flavor boost. You can even stir in some grated cheese, like Parmesan, just before serving. Each of these options brings a lovely creaminess to your soup. Yes, you can use canned pumpkin instead of fresh. Canned pumpkin is convenient and saves time. It has a smooth texture and is often cooked already. However, fresh pumpkin can have a deeper flavor. Canned pumpkin may lack some of the natural sweetness of fresh. If you use canned, check for added sugars or spices. This choice depends on your taste and how much time you have. Pumpkin soup lasts about 3 to 5 days in the fridge. Store it in an airtight container for best results. Make sure to let it cool completely before sealing. If you want to keep it longer, consider freezing it. Frozen soup can last up to 3 months. Just remember to leave some space in the container for expansion. Leftover pumpkin seeds are great for snacking. You can roast them with a little olive oil and salt. This makes a crunchy treat. You can also use them as a garnish on soups or salads. Another idea is to blend them into smoothies for extra nutrition. They are rich in protein and healthy fats, so don’t toss them out! This blog post covered everything you need to know for silky pumpkin soup. We discussed ingredients, storage, and cooking tips. I provided ways to modify the recipe for different diets. Remember, small changes can lead to big flavor boosts. Avoid common mistakes to ensure your soup turns out great each time. With these tips in hand, you can create delicious variations for any season. Enjoy making this dish and sharing it with others! Your kitchen adventures await, so dive in with confidence.

Silky Pumpkin Soup Creamy Comfort in a Bowl

Warm up your evenings with a bowl of Silky Pumpkin Soup: Creamy Comfort in a Bowl. This easy recipe transforms

To make Cheesy Shrimp Spinach Penne, you need the following ingredients: - 8 ounces penne pasta - 1 pound large shrimp, peeled and deveined - 3 cups fresh spinach, roughly chopped - 1 cup heavy cream - 1 cup shredded mozzarella cheese - 1/2 cup grated Parmesan cheese - 3 cloves garlic, minced - 1 tablespoon olive oil - 1/2 teaspoon red pepper flakes (optional) - Salt and pepper, to taste - Fresh basil leaves, for garnish (optional) These ingredients work together to create a creamy and delicious dish. The penne pasta holds the sauce well, while the shrimp adds protein and flavor. Fresh spinach gives the dish a nice color and nutrients. The heavy cream and cheeses make it rich and satisfying. Garlic brings in a warm flavor, and red pepper flakes can add a little heat if you like. Don’t forget the fresh basil for a lovely finish! Start by boiling a large pot of salted water. Use about 4 quarts of water for 8 ounces of penne pasta. Bring it to a rapid boil. Add the penne to the water, stirring gently. Cook the penne until it is al dente, which usually takes about 10-12 minutes. Al dente means the pasta is firm to the bite. Once cooked, drain the pasta and set it aside. Next, heat 1 tablespoon of olive oil in a large skillet over medium heat. Add 3 cloves of minced garlic and sauté for about 30 seconds. The garlic should smell fragrant but not brown. Now, add 1 pound of peeled and deveined shrimp. Season with salt, pepper, and red pepper flakes if you like a little heat. Cook the shrimp for 2-3 minutes until they turn pink. Once done, remove the shrimp from the skillet and set them aside. In the same skillet, lower the heat and pour in 1 cup of heavy cream. Stir continuously for about 2-3 minutes. You want the cream to thicken slightly. After that, gradually add 1 cup of shredded mozzarella cheese and 1/2 cup of grated Parmesan cheese. Stir until the cheeses melt and create a creamy sauce. Finally, add 3 cups of roughly chopped spinach and stir until the spinach wilts. Now, return the cooked shrimp to the pan along with the drained penne pasta. Toss all the ingredients together. Make sure the pasta is evenly coated with the cheesy sauce. Heat through for about 1 more minute. Taste your dish and adjust the seasoning if necessary. To serve, use large bowls for a nice presentation. Garnish with fresh basil leaves and an extra sprinkle of Parmesan cheese. This adds color and a pop of flavor to your dish. Enjoy your cheesy shrimp spinach penne warm! Seasoning is key in this dish. Start with salt and pepper to bring out the taste. You can add red pepper flakes for a little heat. A squeeze of lemon juice at the end can brighten the dish. It adds a nice balance between the creaminess and the acidity. Cook the shrimp just right. Overcooked shrimp become rubbery and tough. Cook them until they turn pink, about 2-3 minutes. For a creamy sauce, stir the heavy cream over low heat. This helps it thicken without burning. Add cheese slowly, mixing well to keep it smooth. Cook the penne pasta ahead of time. This saves you time when you’re ready to eat. You can store the cooked pasta in the fridge. To save the whole dish, let it cool down first. Use airtight containers for storage. This dish can last for up to three days in the fridge. {{image_2}} You can switch up the protein in Cheesy Shrimp Spinach Penne. Chicken works well. Just cook it until golden. Tofu is a great option for a plant-based meal. Cut it into cubes and sauté until browned. Feel free to explore different types of pasta too. While penne is great, you can use fusilli or farfalle. These shapes hold sauce well and add fun to your dish. If you want a dairy-free version, try plant-based cream. Coconut cream adds richness. Cashew cream offers a nice texture. Both give your dish a creamy feel without dairy. For cheese, look for vegan options. Nutritional yeast can add a cheesy flavor. Some brands offer vegan mozzarella that melts nicely. These swaps keep the dish tasty and friendly for everyone. Boost the nutrition by adding more greens. Kale or Swiss chard works nicely. Chop them up and add them in with the spinach. Seasonal veggies are great to include too. Try cherry tomatoes in summer or butternut squash in fall. They add flavor and color, making your dish even more appealing. To store leftovers of Cheesy Shrimp Spinach Penne, place it in an airtight container. This helps keep it fresh. Use glass or plastic containers with tight lids. Make sure to cool the pasta to room temperature before sealing. This prevents moisture buildup, which can spoil the dish. Yes, you can freeze Cheesy Shrimp Spinach Penne! First, let it cool completely. Then, place it in a freezer-safe container. You can also use freezer bags for easy storage. When ready to eat, thaw it overnight in the fridge. Reheat in a skillet over low heat. Add a splash of cream if it looks dry. In the fridge, this dish lasts about 3 to 4 days. Always check for signs of spoilage. If it smells sour or has a strange color, it's time to toss it. Keeping it in proper storage helps maintain its taste and texture. This dish takes about 30 minutes to make. You need around 10 minutes to prep the ingredients. The cooking time is about 20 minutes. It’s quick and perfect for busy nights! Yes, you can replace shrimp with several other proteins. Chicken works great if you prefer it. Tofu is a good choice for a plant-based option. You can also use scallops or even cooked sausage for a different flavor. Yes, this recipe is great for meal prep! You can cook the pasta and shrimp ahead of time. Store them separately from the sauce to keep things fresh. Use airtight containers and refrigerate. The dish stays tasty for about 3-4 days. You can serve this dish with a simple side salad. A garlic bread would also pair well. Try some steamed vegetables for a healthy touch. A glass of white wine can elevate your meal too! This blog post covered a tasty Cheesy Shrimp Spinach Penne recipe. You learned about the ingredients, step-by-step cooking, and useful tips. Don’t forget about the variations to customize your dish. Proper storage tips ensure your leftovers remain fresh. Meal prepping can ease busy weeks while still offering delicious meals. Keep experimenting with flavors and ingredients to make this dish your own. With these guidelines, you can impress everyone with your cooking skills! Enjoy the process and satisfy your taste buds.

Cheesy Shrimp Spinach Penne Delightful Creamy Dish

Are you ready to dive into a dish that’s bursting with flavor? My Cheesy Shrimp Spinach Penne is a creamy

For a tasty Cabbage Glass Noodles Stir-Fry, gather these items: - 200g glass noodles (bean thread noodles) - 1 small head of green cabbage, thinly sliced - 1 cup carrots, julienned - 1 bell pepper (any color), sliced - 1 cup shiitake mushrooms, sliced - 3 cloves garlic, minced - 1 tablespoon ginger, minced - 3 tablespoons soy sauce - 1 tablespoon sesame oil - 1 tablespoon vegetable oil - 1 tablespoon chili sauce (adjust to taste) These ingredients blend well to create a dish that is both vibrant and filling. To make your stir-fry more appealing, add these garnishes: - 2 green onions, chopped - Sesame seeds These garnishes not only look great but also add flavor. Green onions give a fresh crunch, while sesame seeds add a nutty taste. Both are nutritious, offering vitamins and healthy fats. Enjoy your colorful and healthy meal! 1. Prep the Noodles: Start by soaking the glass noodles in warm water for 10-15 minutes. This softens them, making them easy to stir-fry. Once they’re soft, drain them and set them aside. 2. Chop the Vegetables: Thinly slice the cabbage and bell pepper. Julienne the carrots and slice the shiitake mushrooms. Mince the garlic and ginger. Keep everything close as you cook, so you can grab it quickly. 3. Maximize Flavor: When chopping, try using a sharp knife. This keeps the veggies crisp. Fresh garlic and ginger add a punch. Make sure they are minced well to release their oils and flavors. 1. Heat the Pan: Grab a large frying pan or wok. Add vegetable oil and heat it over medium-high heat. 2. Sauté Aromatics: Once hot, add the minced garlic and ginger. Stir-fry for about 30 seconds. You want to smell the fragrance but not burn them. 3. Add Vegetables: Toss in the cabbage, carrots, bell pepper, and shiitake mushrooms. Stir-fry for 5-7 minutes. You want them tender but still crisp. Keep stirring for even cooking. 4. Incorporate Noodles: Push the veggies to one side of the pan. Add the soaked glass noodles to the empty side. Drizzle soy sauce, sesame oil, and chili sauce over the noodles. Toss everything together for 2-3 minutes. Ensure the noodles heat through and mix well with the veggies. 5. Garnish: Remove the pan from heat. Top with chopped green onions and a sprinkle of sesame seeds. This adds color and crunch to your dish. Serve hot and enjoy your quick meal! When stir-frying, keep your pan hot. This helps cook the food fast. Heat the vegetable oil until it shimmers. Add garlic and ginger first. Stir for about 30 seconds. This makes flavors pop. For the veggies, cut them into even sizes. This helps them cook evenly. Cabbage needs about 5-7 minutes. It should be tender but still crisp. Carrots and peppers will cook in the same time. If you use other vegetables, adjust the cooking time. Soft vegetables like zucchini cook faster than cabbage. Hard veggies like broccoli take longer. Always taste as you cook! To boost flavor, try adding soy sauce in stages. Start with a little, taste, and add more if needed. You can also mix in sesame oil for a nutty taste. Chili sauce gives heat. Adjust it to your liking. Want more depth? Add a splash of rice vinegar. This balances sweetness and spice. Garnish with green onions and sesame seeds. They add crunch and color. Fresh herbs like cilantro can also brighten the dish. This makes your meal even more appealing! {{image_2}} You can easily change the veggies in this stir-fry. Use what you have! Here are some great swaps: - Broccoli: Adds crunch and a nice green color. - Zucchini: It cooks quickly and adds a mild flavor. - Spinach: Toss it in at the end for a fresh touch. If you need gluten-free options, use tamari instead of soy sauce. For a vegetarian dish, skip any meat and double the veggies. You’ll still get a tasty meal! Want a kick? You can adjust the spice in this dish. Here are some ideas: - For spice lovers: Add more chili sauce or fresh peppers. - For mild tastes: Use less chili sauce or skip it altogether. Thinking of adding protein? Tofu is a great choice. Just cube it and stir-fry until golden. If you prefer meat, chicken works well too. Simply slice it thin and cook it first before adding the veggies. To keep your Cabbage Glass Noodles Stir-Fry fresh, store leftovers in an airtight container. Make sure the dish cools down before sealing it. This helps keep moisture inside. The stir-fry can last in the fridge for about 3 to 4 days. If you notice any odd smells or colors, it's best to toss it. When it's time to eat your leftovers, you have a few options. You can use a microwave or a pan. If using the microwave, place the stir-fry in a bowl and cover it with a damp paper towel. This keeps the noodles from drying out. Heat in short bursts, stirring in between. If you prefer the pan, add a splash of water and stir over medium heat. This helps to refresh the noodles and keeps them from getting sticky. Enjoy your tasty meal again! What are glass noodles? Glass noodles are made from mung bean starch. They are thin and transparent. These noodles are also known as bean thread noodles. They soak easily and cook quickly. How do I store leftovers? Store leftovers in an airtight container. They will last in the fridge for about three days. Reheat them in a pan or microwave for best results. What is the serving size? This recipe serves four people. Adjust the portions based on your needs. Each serving is a great mix of veggies and noodles. Are there any dietary concerns? This dish is naturally gluten-free if you use gluten-free soy sauce. It is also vegan, which suits many diets. What if my noodles are mushy? If your noodles turn mushy, you may have soaked them too long. Next time, soak them just until soft. Rinse with cold water to stop the cooking. What if my veggies are overcooked? If your veggies are too soft, cook them for less time next time. Aim for five to seven minutes, keeping them crisp. How can I adjust the flavor after cooking? If the dish lacks flavor, add more soy sauce or chili sauce. A dash of lime juice can also brighten the taste. For the full recipe with detailed instructions and proportions, visit [Crispy Cabbage & Glass Noodles Stir-Fry]. Cabbage Glass Noodles Stir-Fry is simple and tasty. We covered key ingredients, preparation, and cooking steps. You learned tips for perfecting flavor and texture. We also explored variations and storage methods to keep meals fresh. In summary, this dish is flexible for your taste and easy to make. Enjoy trying new ingredients or spice levels to suit your palate. Happy cooking!

Cabbage Glass Noodles Stir-Fry Flavorful and Quick Meal

Looking for a quick and tasty meal? Try this Cabbage Glass Noodles Stir-Fry! It’s simple, flavorful, and packed with nutrients.

- 24 Oreo cookies, crushed - 1/2 cup unsalted butter, melted - 1 (8 oz) package cream cheese, softened - 1/2 cup powdered sugar - 1 tsp vanilla extract - 1 cup whipped cream (or Cool Whip) - 1 cup chocolate pudding mix - 2 cups milk - Extra crushed Oreos for topping This No-Bake Oreo Delight is a simple dessert that everyone loves. To make it, you will need some key ingredients that create rich flavors and creamy textures. First, grab 24 Oreo cookies. These give our dessert its signature taste. Crush them into fine pieces to form the base of our treat. Next, you need 1/2 cup of unsalted butter. This will help bind the crushed Oreos together. You will also need 1 (8 oz) package of softened cream cheese. This adds a creamy layer that balances the sweetness. Mix in 1/2 cup of powdered sugar for a touch of sweetness. A teaspoon of vanilla extract will enhance the flavor. For that light and fluffy texture, use 1 cup of whipped cream or Cool Whip. You’ll also need 1 cup of chocolate pudding mix mixed with 2 cups of milk. This creates a rich pudding layer on top. Lastly, keep some extra crushed Oreos for topping. They add a nice crunch. With these ingredients, you can create a delightful dessert that’s perfect for any occasion. - First, crush 24 Oreo cookies in a bowl. You can use a rolling pin or a food processor. - Next, melt 1/2 cup of unsalted butter in the microwave. - Combine the crushed cookies and melted butter. Stir until it looks like wet sand. - Now, press this mixture firmly into the bottom of a 9x9 inch baking dish. Make sure it's even. - Take 8 oz of softened cream cheese and beat it in a bowl until smooth. - Gradually mix in 1/2 cup of powdered sugar and 1 tsp of vanilla extract. Stir until well combined. - Fold in 1 cup of whipped cream gently. This makes the layer light and fluffy. - Spread this cream cheese mix evenly over the crust in the baking dish. - Prepare 1 cup of chocolate pudding mix by following the package instructions. Use 2 cups of milk. - Allow the pudding to thicken for a few minutes. - Once it's ready, pour the pudding over the cream cheese layer. Spread it evenly with a spatula. - For a fun touch, sprinkle extra crushed Oreos on top of the pudding layer. This adds crunch and looks great! - Finally, cover the dish with plastic wrap. Refrigerate for at least 4 hours. This helps it set completely. - After chilling, cut into squares and serve it chilled. Enjoy your No-Bake Oreo Delight! To get the best creamy texture, make sure to soften the cream cheese first. This helps it mix smoothly into the dessert. When you fold in the whipped cream, do it gently. This keeps the light and airy texture intact. This dessert shines at parties and gatherings. It’s easy to serve and loved by all. Always serve it chilled for the best taste. This makes every bite refreshing and delightful. You can make this dessert even more fun! Try adding chocolate chips or nuts for extra crunch. If you want to switch things up, swap Oreo cookies for other cookie varieties. You can use chocolate chip cookies or even peanut butter cookies. {{image_2}} You can change up the flavor of your No-Bake Oreo Delight by using different types of Oreos. Here are two tasty options: - Mint Oreo version: Mint Oreos add a fresh twist. They give a cool flavor that mixes well with cream cheese. Just swap regular Oreos for Mint Oreos in the crust and topping. - Peanut Butter Oreo twist: Peanut Butter Oreos bring a rich, nutty taste. Use them in place of regular Oreos for a fun change. The creamy peanut butter flavor pairs nicely with the other layers. If you want a dairy-free version, you can still enjoy this dessert! Here's how: - Substitute regular cream cheese with dairy-free cream cheese. This keeps the creamy texture. - Use dairy-free whipped topping instead of regular whipped cream. This makes it light and fluffy. For those who need a gluten-free dessert, this recipe can easily adapt: - Use gluten-free Oreo cookies instead of regular ones. They taste just as good! This way, everyone can enjoy this treat without allergies. You can keep No-Bake Oreo Delight in the fridge for up to five days. Make sure to cover it well with plastic wrap or a lid. This helps keep it fresh and tasty. The cool air in the fridge will help the layers stay firm. If you want to freeze the dessert, slice it into squares first. Wrap each piece tightly in plastic wrap. Then, place them in an airtight container. This helps avoid freezer burn. You can freeze it for up to two months. To thaw, just place it in the fridge overnight before serving. When you’re ready to serve, take it out of the fridge or freezer. Let it sit at room temperature for about 10 minutes. This makes it easier to cut and eat. For the best taste, serve it chilled. Don't forget to add extra crushed Oreos on top for a fun crunch! To make No-Bake Oreo Delight, start by crushing 24 Oreo cookies. Mix these with 1/2 cup of melted unsalted butter until it looks like wet sand. Press this mixture into a 9x9 inch baking dish. This forms your crust. In another bowl, beat 1 package of softened cream cheese. Add 1/2 cup of powdered sugar and 1 tsp of vanilla extract to it. Mix until smooth. Fold in 1 cup of whipped cream. Spread this onto the crust. Next, prepare 1 cup of chocolate pudding mix with 2 cups of milk. Once thick, pour the pudding over the cream cheese layer. Finish by topping with extra crushed Oreos. Cover and chill for at least 4 hours before serving. Yes, you can use other cookies! Try chocolate chip cookies for a twist. Vanilla wafers give a light taste. Peanut butter cookies add a rich flavor. Any cookie you like can work. Just crush them and replace the Oreos in the crust. This keeps the fun and taste of the dessert. The dessert takes about 4 hours to chill. This time allows it to firm up nicely. Factors that can affect setting include your fridge's temperature and how thick your layers are. A colder fridge can speed up the setting time. Always check before serving to ensure it's fully chilled. Yes, you can make No-Bake Oreo Delight ahead of time! It actually tastes better when it sits. Prepare it the day before your event. Just cover it well with plastic wrap. This keeps it fresh. You can serve it straight from the fridge for best taste. This dessert combines Oreo cookies, cream cheese, and chocolate pudding for rich flavor. You can use various Oreos or adapt it for dietary needs. Remember to soften the cream cheese for the best texture. Chill before serving to enhance taste. With simple steps, you can impress at gatherings. Enjoy making your own No-Bake Oreo Delight with your favorite twists!

No-Bake Oreo Delight Easy and Creamy Dessert Dish

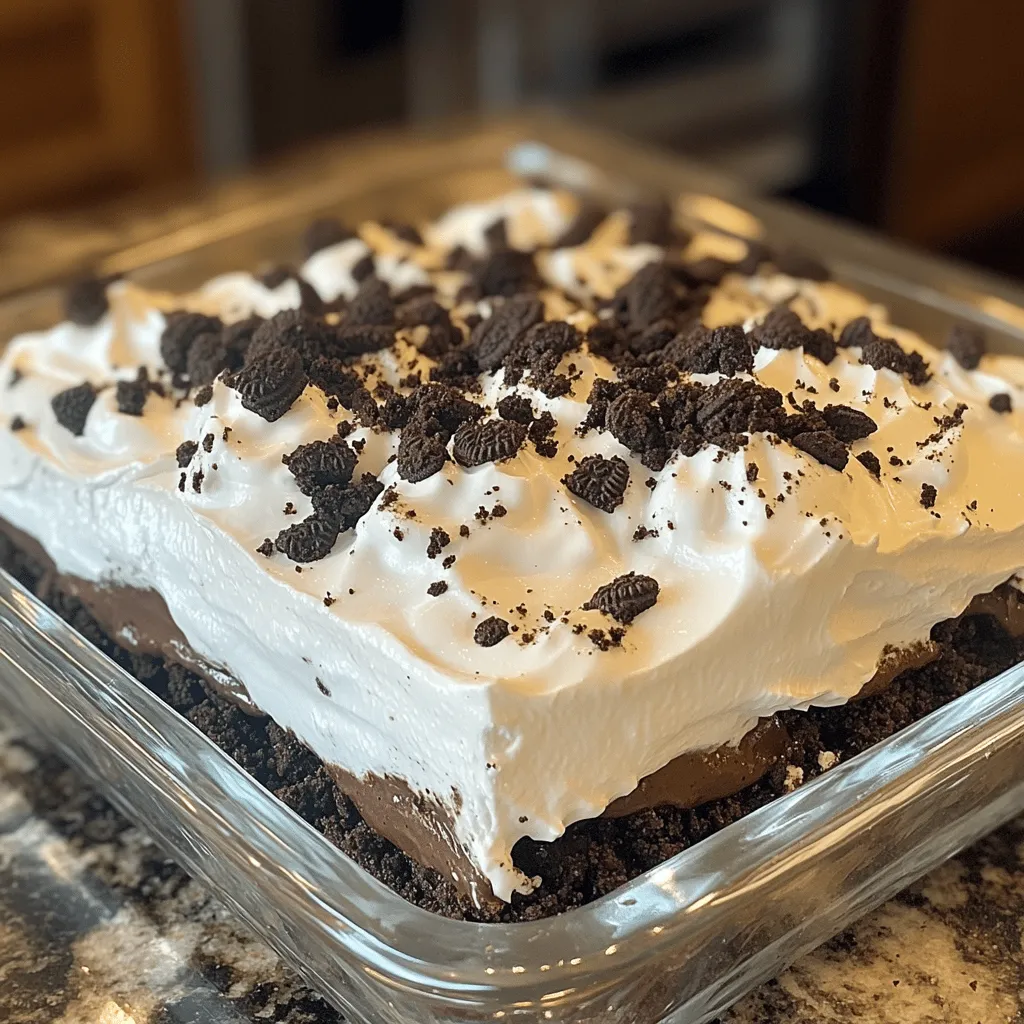
Craving a quick and easy dessert? Let me introduce you to No-Bake Oreo Delight! This creamy treat blends rich Oreos,

To make tasty baked pumpkin donuts, you need simple ingredients. Here’s what you will need: - 1 cup canned pumpkin puree - 1/2 cup granulated sugar - 1/2 cup brown sugar, packed - 1/4 cup vegetable oil - 2 large eggs - 1 teaspoon vanilla extract - 1 1/2 cups all-purpose flour - 1 teaspoon baking powder - 1 teaspoon baking soda - 1 teaspoon ground cinnamon - 1/2 teaspoon ground nutmeg - 1/2 teaspoon ground ginger - 1/4 teaspoon salt - 1/4 teaspoon ground cloves Each ingredient adds flavor and texture to the donuts. Canned pumpkin puree gives them a rich taste. The sugars sweeten the batter and help it rise. Vegetable oil keeps the donuts moist. Eggs act as a binder and add fluffiness. Vanilla extract provides a warm, sweet note. Flour makes up the base, while baking powder and baking soda help them rise. The ground spices create that perfect fall flavor. Salt balances the sweetness and enhances all the tastes. For the full recipe, check the details above. Enjoy making these delicious donuts! Preheating the Oven Start by preheating your oven to 350°F (175°C). This step is key for even baking. While the oven warms, lightly grease your donut pan. This helps the donuts pop out easily after baking. Combining Wet Ingredients In a large bowl, add the canned pumpkin puree, granulated sugar, brown sugar, vegetable oil, eggs, and vanilla extract. Whisk these ingredients together until smooth. This mix will give your donuts that rich pumpkin flavor. Mixing Dry Ingredients In another bowl, mix the all-purpose flour, baking powder, baking soda, ground cinnamon, ground nutmeg, ground ginger, salt, and ground cloves. Stir these dry ingredients together well. This mix adds the spice and structure to your donuts. Incorporating Dry into Wet Ingredients Gradually add the dry mix to the wet mix. Stir gently until just combined. Be careful not to overmix. A few lumps are fine. This helps keep your donuts light and fluffy. Filling the Donut Pan Spoon the batter into the prepared donut pan. Fill each cavity about 2/3 full. This allows room for the donuts to rise without spilling over. Baking Time and Temperature Place the donut pan in your preheated oven. Bake for 12 to 15 minutes. To check if they are done, insert a toothpick into the center. If it comes out clean, your donuts are ready. Cooling Instructions Let the donuts cool in the pan for about 5 minutes. Then, transfer them to a wire rack. Let them cool completely. This step ensures they maintain their shape and texture. For more details, refer to the Full Recipe for Baked Pumpkin Spice Donuts. To keep your donuts moist, mixing the batter correctly is key. Mix just until the flour is combined with the wet ingredients. Overmixing can lead to tough donuts. Aim for a smooth batter with small lumps. Baking time can vary based on your oven. Start checking for doneness at 12 minutes. If a toothpick comes out clean, your donuts are ready. If not, give them a few more minutes. Toppings can elevate your pumpkin donuts. I love rolling them in a mix of cinnamon and sugar while they’re still warm. It adds a sweet crust that complements the spices. You might also try a simple glaze made from powdered sugar and milk. Adjusting spices can help you find your perfect flavor. If you like a stronger taste, add more cinnamon or nutmeg. For a kick, consider a pinch of ground cloves. Taste the batter before baking to see if you need more spice. Using the right kitchen tools makes baking easier. A good donut pan is essential. Look for one made from non-stick material for easy release. Silicone pans can work great too, as they help prevent sticking. A whisk and mixing bowls are also important. Make sure you have a good set of measuring cups and spoons. Accurate measurements ensure your donuts turn out perfectly every time. For the full recipe, check out the Baked Pumpkin Spice Donuts section. {{image_2}} You can change the flavor of baked pumpkin donuts easily. Here are two fun ideas: - Chocolate Chip Pumpkin Donuts: Add 1 cup of chocolate chips to your batter. This mix makes the donuts sweet and rich. The chocolate pairs well with the pumpkin spice. - Maple Glazed Pumpkin Donuts: For a sweet twist, top your donuts with maple glaze. Mix 1 cup of powdered sugar with 2 tablespoons of maple syrup and 1 tablespoon of milk. Drizzle this over the cooled donuts for a sweet finish. Making these donuts for special diets is simple. Here are two tasty options: - Gluten-Free Pumpkin Donuts: Swap the all-purpose flour for 1 ½ cups of gluten-free flour. Check that your baking powder is also gluten-free. The donuts will still be soft and delicious. - Vegan Pumpkin Donuts: Replace the eggs with ½ cup of unsweetened applesauce. Use a plant-based milk instead of regular milk if you glaze them. These donuts will be just as yummy without any animal products. Serving these donuts can be fun and creative. Here are some ideas: - Pairing Ideas with Coffee or Tea: Enjoy your donuts with a warm cup of coffee or tea. The spices in the donuts taste great with a simple black coffee or a cozy chai tea. - Creative Serving Styles: Arrange the donuts on a colorful plate. You can stack them or make a donut tower. Add some fall leaves or small pumpkins around the plate for a festive look. For the full recipe, check out the steps above to bake these delicious treats! To keep your baked pumpkin donuts fresh, I suggest storing them at room temperature. Place them in a sealed container or a zip-top bag. This keeps them moist for a few days. If you want to refrigerate them, wrap each donut in plastic wrap. Then place them in an airtight container. This helps prevent them from drying out. If you have more donuts than you can eat in a few days, freezing is a great option. To freeze baked pumpkin donuts, first, let them cool completely. Then, place them in a single layer on a baking sheet. Freeze for about an hour. After that, transfer them to a freezer-safe bag or container. This method keeps them from sticking together. For reheating, just take a donut out of the freezer. Thaw it in the fridge or microwave. Heat it in the microwave for about 10-15 seconds. This makes them warm and tasty again. Baked pumpkin donuts last about 3-4 days at room temperature. In the fridge, they stay fresh for about a week. If you freeze them, they can last up to three months. Just remember to check for any signs of freezer burn when you take them out. Enjoy these delicious treats whenever you like! For the full recipe, check out the details above. You can check if your donuts are done by using a toothpick. Simply insert a toothpick into the center of a donut. If it comes out clean, your donuts are ready. If the toothpick has batter on it, bake them a bit longer. This simple test helps ensure your donuts are baked just right. Yes, you can make the batter ahead of time. Mix the wet and dry ingredients separately. Keep the wet mix in the fridge for up to two days. When you are ready to bake, combine the two mixtures and fill the donut pan. This makes it easy for busy mornings or last-minute gatherings. If you lack a donut pan, don’t worry! You can use a muffin tin instead. Just pour the batter into the muffin cups. Bake them for about 15 to 18 minutes. They will not have a hole, but they will be just as tasty. You can also shape the donuts by hand and bake them on a baking sheet. Enjoy your delicious baked pumpkin donuts, no matter the shape! This blog post covered how to make delicious pumpkin donuts from scratch. We explored essential ingredients, detailed steps for preparing and baking the donuts, useful tips, fun variations, and storage methods. In summary, these donuts are easy to make and perfect for any occasion. Don’t shy away from trying new flavors or tweaking the recipe. Enjoy your baking and treat yourself to these tasty delights!

Baked Pumpkin Donuts Deliciously Spiced Treat

Pumpkin season is here, and that means it’s time for baked pumpkin donuts! These deliciously spiced treats are packed with

- 1 lb white fish fillets (like cod or tilapia) - 1 cup fresh cilantro, chopped - 8 small corn tortillas - 1 teaspoon chili powder - 1 teaspoon cumin - 1 teaspoon garlic powder - 1 teaspoon onion powder - Salt and pepper to taste - 1 cup shredded red cabbage - 1 avocado, sliced - ½ cup diced tomatoes - ¼ cup sour cream or Greek yogurt For these cilantro lime fish tacos, the ingredients shine through in every bite. The white fish provides a nice, mild flavor that works well with the vibrant cilantro and zesty lime. I often choose cod or tilapia because they cook quickly and flake beautifully. The seasonings transform the fish into a tasty delight. Chili powder adds warmth, while cumin gives a cozy earthiness. Garlic and onion powders enhance the overall flavor without overpowering the dish. Toppings are where the fun begins! Shredded red cabbage adds crunch and color. Sliced avocado brings creaminess, balancing the fish's texture. Diced tomatoes add freshness, and a drizzle of sour cream or Greek yogurt adds a tangy finish. You can mix and match these ingredients based on your taste. Want more crunch? Add more cabbage. Prefer heat? Toss in jalapeños. These tacos are all about personal taste and creativity. For the complete guide, don’t forget to check out the Full Recipe. To start, gather your spices. In a bowl, mix together: - 1 teaspoon chili powder - 1 teaspoon cumin - 1 teaspoon garlic powder - 1 teaspoon onion powder - Salt and pepper to taste This mix adds a great flavor to the fish. Now, take your fish fillets, about 1 lb of white fish like cod or tilapia. Rub the spice mixture evenly over the fish fillets. Make sure each piece is covered well. This step is key to making your fish tasty. Next, heat 2 tablespoons of olive oil in a skillet over medium-high heat. Once the oil is hot, carefully add the seasoned fish fillets. Cook the fish for about 3-4 minutes on each side. You want the fish to be flaky and cooked through. Squeeze half of the lime juice over the fish while it cooks. This adds a zesty kick! After cooking, take the fish off the heat and let it rest for a minute. This helps keep it juicy. While the fish rests, warm your tortillas. In a separate pan, heat the corn tortillas one at a time. Cook them for about 30 seconds on each side until they are soft and pliable. Now, it’s time to assemble the tacos! Flake the cooked fish into large pieces. Place the flaked fish onto the warm tortillas. Top with your choice of toppings like: - 1 cup shredded red cabbage - 1 avocado, sliced - ½ cup diced tomatoes - 1 cup fresh cilantro, chopped Finish by drizzling the remaining lime juice over the tacos. If you want, add a dollop of sour cream or Greek yogurt for creaminess. Enjoy your crispy and flavorful Cilantro Lime Fish Tacos! For the full recipe, check the detailed instructions above. To enhance the flavor of your cilantro lime fish tacos, consider adjusting the spices. If you like heat, add more chili powder or even some cayenne pepper. For a milder taste, reduce the amount of chili powder. Always use fresh lime juice; it brightens the dish and adds a zesty kick. Bottled lime juice lacks the freshness that makes the tacos shine. Make sure the fish is cooked through and flaky. Cook it for about 3-4 minutes on each side. You’ll know it’s ready when it easily flakes with a fork. For warming tortillas, use a dry pan over medium heat. Warm each tortilla for about 30 seconds on each side until they are soft and pliable. This step ensures the tortillas hold all the delicious fillings without tearing. Pair your tacos with fresh sides like a light salad or corn salsa. These sides add color and crunch, making your meal more vibrant. For garnishing, sprinkle extra cilantro on top. You can also add lime wedges for that perfect squeeze of citrus just before you take a bite. For a complete guide, check out the Full Recipe for more details on these tasty tacos! {{image_2}} You can switch up the fish for your tacos. Salmon and mahi-mahi are great choices. Salmon adds richness, while mahi-mahi has a firm texture. Both will soak up the cilantro lime flavor well. You can even use shrimp or scallops for a fun twist. Just remember to adjust cooking times based on the fish you choose. If you need gluten-free options, use corn tortillas. They have a wonderful flavor and hold up well. For a vegan version, swap the fish for grilled mushrooms or jackfruit. You can also replace sour cream with avocado or cashew cream. These swaps keep the dish tasty and fresh. Want to add some heat? Slice up jalapeños and toss them on top. A dash of hot sauce can also spice things up. Don't stop there! Try using different herbs like dill or parsley to change the flavor. Each herb brings its own unique twist to your tacos. Mix and match to find your favorite combination! To store cooked fish tacos, let them cool first. Place the fish, tortillas, and toppings in separate airtight containers. This keeps each component fresh. Store them in the fridge for up to three days. When you're ready to eat, you can mix and match the toppings to your liking. When reheating, you want to keep the fish crispy and tasty. The best way is to use a skillet. Heat it over medium heat. Add the fish and warm it for about two to three minutes on each side. You can warm the tortillas at the same time in another pan. This way, you'll enjoy a fresh taste without losing texture. Yes, you can freeze the fish! Place cooked fish in a freezer-safe bag. This will keep it good for up to three months. For the tortillas, wrap them in foil and freeze them separately. Toppings like cabbage and avocado do not freeze well. Instead, prepare those fresh when you’re ready to eat. This way, your tacos will taste great! For the full recipe, check the link provided. For the best flavor, I like to use white fish. Cod and tilapia are top choices. They cook fast and are mild. You can also try mahi-mahi or flounder for a different taste. Each of these options gives a nice flaky texture, perfect for tacos. Yes, you can prep some ingredients in advance. You can marinate the fish with spices the night before. Just keep it in the fridge. You can also chop the cilantro, cabbage, and tomatoes ahead. This way, when you’re ready to cook, it will be quick and easy. If you like heat, try adding sliced jalapeños. You can mix them into the toppings or add them right on the fish. Another option is to use a spicier chili powder. You can also drizzle some hot sauce over each taco before serving. This will give you that extra kick! For the complete instructions, check out the full cilantro lime fish tacos recipe. This article shared how to make delicious cilantro lime fish tacos. You learned about key ingredients, cooking steps, and options for toppings. Tips on flavor and serving were also included. Now, you’re ready to create your own tasty tacos. Try different fish varieties and adjust spices to your liking. Enjoy experimenting with toppings and finding your favorite combinations. Cooking should be fun, so make it your own. Happy cooking!

Cilantro Lime Fish Tacos Crispy and Flavorful Delight

Dive into a world of flavor with my Cilantro Lime Fish Tacos! These crispy delights combine fresh ingredients and zesty

- 1 cup cooked chicken, shredded - 1 cup pumpkin puree - 1 cup all-purpose flour - 1/2 cup water (plus extra as needed) - 1 tablespoon olive oil - 1 teaspoon garlic powder - 1 teaspoon ginger powder - 1/2 teaspoon salt - 1/2 teaspoon black pepper - 1/4 cup green onions, finely chopped - 1 tablespoon soy sauce - Optional: Sesame seeds for garnish The first step in making Chicken Pumpkin Dumplings is gathering all the ingredients. Using cooked chicken saves time. You can use leftover chicken or rotisserie chicken. For the pumpkin, I prefer pumpkin puree for its smooth texture and rich flavor. It blends well with the chicken. Next, you need all-purpose flour to create the dumpling dough. This flour gives the dumplings the right texture. You will also need water to bind everything together. Start with 1/2 cup of water. You can add more if the dough feels too dry. Now let’s talk seasonings. Olive oil adds a nice richness to the filling. Garlic powder and ginger powder bring warmth and depth of flavor. Salt and black pepper enhance the overall taste. Green onions add a fresh crunch and color. Lastly, soy sauce gives the filling a delicious umami kick. If you want to make your dumplings pop, sprinkle some sesame seeds on top before serving. This adds a nice touch and a bit of crunch. With these ingredients ready, you can dive into the full recipe to make these delightful dumplings! - Combine chicken, pumpkin, and seasonings in a bowl. - Mix until fully combined. Start by shredding your cooked chicken. Use a fork or your hands. Then, scoop one cup of pumpkin puree into a big mixing bowl. Add the shredded chicken to the bowl. Next, sprinkle in garlic powder, ginger powder, salt, black pepper, and chopped green onions. Pour in the soy sauce too. Now, mix everything together until it’s all one color. You want to see no dry spots. This filling is the heart of your dumpling. - Gradually add flour and water to form dough. - Resting and kneading the dough. Now, let’s make the dough. Take one cup of all-purpose flour and add it to the bowl slowly. You can add the water half a cup at a time. Stir it with a spoon as you add the flour and water. Keep mixing until your dough holds together. Once it’s formed, cover the bowl with a damp cloth. Let it rest for 15 minutes. This helps make it soft. After resting, sprinkle some flour on a surface. Knead the dough for a few minutes until it feels smooth. - Rolling out the dough. - Filling and sealing the dumplings. Next, divide your dough into small balls. They should be about the size of a golf ball. Take one ball and roll it out into a flat disc, about 3-4 inches wide. Place a spoonful of your chicken and pumpkin filling in the center. Fold the dough over the filling to make a half-moon shape. Pinch the edges tightly to seal them. Make sure no air gets inside. Repeat this with each ball until you have all your dumplings ready. - Steaming instructions. - Cooking time and indicators for doneness. To cook your dumplings, you need a steamer. If you don’t have one, you can use a pot with a lid. Fill it with water and bring it to a boil. Place the dumplings in the steamer basket without letting them touch. Cover the steamer and steam for about 15-20 minutes. You’ll know they are done when they look shiny and feel soft. Once cooked, carefully take them out and place them on a serving platter. Enjoy your delicious Chicken Pumpkin Dumplings! For a complete guide, check the Full Recipe. To make great dumplings, the dough's texture matters. Aim for a soft, smooth feel. The dough should not stick to your hands. If it does, add a little flour. If it's too dry, add a bit more water. This balance is key. Knead the dough gently but well. Let it rest for 15 minutes under a damp cloth. This helps the gluten relax, making it easier to roll out. You can switch up the filling if you want. Try using ground turkey or tofu for a different taste. You can also add minced veggies like carrots or spinach. For extra flavor, mix in herbs like cilantro or basil. A splash of lime juice or a sprinkle of chili flakes can make it pop. Get creative and make it your own! Dumplings taste great with dips. Soy sauce or a spicy chili sauce pairs well. You can also make a tangy dipping sauce with vinegar and sesame oil. For sides, try a fresh salad or steamed veggies. They add color and nutrition to your meal. Enjoy your Chicken Pumpkin Dumplings with these tasty options. For more detailed steps, check out the Full Recipe for guidance. {{image_2}} You can play with flavors in your chicken pumpkin dumplings. One option is to make sweet pumpkin dumplings. Just add a bit of brown sugar and cinnamon to the pumpkin puree. This gives the dumplings a delightful sweet twist. You can enjoy them with a drizzle of honey or a dollop of whipped cream. For a savory option, try herb-infused dumplings. Mix fresh herbs like thyme or rosemary into the dough. These herbs add depth to your dumplings. They pair well with the chicken and pumpkin flavors. If you need gluten-free options, swap the all-purpose flour with a gluten-free blend. Many brands offer these blends that work well in dumpling recipes. You may need to adjust the water slightly to get the right dough texture. For vegan adaptations, use shredded jackfruit or tofu in place of chicken. Blend them with pumpkin and spices for a tasty filling. You can also use a plant-based flour for the dough. This way, everyone can enjoy the dish! Try traditional Asian methods for cooking dumplings. You can pan-fry or boil them instead of steaming. This adds a crispy texture that many people love. For a Southern-style variation, consider adding spices like cayenne or paprika to the filling. You can also serve the dumplings with a spicy dipping sauce. This gives a nice kick and enhances the flavors. These variations make chicken pumpkin dumplings a fun dish to explore. With so many options, you can keep this recipe fresh and exciting! Check out the Full Recipe for all the details to get started. To store leftover dumplings, let them cool first. Place them in an airtight container. You can keep them in the fridge for about 3 days. Be sure to check for any signs of spoilage before eating. For freezing, arrange the dumplings on a baking sheet. Make sure they don’t touch each other. Freeze them for about 1 hour. Then, transfer the dumplings to a freezer bag. They can stay frozen for up to 3 months. When ready to eat, steam them straight from the freezer for about 20-25 minutes. If you want to make dumplings in advance, prepare the filling and dough ahead of time. Store the dough in the fridge for up to 2 days. For longer storage, freeze the dough before shaping. Use parchment paper between layers to avoid sticking. This way, you can enjoy fresh dumplings anytime! For more detailed steps, check the Full Recipe. Yes, you can use fresh pumpkin. Fresh pumpkin gives a bright flavor. However, it takes more work. You need to roast or steam it first. After cooking, mash it well. Canned pumpkin is smoother and easier to use. It saves time and is still tasty. Both options work, but pick what fits your cooking style. Chicken pumpkin dumplings pair well with many sides. Try a simple salad with greens. A light soy sauce dip works great too. You can serve them with steamed vegetables like broccoli or carrots. Rice or noodles also complement the dish nicely. These sides add color and flavor to your meal. Dumplings are done when they are soft and firm. They should not feel doughy. You can cut one open to check. The filling should be hot and fully cooked. Another sign is that they will float a bit when steaming. Trust your senses to guide you. Yes, you can make the dough in advance. Wrap it tightly in plastic wrap. Store it in the fridge for a day or two. When you are ready to use it, let it warm up. Knead it lightly before rolling out. This saves time when you want to enjoy your dumplings. For the full recipe, check out the main article. You’ve learned how to make Chicken Pumpkin Dumplings with clear steps and helpful tips. We covered the right ingredients, preparation, cooking methods, and storage ideas. Remember, you can customize the filling and try different flavors. These dumplings are not just easy; they’re tasty too. Now, gather your ingredients and start cooking. Enjoy sharing these unique dumplings with family and friends. Your kitchen adventure awaits!

Chicken Pumpkin Dumplings Simple and Flavorful Recipe

Are you ready to delight your taste buds with something new? This Chicken Pumpkin Dumplings recipe blends savory chicken and

Let’s dive into the fun part: the ingredients! This recipe for Apple Pumpkin Streusel Muffins blends flavors perfectly. Each component adds to the taste and texture. Here’s a detailed list for you: - 1 cup pumpkin puree (canned or homemade) - 1 medium apple (peeled and diced, preferably Granny Smith) - 2 large eggs - ½ cup vegetable oil - 1 cup brown sugar (packed) - 1 teaspoon vanilla extract - 1 ½ cups all-purpose flour - 1 teaspoon baking soda - ½ teaspoon baking powder - ½ teaspoon salt - 1 teaspoon ground cinnamon - ½ teaspoon ground nutmeg - ½ cup chopped walnuts or pecans (optional) For the streusel topping: - ½ cup all-purpose flour - ½ cup rolled oats - ½ cup brown sugar (packed) - ½ teaspoon ground cinnamon - 4 tablespoons cold butter (cubed) Feel free to customize! You can swap the apple for pears or add chocolate chips. The nuts are optional, but they give a nice crunch. This recipe is all about making it your own. Check out the Full Recipe for complete details! 1. Preheat the Oven: Start by preheating your oven to 350°F (175°C). This step helps the muffins bake evenly. You can line a muffin tin with paper liners or lightly grease each cup. 2. Mix Wet Ingredients: In a large bowl, combine 1 cup of pumpkin puree, 1 diced apple, 2 eggs, ½ cup vegetable oil, 1 cup packed brown sugar, and 1 teaspoon vanilla extract. Whisk everything together until smooth. 3. Mix Dry Ingredients: In another bowl, whisk together 1 ½ cups of all-purpose flour, 1 teaspoon baking soda, ½ teaspoon baking powder, ½ teaspoon salt, 1 teaspoon ground cinnamon, and ½ teaspoon ground nutmeg. Mixing these well ensures even flavor and texture. 4. Combine the Mixtures: Gradually add the dry mix to the wet ingredients. Stir gently until just combined. Avoid over-mixing; you want fluffy muffins. If you like, fold in ½ cup of chopped walnuts or pecans for added crunch. 1. Fill the Muffin Cups: Use a spoon or scoop to divide the batter evenly into the prepared muffin cups. Fill each cup about 2/3 full. This allows room for the muffins to rise without spilling. 2. Add the Streusel Topping: In a small bowl, mix ½ cup of flour, ½ cup of rolled oats, ½ cup of packed brown sugar, and ½ teaspoon of cinnamon. Cut in 4 tablespoons of cold butter until it looks crumbly. Then, sprinkle this topping generously over each muffin. 3. Bake: Place the muffin tin in the oven. Bake for 18-22 minutes. Check for doneness by inserting a toothpick in the center. If it comes out clean, your muffins are done. Follow these steps for tasty Apple Pumpkin Streusel Muffins. You can find the Full Recipe for more details! To bake great muffins, avoid common pitfalls. First, do not overmix your batter. Stir just until you see no dry flour. Overmixing can make muffins tough. Next, pay attention to ingredient temperature. For the best muffins, use room-temperature eggs and oil. Cold ingredients may not mix well, which affects the rise. Measuring flour is key for the perfect texture. Spoon the flour into your measuring cup and level it off. Do not pack it down. Too much flour makes muffins dry. Storing muffins correctly keeps them fresh. Once cooled, place them in an airtight container. They can last up to three days at room temperature. If you want to save muffins for later, freezing is a great option. Wrap each muffin in plastic wrap and then place them in a freezer bag. They freeze well for up to three months. To reheat muffins, take them out of the freezer. Let them thaw in the fridge overnight. Then, warm them in the oven at 350°F for about 5-10 minutes. This keeps them fluffy and tasty. For the complete recipe, check the Full Recipe link. {{image_2}} You can easily change up the fruits and nuts in this recipe. Instead of apples, try pears or cranberries. Both add a lovely tangy taste. For nuts, swap walnuts or pecans with almonds or hazelnuts. They bring a different crunch and flavor. If you need gluten-free muffins, use a gluten-free flour blend in place of regular flour. It works well and keeps the muffins fluffy. You can also use oat flour or almond flour for a unique taste. Just remember to adjust the liquid in your recipe, as these flours can absorb more moisture. To amp up the flavor, consider adding spices. A pinch of allspice or ginger can add warmth. You can also mix in some cloves for a nice kick. These spices enhance the fall flavors of pumpkin and apple. Want to make your muffins even more special? Add chocolate chips or caramel bits. Stir in about half a cup into the batter. They melt while baking and create delightful pockets of sweetness. You can also drizzle caramel sauce over the muffins once they cool for an extra treat. For the full recipe, check out the details above. Each muffin offers a tasty balance of nutrients. Here’s a quick breakdown per serving: - Calories: 180 - Protein: 3g - Fat: 8g - Carbohydrates: 27g - Fiber: 1g - Sugar: 10g Pumpkin brings many benefits. It is rich in vitamins A and C. It also may help with eye health. Apples add fiber and antioxidants. They can support gut health and digestion. Together, these ingredients make a healthy snack option. Some may have allergies to ingredients in this recipe. The muffins contain eggs and nuts. You can skip the nuts or use seeds instead. For a vegan option, replace the eggs with flaxseed meal. Mix one tablespoon of flaxseed with three tablespoons of water for each egg. You can also use a plant-based oil instead of vegetable oil. If you are on a keto diet, try using almond flour instead of all-purpose flour. This change cuts down on carbs and keeps the muffins tasty. Enjoy these muffins while considering your dietary needs! How to ensure the muffins are moist? To keep your muffins moist, use pumpkin puree. This adds moisture and flavor. Don’t overmix the batter; mix until just combined. Also, bake them until a toothpick comes out clean, but don’t overbake. Can I use fresh pumpkin instead of canned? Yes, you can use fresh pumpkin! Just cook and puree it first. Make sure it is smooth and not too watery. This will give your muffins a fresh taste. What other toppings can I use besides streusel? You can try nuts, seeds, or even a glaze. Chopped apples or chocolate chips also add great flavor. Mix it up to find your favorite! Many people love this recipe! One user suggests adding a pinch of salt to enhance the flavor. Another recommends serving the muffins warm with butter or cream cheese. They pair well with coffee or tea for a cozy treat. For your convenience, here is the [Printable Full Recipe](#) for Apple Pumpkin Streusel Muffins. Enjoy making these delicious treats! Now you have all the tools to make perfect muffins. We covered each ingredient, the steps, and even tips to avoid mistakes. You learned about variations and how to store your muffins for later. Remember, small changes can make a big difference. Enjoy experimenting with flavors and ingredients to find your best muffin. Happy baking!

Apple Pumpkin Streusel Muffins Fluffy and Flavorful Treat

Are you ready to bake the ultimate fall treat? My Apple Pumpkin Streusel Muffins are soft, fluffy, and packed with

To make delicious apple cider whoopie pies, you'll need: - 2 cups apple cider - 1 cup all-purpose flour - 1 ½ cups whole wheat flour - 1 teaspoon baking powder - 1 teaspoon baking soda - 1 teaspoon cinnamon - ½ teaspoon nutmeg - ½ teaspoon salt - ½ cup unsalted butter, softened - 1 cup brown sugar, packed - 1 large egg - 1 teaspoon vanilla extract - 1 cup apple butter (for filling) - Optional: powdered sugar for dusting These ingredients work together to create soft and tasty pies. The apple cider gives them a unique flavor and moistness. You can enhance your whoopie pies with a few optional items: - Add chopped walnuts or pecans for crunch. - Mix in a pinch of ginger for a spicy kick. - Use maple syrup instead of brown sugar for a richer taste. These additions let you play with flavors and make the recipe your own. Don't have all the ingredients? No problem! Here are some swaps: - Use coconut oil instead of butter for dairy-free pies. - Substitute gluten-free flour for whole wheat flour if needed. - Applesauce can replace the egg for a vegan option. These substitutions help you adapt the recipe to suit your needs. You can still enjoy these tasty treats! For the complete recipe, check [Full Recipe]. First, we need to make the apple cider. Pour 2 cups of apple cider into a saucepan. Heat it over medium heat. Let it simmer until it reduces to about 1 cup. This will take about 15 to 20 minutes. Once it thickens, set it aside to cool. This reduction gives our whoopie pies a deep apple flavor. Next, grab a medium bowl. Combine the all-purpose flour and whole wheat flour here. Add baking powder, baking soda, cinnamon, nutmeg, and salt. Whisk everything together until it's well mixed. This mix is key to our whoopie pies' texture. Now, take a large mixing bowl and cream the softened butter and brown sugar together. Mix until the mixture is light and fluffy. Then, add one large egg and 1 teaspoon of vanilla extract. Mix until smooth. Slowly pour in the cooled apple cider. Stir until just combined. After that, gradually add the dry ingredients. Mix until no flour is visible, but don’t overmix. Preheat your oven to 350°F (175°C). Line two baking sheets with parchment paper. Using a cookie scoop or tablespoon, drop rounded tablespoons of dough onto the sheets. Make sure to space them about 2 inches apart. Bake for 12 to 15 minutes. The edges should turn lightly golden. Let the pies cool on the baking sheets for about 5 minutes. Then, transfer them to wire racks to cool completely. Once the cookies are cool, take one and spread about a tablespoon of apple butter on the flat side. Sandwich it with another cookie. Repeat this with the rest of the cookies. If you like, dust the whoopie pies with powdered sugar before serving. Enjoy your delicious treat! For the complete recipe, refer to the Full Recipe section. To get the best texture, start with room temperature butter. This helps create a light and fluffy mix. Be careful not to overmix the dough. Overmixing can make the pies tough. Aim for a smooth batter, but some lumps are okay. Let them bake until the edges are golden. This gives a nice contrast to the soft center. To keep your whoopie pies fresh, store them in an airtight container. This keeps them soft and moist. Place parchment paper between layers to avoid sticking. You can keep them at room temperature for up to three days. For longer storage, put them in the fridge for a week. You can freeze them too! Just wrap each pie in plastic wrap, then in foil. They last up to three months. These whoopie pies shine when served warm. They pair well with a scoop of vanilla ice cream. A drizzle of caramel sauce adds a nice touch. For a fun twist, try a cup of hot apple cider on the side. You can find the full recipe linked above. Enjoy your delicious creations! {{image_2}} While apple butter makes a great filling, you can switch things up. Try using cream cheese frosting for a tangy twist. You can also use caramel sauce for a sweet and gooey bite. Another fun idea is to mix in some cinnamon whipped cream. This adds a lovely lightness and flavor. Experiment with different fillings to find your favorite. To enhance the dough, you can add more spices. Consider adding ground ginger or allspice for warmth. You can also mix in some lemon zest for a fresh taste. If you love nuts, try adding chopped walnuts or pecans to the batter. These additions will give your whoopie pies some nice textures and flavors. You can easily make these whoopie pies vegan. Replace the butter with coconut oil or vegan butter. Use a flax egg instead of a regular egg. For a gluten-free option, swap the all-purpose flour with a gluten-free blend. Make sure your baking powder is gluten-free as well. These adjustments let everyone enjoy this tasty treat! For more detailed steps and the complete process, check out the Full Recipe. To store your leftover whoopie pies, place them in an airtight container. This keeps them soft and fresh. You can also layer parchment paper between the pies to prevent sticking. Keep the container in a cool, dry place. Avoid direct sunlight, as it can dry out the cookies. If you want to save whoopie pies for later, freezing is a great option. First, let the pies cool completely. Then, wrap each pie tightly in plastic wrap. Place the wrapped pies in a freezer-safe bag or container. They can stay in the freezer for up to three months. When ready to enjoy, thaw them in the fridge overnight. Homemade whoopie pies can last for about 3-5 days at room temperature. They stay fresh longer in the fridge, up to a week. If frozen, they maintain quality for three months. Just remember, the sooner you eat them, the better they taste! For the full recipe, check out the detailed instructions above. To make apple cider whoopie pies, simmer 2 cups of apple cider. Reduce it to about 1 cup. Mix your dry ingredients in one bowl: flours, baking powder, baking soda, cinnamon, nutmeg, and salt. In another bowl, cream softened butter and brown sugar. Add an egg and vanilla, mixing well. Combine the cooled cider with the butter mix. Gradually add the dry mix until combined. Drop rounded tablespoons on baking sheets. Bake at 350°F for 12-15 minutes. Cool, fill with apple butter, and sandwich them. Yes, you can use store-bought apple butter. It saves time and still tastes great. Just spread about a tablespoon on one cookie half and sandwich it with another. If you want a homemade touch, you can make your own apple butter. The whoopie pies are done when their edges turn lightly golden. The tops should look set and slightly spring back when touched. Overbaking can lead to dry pies, so keep an eye on them. Serve whoopie pies at room temperature or chilled. Dust them with powdered sugar for a nice touch. Pair them with a warm drink like cider or coffee for a cozy treat. You might want to cut them in half to show off the filling! For the full recipe, check the detailed instructions. Now you know how to make tasty apple cider whoopie pies. We covered key ingredients, step-by-step instructions, and helpful tips. You discovered flavor variations and how to store your treats. Baking can be fun and rewarding. Enjoy testing new flavors or sharing with friends. Creating whoopie pies adds joy to any gathering. I'm excited for you to try these recipes and enjoy the results. Happy baking!

Delectable Apple Cider Whoopie Pies Simple Recipe

Love the taste of fall? You’ll enjoy making delicious apple cider whoopie pies! This simple recipe combines sweet apple flavor

Older posts
Page1 Page2 … Page170 Next →
© 2025 Chelles Recipes • Built with GeneratePress

More Information

  • Home
  • Contact
  • About
  • Dinner
  • Appetizers
  • Dessert

Our Policies

  • Privacy Policy
  • GDPR Policy
  • Terms Of Use
  • Copyright Policy
  • Cookie Policy
  • Disclaimer
©2025, Chelles Recipes About Privacy Policy Back To Top